Featured Post

Welcome to the Forensic Multimedia Analysis blog (formerly the Forensic Photoshop blog). With the latest developments in the analysis of m...

Friday, March 28, 2008

Adobe Photoshop Express


I got a note asking about the new Adobe Photoshop Express beta that's available (click here to check it out).

It seems to me to be like an on-line, flash driven version of Elements. With that in mind, and the fact that it's free to try, would likely make it attractive to some users. But, with everything that's free ... check the fine print.

Here's Section 8 of the Terms and Conditions:

8. Use of Your Content. 

1. Adobe does not claim ownership of Your Content. However, with respect to Your Content that you submit or make available for inclusion on publicly accessible areas of the Services, you grant Adobe a worldwide, royalty-free, nonexclusive, perpetual, irrevocable, and fully sublicensable license to use, distribute, derive revenue or other remuneration from, reproduce, modify, adapt, publish, translate, publicly perform and publicly display such Content (in whole or in part) and to incorporate such Content into other Materials or works in any format or medium now known or later developed. 

2. “Publicly accessible” areas of the Services are those areas of the Adobe network of properties that are intended by Adobe to be available to the general public. However, publicly accessible areas of the Services do not include Services intended for private communication or areas off the Adobe network of properties such as portions of World Wide Web sites that are accessible via hypertext or other links but are not hosted or served by Adobe.

In other words, you might not want to use this service for case work.

Other than that issue, check it out with your private stuff. Another tool is another tool.

Perspective and Sharpness

Here is a link to an interesting article from Sinar about view cameras and perspective / sharpness. It deals with the issue with view cameras in mind, but some interesting questions can be drawn in relation to what we do with Photoshop.

Enjoy.

Have you seen this DVR?


These pictures came in yesterday. Local detectives have this recorder and are looking for manufacturer information as there are no clear identifying marks or brand names to be found on this DVR. It appears to be a Linux based standalone.

If you can help with an ID, please use the link below to post a comment.

Thanks.

Wednesday, March 26, 2008

An interesting article on expert witnesses

Here's a link to an interesting article about expert witnesses with some helpful tips.

"Talk, don’t read. Your notes are not a
script, says Lewis. “Your goal is simply
to be answering questions and using
any of the paperwork you take into the
courtroom with you as a reference.”
If you know your case well, you can
be articulate and informed without
sounding rehearsed—and if you don’t
have to read from your notes, you’ll be
able to look the jury in the eye."

Thanks to ftwitty over at iStockphoto for the link.

Tuesday, March 25, 2008

eBay auction was a success

Congratulations to Enrique U. of Campeche, Mexico, the winner of the eBay charity auction for a signed copy of Forensic Photoshop. Our thanks to Enrique for his support of our favourite charity, the Pasadena Scottish Rite Childhood Language Center.

I am humbled and amazed at the fact that the book has been bought in Europe, the UK, Canada, the US, Mexico, and Australia ... and these are just from the initial numbers. Thank you so much for your continued support.

Using layers to speed things up

Here's an older technique that still works well. A question came in about working  some scans of photos from an old case file. The negatives had long since been lost, but the prints were still in the file and needed to be scanned and cleaned up. The agency hasn't upgraded to a CS version of Photoshop. What to do?


Try this. After scanning the prints, correct the first one using the Forensic Photoshop workflow. In this case, I've used a Curves adjustment to correct for the colour drift in the print and an Exposure adjustment to help the shoe print really stand out. Then, I created a Group from the adjustments.


The final step in the process is easy. Just drag the group's folder on to the uncorrected image. The adjustments will automatically apply to the second (uncorrected) image. Fix the first ... then fix them all.


When faced with a seemingly difficult task like fixing a bunch old prints, Photoshop can make light work of it all in just a few simple steps.

Saturday, March 22, 2008

Massive CCTV Failure

Here's a link to a story from New York clearly illustrating the problems with massive CCTV deployments. Our prayers are with the victims and their families.

Thursday, March 20, 2008

The future of CCTV image optimization?

Here is a link to an article that hints at the future of image optimization. The research on Particle Swarm Optimization looks interesting. Check it out for yourself and see what you think.

Enjoy.

Interpolate vs Smart Object Resize

An interesting question came in about resizing images for court display.

Often times, we get small images that need to be displayed on large poster boards in courtrooms. What to do? I have used a rather involved process in the past that employs Photoshop, Acrobat, a flatbed scanner, a Fiery RIP, and a large format printer. It's rather complicated and time consuming but yields good results - if you have all of those pieces. But what if you don't?

Try this:
  1. Create a New Document in Photoshop at the final output size and resolution (e.g. 18"x24" @ 240 dpi). This will just be a blank page at first.
  2. Make sure that Bridge/Photoshop chooses ACR to handle your jpeg/tiff files and that they open as Smart Objects.
  3. Choose File>Place and select your image.
  4. Follow the prompts through until your image is placed in the new Photoshop document. It will be in a box with an X through it. You'll notice that the new layer has the Smart Object icon.
  5. Hold the Shift key down and drag the corner of the box to fill the new document area with your image. The Shift key locks in the aspect as you resize.
  6. Your image resizes without any additional blurring.
Because the Smart Object references the original file, the original remains intact and safely locked away. The Smart Object is just a representation of the original and thus gets resized - up, down, and up again - without any damage to the original - unlike standard interpolation techniques.

Try this one for yourself and see what fun you can have with your images.

Wednesday, March 19, 2008

Clean your screen

With all the talk about colour management and calibration - not much ever gets said about cleaning your screen. If you are using an LCD monitor or a laptop, click here for some helpful advice on keeping your equipment clean.

I love Photoshop Lab's comment: "If it's dirty and gross, clean it. Nothing more annoying than trying to remove a spot on an image that's actually one of your boogers. Eww."

Enjoy.

More book info

A question came in asking about posting more information about the book - like a table of contents, index, and so forth.

Without reproducing the TOC in its entirety, here's the relevant information:

Topics include setting up Photoshop and Bridge, getting your images into and out of Photoshop, fixing focus problems, correcting global light and colour problems, fixing light and colour locally, sharpening, noise reduction techniques, preparing for output, interpolation, printing, and archival issues - and much more.

Included in the price of the book is access to a special web site with video tutorials of the book's exercises as well as links to the referenced plug-ins, image files, and preference files.

Order your copy today and begin the journey to beautiful and balanced images!

Monday, March 17, 2008

ACR question - what does the fill light slider do?

The Fill Light control in ACR's Basic tab can be used to recover detail in the shadows without affecting the highlights or causing posterization.

Keep the questions coming.

Enjoy the day.

Sunday, March 16, 2008

Forensic Photoshop Road Show

I just wanted to post a wee note to say that the Forensic Photoshop blog will be dormant for a few days. I'll be taking the show on the road. Next stop, the NATIA Pacific Chapter meetings in East Los Angeles. Other tour stops are scheduled for Las Vegas in May and San Jose in July.

If you'd like to add your city to the Forensic Photoshop road show, just send me a note.

Sharing your files and answering your questions

I've always been happy to take requests to look at files for folks. My service provider is getting cranky about file sizes, transfer rates, and whatnot so I've decided to start using Driveway's Dashboard as a file transfer provider.
If you want to send a file for review, just use the Dashboard widget. Don't send confidential files as others can see what's in here. If you want to send something confidentially, send me a note and I'll send you a link to a private upload widget.

Friday, March 14, 2008

Switching to Mac - Part 2

I should have waited. The Mac came before the book that I ordered to help with the switch. With the help of friends, I made the switch.

Then the book arrived. Switching to Mac: The Missing Manual Leopard Edition by David Pogue is just what I needed to get me moving fast into the wonderful world of Mac.

If you are switching to Mac, you absolutely need this book. One of the best features is the suggested replacement apps for those programs that do not have a Mac equivalent, like MS Access.

Enjoy

Tuesday, March 11, 2008

O2M - Product Review

I wanted to get years of saved mail from Outlook for Windows into my new Mac. I searched Google for tips. I found that very few apps could import a PST file from Outlook. Even Entourage, Microsoft's own product, will not migrate Windows mail.

Sure, I could use Thunderbird or SeaMonkey. I tried them both, but I didn't like how they worked. I like the new .Mac/Apple Mail. So, how do I get my PST file into Apple Mail? The answer came from an anonymous comment (my thanks to you just the same).

O2M, a product from Little Machines, claims to be the fastest product out there for transferring all things Outlook into your Mac. Until the comment, I'd never heard of them. A search on Google for the topic didn't return their site in the first few pages. How good can the product be if no one's heard of it?

Outstanding! That's how good it is. I downloaded the trial as a test. I was able to convert a folder and some contacts into the standard MBox format. From there, I could import the MBox file into Apple Mail. it worked so well that I bought the license - and it only costs US$10.00.

I've got over 5000 saved messages in a PST file that's almost 1GB in size. O2M took about 30 minutes to save it all in the MBox format. Then, I just imported those files into my Apple Mail program. With .Mac, I could move some of the files into my on-line folders. Who would have thought it could be so easy?

If you are moving to Mac from PC and have to get your mail out of Outlook, give O2M a try. I think that, like me, you'll love it.

Monday, March 10, 2008

The Power of Images - Part 2

This is part two of the lead up to the super secret project.

Check out the New Yorker next week (March 17th edition). The link gives a hint about the super secret project. For the full article, you'll have to purchase the print edition (sorry, their choice - not mine).

Enjoy.

Sunday, March 9, 2008

Book news

In spite of all of the problems with "the publishing team," the book had it's best week yet. My thanks to everyone for their continued support. The site had over 500 unique views last week. And ... my thanks to all for the kind e-mails and comments on the switch to Mac. It's been a positive experience thus far.

Enjoy.

Saturday, March 8, 2008

MacBook Pro

Today starts a new era ... my new MacBook Pro arrived. I've brought the old stuff in via Parallels for now. As time goes on, I'll replace the apps run in Parallels with native Mac apps. 

First question: which is the best e-mail client for Mac? I'd like to export my saved mail from Outlook and still be able to access it without trouble.

Second question: what's the best way to get my iTunes library from the WinXP share into iTunes on my Mac?

I'm already loving this. A keyboard that lights up and a screen that adjusts to the ambient light. Who would have thought?

Enjoy.

Friday, March 7, 2008

Working with QuickTime Movies

A question came in about working with video in Photoshop CS3. The answer to "how do I get the video back out of Photoshop once I'm finished?" prompted a discussion that I'll share with you.

To get the video back out of Photoshop CS3, click on File>Export>Render Video.


The first screen contains a lot options. For this exercise, we're primarily concerned with the File Options section - QuickTime Export Settings. We actually have to click on two settings buttons to get where we want to be. The first click brings up the Movie Settings dialog box. This box also contains a Settings button. Click on that button to get to Standard Video Compression Settings.


There was much more to the export answer than just a few clicks and you're done. At the default settings, the Compression Type is set to Animation. Unless we're distributing this video on YouTube, we'd rather not have any additional compression. In this case, we'll choose None. For the YouTube submission, try the H.264 option.


Selecting None, make sure that the Compression slider is set to Best and click OK. Make sure the settings shown reflect the projects actual settings for frame size and rate and click OK again. A third OK, after choosing file name and location, and you are exporting video.

Just a simple answer and accepting the defaults would have lead the reader to further compress his video. Again, for us, this is not acceptable. We can work with video in Photoshop CS3 and keep the recompression down to a bare minimum.

Enjoy.

Find the new book, Forensic Photoshop, by clicking here.

Petition to Request Depublishing of California Court Case In re Rachel L.

Normally, I do not engage in this type of request. But this case is different. This case personally effects me, my wife and children, and all homeschooling families in the state of California. My wife and I believe so strongly that homeschooling our children is the proper work of the parents and not the state that if this case is allowed to remain on the books, we would have no choice but to leave California.

Depublishing the opinion, in my view, is the best option. It leaves in tact the sanctions against the family involved and addresses the issues of child neglect and etc. whilst sparing the rest of California's legally operating home schools. A single case of child neglect should never have been used to drop the axe on the 150,000+ law abiding parents in the state who choose to home school.

We often hear rhetoric about no child left behind and small class sizes. My wife, with her early childhood education BA from Cal State Northridge, is better suited to educate our children in our very small class. My children are years ahead of their public school peers. Additionally, they are actively involved in the community at a level simply not possible for children who must attend public schools until late afternoon and face hours of home work when they finally get home - often keeping them from getting a proper amount of sleep.

I understand that many parents have no choice but to send their children to public schools. Some parents find themselves both at work to be able to afford the best private schools. The beauty of America is that there are options for everyone. Freedom is the essential ingredient. I pay taxes to support a system that I do not use. If it is all that a parent can do to work 3 jobs and support an entire family, sending his/her children to public school, I am glad that my taxes could help. I pray that the children take every advantage available to advance themselves and their family.

My wife and I can and do provide a first class education to our children at home. In America, the land of freedom and opportunity, the land of freedom of speech, freedom of assembly, and freedom of religion; the right to educate our children should not even be in question. Sadly, it now is.

Please Sign the Petition to Support Home School Freedom in California

A California Court of Appeal recently decided that homeschooling is illegal in California unless a parent is a certified teacher.

The case arose in a confidential juvenile court proceeding. The family was represented by court-appointed attorneys and HSLDA did not become aware of the case until the Court of Appeal case was published on February 28, 2008.

The Court could have restricted its decision to the facts before it, but instead, it issued a broad ruling that effectively outlaws home education in California. The Court also certified its decision for publication, which means that the decision can now be cited as legal authority by all other courts in California.

The family and their California counsel are planning to appeal to the Supreme Court of California, which could result in reversal.

Another option to keep homeschooling free in California is to petition the Supreme Court of California to “depublish” the opinion. If the opinion is “depublished” then it cannot be used by other California courts and this threat to home school freedom will be neutralized for other California home schoolers.

"The HSLDA will be formally petitioning the California Supreme Court to depublish the opinion. We would like to show that many other people, both in California and across the country, care deeply about home school freedom in California."

Please show your support for this effort by signing the petition today.

Want more information, click here to find out how the HSLDA is defending the rights of parents to home school their children in California.

Thursday, March 6, 2008

A closer look at the Histogram palette

Barbara Obermeier's Photoshop All-in-One Desk Reference For Dummies has recently been listed on Safari's on-line book service. I know by the title that some may be tempted to buy it. From an artist's standpoint, it's a nice overview of most of Photoshop's features. From a photographer's standpoint, the book seems a bit slanted towards the artist's workflow. For the most part, the book should be seen as a simple overview - and not so much an all-in-one desk reference (like the Photoshop Bibles tend to be). 

By way of illustration, turn your attention to page 573 - Introducing the Histogram Palette. "If you are into numbers, check the statistics to evaluate the image as well." Since we're into numbers, lets see where this goes ... 

Unfortunately, she doesn't get very deep into the topic. In the break-out box titled "Understanding the histogram statistics," she seems to only reprint the information available in the Photoshop help files. There is no explanation as to how the Histogram works, why it's important, or even that there is an error in the help file's explanation of a certain point (pointed out by a reader to the live help site).


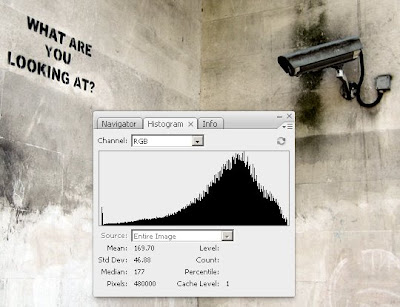
So, let's take a look at the Histogram. In its simplest form, the histogram is a graph. The horizontal axis charts the brightness value. The darkest, black is on the left and white (the brightest) is on right. The vertical axis graphically displays the number of pixels in the image having the brightness value that corresponds to that position on the horizontal axis. OK. So what about the statistics? Here's how the book and the help files explain them (with my comments added):
  • Mean: Average intensity value (the average brightness value of all pixels)
  • Standard Deviation: How much the intensity values vary (how much variation there is in the tonality of the image) (small deviation = steep curve - large deviation = broad curve) (more below)
  • Median: Middle value of the intensity value range (the point where half the pixels are darker and half are lighter)
  • Pixels: Total number of pixels used to represent (calculate) the histogram
  • Cache Level: The current level of image cache used to calculate the histogram (this one is tricky - The original image is Cache Level 1. For each level above 1, four adjacent pixels are averaged to arrive at a single pixel value [notice the warning triangle]. Thus, each cache level has 25% of pixels of the level below it. When Photoshop needs a quick approximation, it uses one of the top levels. Click on the Uncached Refresh button [looks like the recycle arrows] above the warning triangle to redraw the image's histogram using the actual pixels.)


Once we've performed a levels or curves adjustment, the tonality is restored and the graph's peak appears to be more centred. In the first histogram, the Standard Deviation was just above 30. A standard Deviation below 30 often indicates a lack of tonality, just as over 90 indicates extremes in contrast. With our adjustments made, the Standard Deviation is squarely in the middle of the acceptable range of 40-60, indicating a good tonal range.


In the final image, I've placed the cursor in such a spot to find the place from which half the pixels will be lighter and half will be darker (Percentile: 49.51 was as close as I could get). Ordinarily, this place would be Level 128 (0-255), but in our image it's Level 156. This explains the peak's shift to the right of the graph. The Count is a bit misleading. As a comment on the help files page at Adobe illustrates, "the sum of all counts shown in the histogram is not equal to "Pixels" - it is actually equal to 3X the "Pixels". Adobe's page and the Desk Reference fail to note that the count is taken per channel, thus the 3x factor as pointed out by the comment.

And finally a word of warning, Photoshop's Histogram Statistics are designed for 256 levels. With a 16bpc workflow, there may be variations that do not show in the statistics. This problem can be solved rather easily with the free Wide Histogram plug-in from Reindeer Graphics.

To wrap up, having a subscription to O'Reilly's Safari Books is a great way to sample new titles. The monthly subscription price is roughly equal to the price of a single new book per month. I do like to have the printed versions of my favourites, so I use O'Reilly as a screening service; buying the titles I like and saving money by not buying the titles that look good on first glance but lack the depth that I'm looking for. As an example, I just purchased Switching to the Mac: The Missing Manual, Leopard Edition, by David Pogue from Safari to help in the transition from PC to Mac - saving 35% off the cover price in the process.

As far as the Desk Reference goes, it's 4/5 for beginning artists and a 3/5 for everyone else. I do love the cartoons from Rich Tennant. However, in helping us build our storytelling database, really getting in depth, I'm sorry to say that it doesn't even crack the scale.

Video Preview


The Video Preview command (File>Export>Video Preview) is a handy way of viewing your work on a standard video monitor.

This little known command can help save a project by allowing you to preview the image and see just what it's going to look like on screen. This is the perfect tool to use when creating DVD menus or lower thirds, or for making sure your images will look right when presenting them in court (yes, some still output to tape for viewing on a TV monitor).

So, how do you facilitate this? If you are already using a Firewire connected workflow, then just make sure your break-out box is bi-directional. If you are looking to add this functionality, try one of the ADVCs from Canopus. Remember that this capture option introduces compression (about 5:1), so make sure that it's appropriate to use this option for capturing your video. However, with the exception of the ADVC 55, all of Canopus' models are bi-directional - meaning an ADVC is an inexpensive option for passing the video signal back up to your monitor from Photoshop. The ADVC 110 lists for US$269. Datavideo also has a line of video converters. From what I've read, some of their models also act as firewire repeaters - allowing you to extend the range of your firewire cables and keep the signal strength intact.

Enjoy.

Forensic Photoshop continues to do well at Blurb's web site. Click here to get your copy today.

Wednesday, March 5, 2008

Layers TV: For Everything Adobe

I know that it's been up for a while, but I just can't help mentioning how much I love the Layers TV podcasts.

Yesterday I was sitting the hallway at the Superior Court Building in beautiful downtown Van Nuys, CA, waiting to be called into court. In my hand was my trusty iPod 80Gb Classic loaded with Layers TV podcast episodes. Not familiar with Layers TV? Just jump on the iTunes store and search for Layers TV in the podcast section. You can download all 24 episodes for free. Thus far, my favourites are 12, 15, and 22-24.

Enjoy.

Tuesday, March 4, 2008

Codec / Video Identifiers

I received a call today about a missing codec. The link on FourCC was bad. What to do?

Here is a decent site for codecs and all things video / audio that is very hack friendly. It sure beats loading the Chinese language pack to read GeoVision's website.

Enjoy.

Imaging news headlines


Compact CCTV Zoom Lens for Applications in Nuclear Power Generation from Advanced Imaging Magazine.

ExtremeCCTV announces the release of its megapixel IP infrared imager.

A nice piece on choosing the correct optics when working in the Infrared bands.

And ... in response to a reader's question, check out LifePixel for converting your digital to infrared.

Enjoy.

The Forensic Photoshop order page

I've had a few e-mails asking about a correct link for the book at Blurb's web site. Some have had trouble getting directly to the book via the link that I sent.

With that in mind, I would say to either visit the book's web site or click on the banner on the right of the blog. From the book's site, you can click on the banner to take you to the order page or just click on the banner here on the blog.

Today, the server's log passed 1000 views of the book's page. Thanks again for all of your support. There have been some technical difficulties, but thus far the response has been positive. It has been quite an experience. I am continually humbled by your support.

Sunday, March 2, 2008

Reflections


A very nice observation from a reader found this hidden jem on page 29 of the book. Sometimes you just get lucky. The person of interest has his/her back to you, but you find a usable image reflected off of a nearby surface.


With a touch of focus correction and a little white balance, she comes right out at us. If necessary, a non-destructive crop can be used to bring the reflection forward - thus making her the centre of attention in this image.

Enjoy.

Saturday, March 1, 2008

Filtering natural light

In terms of film photography, colour film responds to slight changes in the quality of light that the eye doesn't notice. In the digital world, things are a bit different. We can, however, borrow some effects from the old days to help fix our images. We return again to our SUV picture to take a look at yet another plug-in, the Dfx filter suite from Tiffen.


Page 53 of the Book has a colour temperature reference chart that will come in handy in examining this incredible plug-in suite. For our purposes today, I'll expand on the chart by adding the corresponding Kodak Wratten filter reference.

Artificial Light:
2500k-2600k = 80A+80D
2700k = 80D
2900k = 82B
3200k - no filter
3400k = 81A

Natural Light:
3000k-3500k = 80B
3500k-4000k = 80C
4000k-4500k = 80D
4500k-5000k = 82B
5000k-5500k = 82A
5500k - no filter
6000k = 81A
6500k = 81B
7000k = 81C
7500k-8000k = 81EF
16000k = 85

You may recognise the reference numbers from the Photo Filter dialog box. You may also recognise that there are many more filters referenced here than are listed in the dialog box. Not to worry, Dfx has you covered.


The Dfx dialog box is nicely organised. We are interested in Photographic filters and that's just where we'll find them. For the Wratten filters, we'll mainly be concerned with Colour Conversion and Light Balancing filters. The Conversion filters are strong amber (85 series) or strong blue (80 series). The Light Balancing filters are much paler (for example - 81C is useful if your subject is in the shade on a sunny day). But Dfx has many more options than just the Kodak filters.

With just a few clicks, I found the CC50Y Filter (simulates the
Cokin A729 Yellow Cc Filter) in the Color Compensating tab. This filter brought the image very close to where we needed to be. We can further adjust for Quality, Exposure, and the Preservation of the Highlights.


Dfx works as a Smart Filter, so fine tuning is possible. There are several ways to get rid of that left over colour wash - or we can go back to Dfx and try another filter. It's easy enough to navigate and use that we'll have no trouble experimenting.

It's fairly reasonably priced - considering all the filters that come in the complete version. All in all, a very nice tool to help with our mastering colour and light.

Enjoy.