Featured Post

Welcome to the Forensic Multimedia Analysis blog (formerly the Forensic Photoshop blog). With the latest developments in the analysis of m...

Wednesday, October 29, 2008

Stabilise video in Premier Pro

A friend of mine decided to strap a video camera into his car to film himself racing around a local track on amateur's day. Later, on reviewing the video, he found himself getting car-sick just watching it. Of course, he called to ask if there was anything that could be done with it. Naturally, I had the perfect solution.

A while back, I came across a unique plug-in for stabilising video in Premier Pro. It's called Mercalli from proDAD. Once installed, Mercalli sits in your Video Effects pallet, in the proDAD folder.


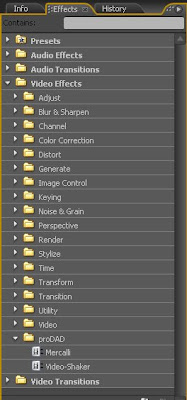
As with any plug-in, just drag the Mercalli plug-in icon on to the video track that needs stabilisation and let the fun begin. 

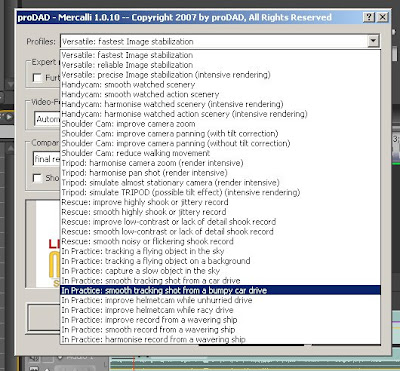
The interface is easy to understand. I found that there is really just one area that you need to focus on when first starting to use Mercalli, the Profiles pull-down menu.


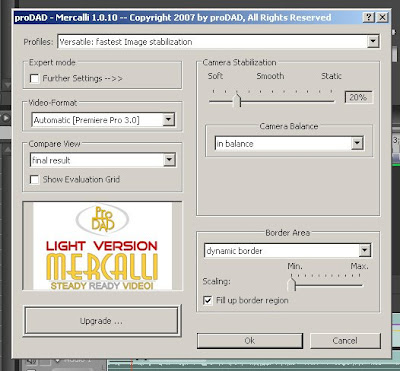
In this case, Mercalli has a built-in profile for smoothing out the shot taken from within a car. As you can see, it has a bunch of profiles for various situations. It even lets you know when a particular profile is going to take some time to render (intensive rendering).


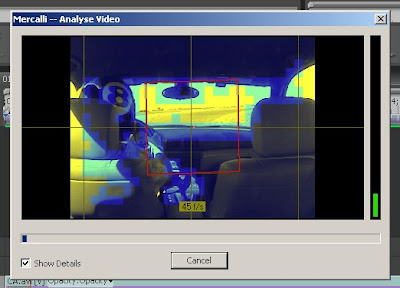
Once you get your profile loaded, click OK and watch Mercalli work. It brings up the Analyse Video window and begins working. The length of time that it takes depends on the length of the clip and your machine's configuration.


Once it's finished analysing the video, you'll have to render the effect in the time line (Enter/Return). But, that's really all that there is to it. Its a simple little plug-in that is definitely worth the price. Image stabilisation in Premier doesn't get any easier.

Remember to check out the new Introduction to Forensic Photoshop e-learning class at the American Institute of Forensic Education.


Tuesday, October 28, 2008

Stamp Visible - the tie that binds.

In a previous post, I demonstrated the Stamp Visible technique for building up corrections in the workflow. We went over this technique in detail at the LEVA Conference class.


Using Stamp Visible (Ctrl+Alt+Shift+E / Cmd+Opt+Shift+E) is an excellent way of preserving your steps, demonstrating your work, and leaving helpful reminders for later about what was done and in what order. You can also leave details about settings in the layers' names. Just remember, once you Stamped the visible layers and produced a new composite layer, turn the others off. You can even group the effects (New Group from Layers) and turn the folder's visibility off as another way of organising.


Once you've finished, you can collapse all the folders and see the thumbnails of your starting point and your final product. This file can be saved as a PSD or a layered Tiff and placed with your other work files.

Remember to check out the new Introduction to Forensic Photoshop from the American Institute of Forensic Education.

Monday, October 27, 2008

An Introduction to Forensic Photoshop: e-learning

I've received so much feedback over the years about the problems of travel for training. With the economy turning agency budgets upside down, many folks are being told that traveling to training is simply out of the question. There are so many restrictions that are put on folks and I've always felt bad about the fact that they'd love to get out and receive training, but they are stuck ... what to do?

That's the bad news. Here's the good news:

I've teamed up with the American Institute of Forensic Education to bring Forensic Photoshop to everyone. I am pleased to announce that my 16 hour Forensic Photoshop coursework is now available as a self-paced e-learning class. Training just got a little easier.

An Introduction to Forensic Photoshop combines the book with a self-paced curriculum guide and proficiency test. It includes instructional videos, sample work files, and is backed by the leader in on-line forensic education.

We'll follow this up next year with a quarterly offering of Advanced Forensic Photoshop. This will cover 40 hours of intense study with virtual white board sessions, webinars, and so much more.

It is often difficult to quantify e-learning for purposes of continuing education requirements or your CV. The AIFE has taken care of that for you. Upon your passing the final exam, you'll receive a certificate of completion and verification that you have earned the 16 hours of credit.

Now, you can get the Photoshop training that you've been asking for in the comfort of your own office. 

Check it out for yourself by clicking here.

Friday, October 24, 2008

Friday morning wrap-up

Here's a few items of note to wrap-up the week.

1. Software Cinema is having a sale and offering up to 50% off a bunch of titles ... including Working with Adjustment Layers by Katrin Eismann. Use promo code SCW1008A at check-out to get your discount. The sale ends on Nov. 1, so hurry and check out this great deal.

2. A reader sent me a link to a product called Fast Video Indexer. It's an interesting take on frame capturing from digital files. Running it in a virtual window caused memory problems, but it ran fine on a native Windows install. To get every frame of video out of an AVI file as a BMP file, make sure to set the "start after" value to 0 and the "save every" time to 0. You'll also need to set the file type to BMP from the default JPEG. If you are having codec problems, there's even a helpful page to help you sort this out as well. It's certainly not a replacement for DVR dCoder or VFSource, but for $34.50, it's not a bad tool to have around.

Enjoy the weekend.

Unlocking the secrets of the Smart Sharpen Filter

More LEVA wrap up ...

One of the great things about having a friend who is an image processing guru is that you can really dive into the inner workings of Photoshop's tools. Take, for example, the discussion that we had on the Smart Sharpen Filter.

Chris Russ gave an outstanding explanation on finding the values necessary to place into the fields. He started with the Ruler Tool


Next, we are looking for a disc shaped object within the image. Something that's near the object or person that we're trying to identify will work the best. In this case, I've chosen the drink cups under the counter. The disc shape is the key to unlocking the power of the Lens Blur setting.


You'll want to have the Info pallet up so that you can read the length. In this case, our length (diameter) is 7.00. Then you'll want to divide this by 2 to get the Radius.


The result is then placed in the Radius field in the Smart Sharpen Filter's dialog box. In this case, the focus correction will be rather strong (as anything over a radius of 2 tends to be). If you need to, you can select Edit>Fade Smart Sharpen (50%) to reduce the intensity of the effect.

For those of you that were interested in Chris' book, Introduction to Image Processing and Analysis (written with his Dad, Dr. John Russ), you can find it on Amazon by clicking here.

Thursday, October 23, 2008

Frame Averaging

One of the exercises that we went over at LEVA was Frame Averaging. As a quick follow-up, I wanted to post the opacity numbers from the different exercises.

Blending two layers: 50% top, 100% bottom.
Blending three layers: 33% top, 50% middle, 100% bottom.
Blending four layers: 25% top, 33% next, 50% next, 100% bottom.

Are you beginning to see the pattern. It's easier to figure out the numbers if you think of the fractions: 1/n ... or for the example of five layers ... 1/5, 1/4, 1/3, 1/2, 1/1. The percentages work from smallest on top to 100% on the bottom.

Wednesday, October 22, 2008

Pattern Noise Removal

The Forensic Photoshop class at LEVA was rather intense. There was a ton of stuff thrown out there in order to maximize the 16 hours of training time. So I'm going to do a series of posts to sort of wrap up the week and help fill in any gaps in your furiously taken notes.

One of the topics that we covered was pattern noise and removal techniques. Fovea Pro (must have item alert) is a great tool for this, but there is another out there and it's free. It's called Image J. Image J is a great cross platform tool and there is one thing it does rather well, get rid of pattern noise quickly and easily whist maintaining your mask as a separate image for repeatability purposes.


Launch Image J and Open an image with pattern noise.


In order for this technique to work, the image's canvas size needs to be adjusted. We're going to work with a factor of 2 here, so we'll resize our canvas to 512x512 and set the Position to Center.


In doing this, we aren't adding pixels to the image per se, just adding some breathing room around it ... giving the program a proper working space to perform its magic. The results are shown below.


From there, we want to run the FFT function to generate the mask. Process>FFT>FFT, as shown below.


It only takes a second on a small image to produce the FFT, the Fourier Transform mask.


From here, we'll select the Paint Brush from the Tool pallet.


Then, we'll proceed to paint out the noise spikes in the FFT of the clown image as shown below. Just a small spot of paint over the noise spike is all that's necessary.


Then, select Process>FFT>Inverse FFT to apply the mask back on the image.


You are left with a new image, one which has been cleaned up rather nicely.


In the end, you are left with 3 separate images; your original, your mask, and the result ... which helps in explaining your case (as well as preserving the original).

Sharpening in one direction only

There are times where it may become necessary to only sharpen in one direction. What's that you say? Why sharpen in just one direction? How do I do that?

As we discussed in class (and a good reason to sign up for the next class),  chip makers do some crazy things. Regular readers of this blog already know my rants on the CCTV industry. With that in mind, some chips anti-alias in one direction, but not the other (ie. anti-alias the image along the horizontal whilst leaving the vertical alone). It turns out that Photoshop has had the cure to this problem all along. Remember the Custom Filter? Well, it's time to use it again.

Read the linked post before proceeding as it helps to get your mind set around the rules for using this odd yet powerful filter. Then, click Filter>Other>Custom to bring up the Custom Filter dialog box.

A pretty effective setting for sharpening along the horizontal, but leaving the vertical alone is demonstrated below. Remember the rules, the entries should equal the scale.


The same is true for the vertical, leaving the horizontal alone.


Give this one a try and I'll think that you'll see ... it's a pretty effective sharpener for use with those dodgy DVR images we all see. Better yet, you can build an action to run this and save yourself from having to input the numbers each time.

Friday, October 17, 2008

See you in Orlando

The fires are out, thanks to the brave men and women of our state's fire services. The home office being properly preserved, I'm off to Orlando for the LEVA Conference. Chris Russ and I will be getting crazy with Photoshop in our 2 day pre-conference class, Forensic Photoshop - from Photons to Pixels and Contrast to Convolution. We've got some really cool things on the menu ... Retinex, Difference of Gaussians, Spacial Averaging, and so much more.

and .... super secret alert ... when I come back, I'll have a big announcement to make ... hint ... hint.

Wednesday, October 15, 2008

A neat little utility

The product advertises "no more Mac to Windows limitations." NTFS for Mac, from Paragon Software allows Mac users to read and write to all Windows volumes. No more "write only" problems with NTFS drives.

So read the advert. Having a few of these drives laying about myself, I made the plunge. For $29.95, who could go wrong?

It works as advertised, with one small hick-up. When the prompt asks for your name in order to register the software - it's asking for the "Product Key." Silly me ... I actually put in my name. It kept giving me an error, saying that the name/serial number combo was in error. Tech support was quick to point out the problem.

The home office still smells like campfire. Services are spotty. See you in Orlando.

Tuesday, October 14, 2008

Where there is smoke, there is fire

The fires are just over the ridge from the home office. Most of the neighbourhood to the north and west of us is under mandatory evacuation orders. With this in mind, the blog will be on holiday for a few days.

You can catch me at the LEVA conference in Orlando next week. Who would have thought ... going to Florida to get away from the weather.

Until then, enjoy.

Monday, October 13, 2008

Digital Night Photography - webcast

You are invited to a free live webcast
Secrets of Digital Night Photography

In a letter to his brother Theo, the great artist Vincent van Gogh wrote, "It often seems to me that the night is much more alive and richly colored than the day." The advent of digital photography has revolutionized the practice of night photography because a digital sensor can record the spectacular colors of the night. These colors are created by light waves in spectrums that are invisible to the naked human eye. For the first time we can truly "see" the world of the night around us.


In this webcast, professional photographer Harold Davis, author of Practical Artistry: Light & Exposure for Digital Photographers (O'Reilly) and creator of the Photoblog 2.0 and Digital Night web sites shows why night photography has become increasingly popular among digital photographers. He demystifies exposure techniques at night, and explains how he post-processes night photos. Following Harold's presentation, there will be time for a Q&A in which he'll answer your questions about night photography.

Attendance is limited, so register now. 

Date: Friday, October 17 at 10am PDT (17:00 GMT)

Cost: Free

Duration: 60 minutes

Questions? Please send email to webcast@oreilly.com

Saturday, October 11, 2008

Three cheers for Bento 2!

Lost in the roar of the CS4 crowd is the release of Bento 2. I've had my hands on the new version of Bento for a little while now and I like what they've done in the way of improvements.


One really cool feature is part of the address field functionality. It now contains a little button that when clicked, takes you to Google maps ... and the location that's listed in the address field of your database. How cool is that? No programming necessary.

So, as an example, I've got a super secret meeting related to the next phase of development of the Forensic Photoshop brand this morning. I've put the info into Bento 2 ... contact, schedule, etc. All I have to do is click on the Display Map control within Bento 2 and ... viola ... up pops Google maps. From there, I can get driving directions and so forth.

The good folks at FileMaker have really impressed me with the level of service and support that they are giving this little, but powerful app.

Friday, October 10, 2008

Why knowing is better

I've always had a bit of a problem with the concept of the "generic stand-alone" DVR. Sure, many aren't adorned with beautiful logos and festooned with stickers announcing their support web site. But, someone made the thing ... and they made it to perform in a certain way. That "certain way" is key to clarifying the images that come from it.


Let's look at the specs from King Pigeon Hi-Tech Co., Ltd.'s SD080 DVR. What jumps out at you? Notice the difference between the Record Resolution and the Display Resolution? How many times does 352 go into 720? Answer: 2.04545454545. The math in going from 240 to 480 isn't as bad. But, how does it get there? What does it mean for your process and your workflow? If you are working with a proprietary player and still export program from the manufacturer, how do you account for the interpolation - or do you?

In Photoshop, you can create a custom Pixel Aspect Ratio for display purposes, Image>Pixel Aspect Ratio>Custom Pixel Aspect Ratio. But, when you go to print that 704x240 image ... you'll need to fix the aspect a bit more permanently (previously covered topic alert).  

You may not know the answers now ... but you should before going to trial. Attorneys are getting much smarter about these things.

Thursday, October 9, 2008

Canvas Rotation

Growing up, I had a series of pretty good art teachers. One teacher's favourite exercise was to study an object or scene, then blindfold yourself and draw it upside down. In one case, we were looking at an old Victorian style house, then on went the blindfolds and we started drawing. We started from the roof and worked our way to the foundation. But, the roof was located on the bottom of our paper ... then working up the page to the foundation. It's a great way to train.

Later on, as I would fill in the details (blind-fold off), I found myself spinning the paper around to get the proper angle for shading and whatnot.

I find myself doing the same things now, spinning my Wacom tablet to get a mask's edge just right, and so forth. So what does this have to do with the upcoming release of CS4?

Great question. The answer is ... canvas rotation.

The new Rotate-To-View feature allows you to rotate your canvas to any angle to ease the creative process - without changing the angle of your tablet or your body. Now, I know what you are thinking ... the old interpolation issue - rotating on an odd angle causes problems and new pixels to be created - leading to unwanted blur and destroying the image. Not to worry, Adobe's playing tricks with the pixel grid. 

How? Why? We'll go over this and much more CS4 stuff in depth in the future.

Until then, enjoy.

Wednesday, October 8, 2008

Counting down ...

It's so close, you can almost taste it. CS4's release is just days away. In celebration of the happy occasion, I thought that I'd share a couple of really cool features.

Adobe has built in support for MacBook Pro and MacBook Air's multi-touch track pad. If you haven't seen how this feature works, as a new MacBook Pro owner, I will say that this is really cool. Pinching, twisting, and throwing are now supported ... just a pinch of your fingers and you can zoom ... moving across large pages gets quicker .... Once I got the hang of two-finger scrolling, I couldn't live without it.

Also supported is 16bit printing. Again, this is a Mac only feature - which has more to do with the OS than with Adobe. Certain printers will support this feature - so look for this to be highlighted in a future post.

Windows users, don't despair. 64 bit support has come - and its Windows only for now. The good news for Mac users is that many of us have a virtual machine running a Windows OS, so we can upgrade to a 64bit version and enjoy this feature as well.

The more I test CS4, the more impressed I am by the thought and effort that goes into a new release.

Tuesday, October 7, 2008

Futian is the centre of the universe

So I am consolidating my various databases, getting ready to migrate from Bento to Filemaker Pro 9 Advanced here at the home office. My list of cctv/dvr manufacturers has expanded like a football team at the Home Town Buffet. One curious fact has emerged: the Futian District in Shenzhen, Guangdong, China (PRC) is the centre of the CCTV/DVR universe.

Companies like Shenzhen's Vangold Technologies offers over 50 different DVR cards to DVR manufacturers. Aopvision Tech's offering of just 16 cards, seems small by comparison. With all of the small companies that dot the countryside, you'll never look at a "generic stand-alone" DVR the same way again. The case is made somewhere, the DVR board - somewhere else, the DVR software - somewhere else again ... The combinations are complex enough to make you cry.

All totaled, my database has passed 300 manufacturers - from the biggies like Pelco, Bosch, GE, and Honeywell, to the mid-sized like Dedicated Micros and GeoVision, to the seemingly small companies like Shenzhen's New Surway Digital Technology (with their 40 DVR cards). So, do the math ... over 300 DVR manufacturers x an average of two dozen products each = way more than 7200 unique DVR products on the market. Ouch! How does one keep up?

And there sits little Futian District - the epicenter of the DVR universe?

Monday, October 6, 2008

Interesting legal news

Another Blogspot blogger lists an interesting court case involving discovery issues and electronic files. The ruling seems to revolve around the requesting party's failure to ask for native file types, or to recognise that such types would necessarily exist. They were given TIFF files instead and had trouble searching through these image files and complained about it to the judge. Judges are getting rather creative in their rulings. Check it out by clicking here.

In other news, a recent law amends the Federal Rules of Evidence, Rule 502. The rule change deals with waivers of privilege based on inadvertent disclosures (the admissibility of mistakenly released privileged documents). Check it out by clicking here.

Friday, October 3, 2008

Need CCTV help? Call the Doktor!

When I see that companies are "getting it," I like to do a little feature on them and their work. So often, we see the results of folks that just don't get it. In the world of CCTV, the people that don't get it far outnumber the people that do.

Doktor Jon is a reader of the blog and has contributed a few comments here and there. The good Doktor is one of the folks who understand CCTV and how to make it work effectively. Jon has a new service that he's offering called VIPER - short for Video Image Performance Evaluation Report. It's a service whose time has come.

Here's the short of it: you are a business owner with a CCTV system. You have no idea if it's worthwhile or fit to purpose. You grab a few stills from the various cameras and send them to Jon.  He takes a look at them to see if easy improvements can be made with your existing infrastructure and so forth and issues you a comprehensive report / recommendations. 

Quite a service for such a reasonable fee. So, if you need help with your CCTV installation ... call the Doktor.

Thursday, October 2, 2008

Photoshop and Lightroom Integration

I've started a series on integrating Photoshop and Lightroom over on the Forensic Lightroom blog. Check it out by clicking here.

Wednesday, October 1, 2008

OMG ... what now?

Just when you thought it was safe to work with images, the wizards at Fujifilm unveiled a working prototype of a consumer 3-D camera at Photokina in Germany. It comes complete with dual lenses, dual 6MP CCDs, and the ability to play back the content on its own built in LCD, without special glasses.

The "FinePix Real 3D System" seems to work like the other 3-D systems out there, but with three important twists. And ... they are also looking at exploiting the dual lens system to shoot two pics at once, a telephoto and a panorama. 

Read all about it by clicking here.