Let's finish up the week by taking a look and a simple but powerful plug-in from PictoColor. iCorrect® EditLab™ Pro 5.5 has quickly become one of my favorite tools and when we are done here today, I think that you'll be a fan as well.
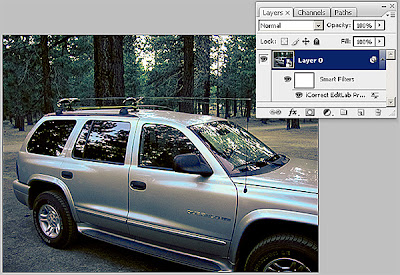
We'll continue with Rob's fishing trip photo and work through the plug-in's four step work flow. The first thing that we notice is that EditLab works in 16bpc mode and it works as a Smart Filter. This is great news for us, as we can work non-destructively with this filter.
Start by choosing Open Object from Adobe Camera Raw 4.2 or click Layer>Object>Convert to Smart Object. Next, add a touch of focus correction with Smart Sharpen. I chose 50 as my Amount, 1.5 as my Radius, and Lens Blur as my removal method.
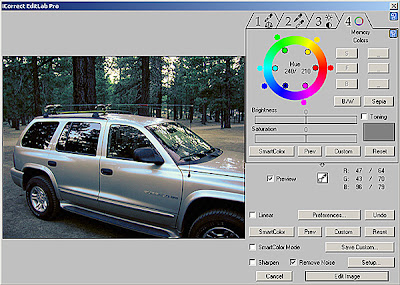
In the next step in our work flow, we want to address global light and colour issues. Activate the EditLab plug-in by choosing Filter>PictoColor>iCorrect EditLab Pro 5.5. This brings you to EditLab's dialog box (shown below).
iCorrect EditLab Pro 5.5 works like four tools in one. These tools are contained within separate panels and are labeled for easy identification. Amazingly, the tools act independently of each other so as you progress from Tab 1 to Tab 4, the tools will not affect any of the previously used tools' corrections. This eliminates the problem that many who are new to colour correcting have of correcting for one thing while throwing off another. With EditLab Pro, one pass through the tools and you are finished with this step in the work flow. What could be easier?
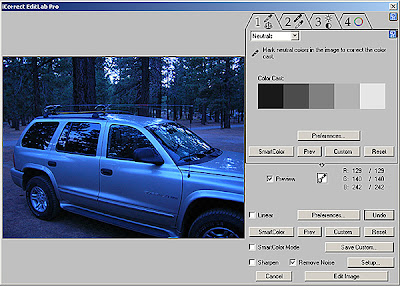
Tab 1 - Color Balance
With the first tool, we begin by correcting the colour balance and removing the colour cast by clicking on neutral (black, white, or gray) colours within the image preview window. The display shows that the original image had a predominantly blue/purple colour cast. As you click around the image, make sure to choose dark shadows, bright highlights, and midrange areas in order to maximize the effectiveness of this tool. When we finish with this tool, we are left with a good starting point; most of the cast has been removed.
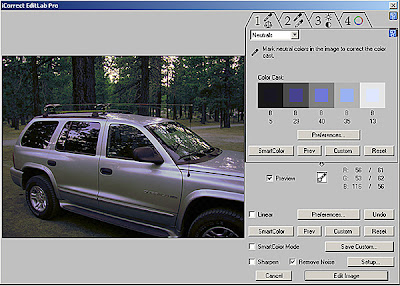
Tab 2: Tonal Range
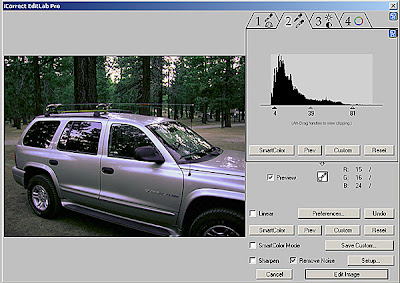
The second tool tab works like a levels adjustment by setting a new black point and new white point. It makes an initial automatic adjustment. From there, we can adjust the sliders in the histogram display. It is possible to extend the black point into negative space, flattening out the image. Be careful and watch the preview window as you make your edits.
Tab 3: Brightness/Contrast/Saturation
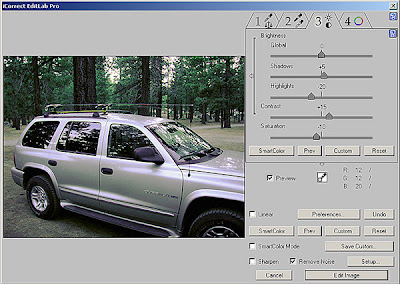
True to it's name, the third tool adjusts brightness, contrast, and saturation. There is a slider for a global adjustment of brightness. You can choose to adjust the brightness of the shadows and highlights independently as well. For Rob's picture, I dialed down the brightness of the highlights and bumped the shadows up a bit. I added a bit of contrast for a little kick and desaturated the image slightly.
Tab 4: Hue-Selective Editing
The fourth tab is what sealed the deal for me. Notice that there is still a little purple in the shadow detail after working with Tab 3. With Hue-Selective Editing, we can get rid of that cast quite simply. Here we finely tune specific colours on a hue-selective basis. I activated a colour on the hue-wheel, in this case blue and purple, and then move the sliders to mitigate the cast. The inside slider affects hue and the outside slider affects the brightness of that hue. Further adding to the fun, you can independently adjust its brightness and saturation using the sliders below the colour wheel.
Well begun is half done
For US$99 (additional $10 for a CD), you couldn't ask for an easier plug-in to use. If you want to go on automatic mode, their SmartColor technology should help you on your way. For tougher cases, such as Rob's fishing trip, you have the power and flexibility that you need at your fingertips. Being able to use this as a Smart Filter is just the icing on the cake.
For those that attended my LEVA course, the trial edition of this plug-in is in your work files (ICEDITLABPRO551SETUP.exe). If you want to get your hands on a trial copy of the plug-in and see for yourself, click here.
On a different note, this Monday is Veterans Day (Remembrance Day). For those of you on active duty, thank you for all that you do to provide freedom and security for the folks back home. For all of the Vets, thank you for your service. In today's crazy world, we are constantly reminded that freedom is not free. Thank you for standing on that wall so that we can all sleep sound at night. A special thanks to the folks at Ft. Stewart, Ga and the men and women of the 3rd Infantry Division deployed in harm's way from the son of a 3rd ID Korean War vet. May God bless and keep you all.
No comments:
Post a Comment