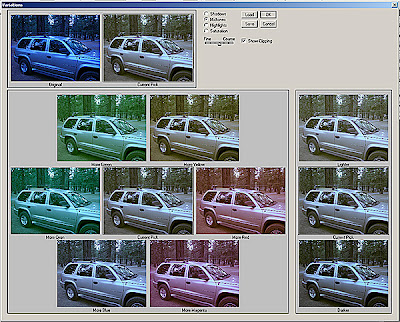
Continuing along the colour cast removal theme, today we are going to look at the Variations image adjustment.
Variations is used to remove a prevailing color cast and to restore the natural hue / saturation balance to an image. Deke McClelland thinks that Variations may be "Photoshop's most straightforward color adjustment command."
First things first. Variations does not work in 16bpc mode. It does not work as an adjustment layer. It does, however, work well as a Smart Filter. Let's see it in action:
- Either choose to open your image as an object from Adobe Camera Raw 4.2 or choose Layer>Smart Object>Convert to Smart Object.
- If you script the opening of images to convert profiles or modes, you'll need to make sure that your image is in 8bpc mode before proceeding. Image>Mode>8 Bits / Channel.
- Now, choose Image>Adjustments>Variations.
- You'll be presented with a slew of choices as shown in the image above. Select the Midtones option from radio buttons near the top of the dialog box. Variations works a lot like a Levels adjustment in that it lets you apply your changes to the highlights, midtones, or shadows in an image. When correcting a colour cast with Variations, you almost always want to choose the default setting, which is Midtones.
- The Fine/Course slider is used to modify the intensity of your edits, like the Fade slider. For us, we'll set it to the midpoint.
- It is helpful to have a colour wheel handy when using this adjustment. The central section of the dialog box contains a total of seven thumbnails: six color variations grouped around your Current Pick. The arrangement of the seven thumbnails is not random and is the reason for the colour wheel tip. The thumbnails are arranged as if they are sitting on top of your colour wheel. This makes it easy to perform your adjustments. Our image is dominated by a colour cast that exists in the Purple - Ultramarine area of the wheel, so selecting a variation from the complimentary side of the wheel will yield instant results. In our case, the first stop is More Yellow.
- At this point, we are visually dialing in the colour (which is why we need a calibrated work flow). We can also increase or decrease the saturation of the image with the three thumbnails to the right of the dialog box.
- For this image, I've moved the Fine/Course slider all the way to Fine and clicked on the More Yellow thumbnail twice (there's a lot of cast in this image). There is a bit of a green tint left in the shadows, so I can select the Shadows radio button and choose Green's complimentary thumbnail, Magenta.
- When I am satisfied with the image's look, I can click OK.
You may need to fix some local issues with a masked Curves adjustment layer, but you are on your way to saving this image visually. Remember, you are working in 8bpc mode. If you attempt to switch to 16bpc after performing this adjustment, you will get a warning from Photoshop about some filters not working in this mode. If you choose 16bpc, there will be a warning triangle in the layer and the image will revert to its original purple/blue. Because it's an 8bpc adjustment, you may choose to perform this just to help you with identifying the colours at play, and then reverting the image to it's original state (F12) before performing another adjustment with this new information.
From a repeatability standpoint, save your layered file. This will have your adjustment layers which can be opened and inspected/adjusted. From a forensic standpoint, colour theory is easily explained. You've simply identified a purple/blue cast and mitigated it visually with filter of it's complimentary colour; the results of which are available for inspection.
Enjoy the day ...
No comments:
Post a Comment