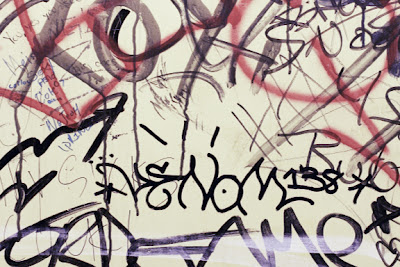
Graffiti seems to be everywhere. Graffiti costs cities hundreds of thousands of dollars per year to clean up. There has been a recent trend towards installing cameras to catch these vandals in the act. Once again, agencies are putting these cameras up, but little thought is being given to the fact that we're adding to our already heavy image processing workload. Hopefully, with today's exercise, we can make that load a little easier to bear.
In the world of graffiti in general, and tagging in particular, each "artist" has a unique signature. Identifying and cataloging these signatures can greatly assist in the prosecution of these pesky and destructive people. Often times, however, graffiti can be layered upon existing layers. Getting these signatures off of the wall and into our catalogs can be a tricky enterprise. Until now ...
Grafitti comes in many different colours. Separating these colours (and the signature tags) can be a time consuming process. With 3D Color Deconvolution, the process is just a few minutes from start to finish. Starting with the image (shown at the top of the page), click on Filters>Forensic Filters>Color Deconvolution. This brings up the dialog box shown above. Select your Undesired Colour (red) and your Desired Colour (black) and your background colour (cream) with a right mouse click. Click on Apply and you are done. Walls with multiple colour layers can be approached with a multiple pass workflow. In our first step, we got rid of the red tag.
Once the red tag is gone, there is still work to do. We can go after the brown areas to leave us with just the black tag "signature" that we are after. Again, click on Filters>Forensic Filters>Color Deconvolution to bring up the dialog box. Select your Undesired Colour (brown) and your Desired Colour (black) and your background colour (cream) with a right mouse click. Click on Apply and you are done.
It's easier to see how this works by looking at the colour in three dimensions. Thankfully, Couleur.org has a great tool for this that allows us to see the selected colour in a three dimensional colour cube. You can see (below) how our starting point looks in three dimensions. Notice the red, orange, and brown areas as they come away from the black (our target). Isolating colour in this way is the brilliance behind the Color Deconvolution plug-in.
When we've finished, our image looks like this.
We can then simply crop out the signature and add it to our files.
Stripped down to its essence, the signature is now a powerful tool in prosecuting taggers. With this, you can build a history of their work and the associated costs to clean up after them. You can also tie this information to GIS data to show the geographical scope of each tagger. These two pieces, along with the time and date info from the camera, can aid in predicting where the tagger might strike next.
To add to the value of this plug-in, it works great for Questioned Document Examiners too. More on that later.
Enjoy the day.


No comments:
Post a Comment