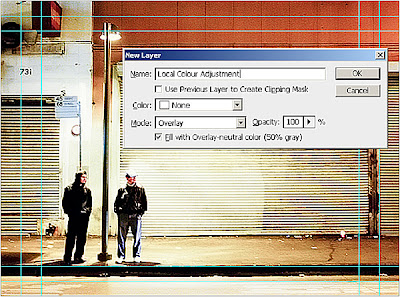
Most folks on the forensic side have been told to stay away from Dodging and Burning (O). Dodging and Burning are great ways to control colour locally. Dodging and Burning, however, directly affect the pixels and are thus destructive processes. But are they really destructive? As with everything in Photoshop, there's another way to handle this—one that's non-destructive.
The Dodge and Burn tools take a bit of getting used to. They can, however, be incredibly useful in making local colour corrections. So before we get into today's exercise, let's look at Dodge and Burn.
The What: Dodge and Burn are used to lighten (Dodge) or darken (Burn) specific areas of an image.
The How: The Dodge tool and the Burn tool are based on a traditional photographer’s process for regulating exposure on specific areas of a print. Photographers would hold back light to lighten an area on the print (Dodging) or increase the exposure to darken areas on a print (Burning). Dodging and Burning takes a bit of practice to get the feel for it. The more you paint over an area with the Dodge or Burn tool, the lighter or darker it becomes.
- Select the Dodge tool or the Burn tool.
- Choose a Brush tip and set brush options in the options bar. For purposes of this exercise, we'll choose a master diameter of 15px and a hardness of 0% (a small soft brush).
- In the Options bar, select one of the following: Midtones to change the middle range of grays, Shadows to change the dark areas, Highlights to change the light areas. For this exercise, we'll select Midtones.
- Specify the Exposure for the Dodge tool or the Burn tool. We'll choose 50% to start with. We can always dial it up later.
- Click the Airbrush button if you want use the brush as an airbrush. The control of this may take a while to get used to.
- Drag over the part of the image you want to lighten or darken. Airbrushing make take a few more strokes that using the default brush.
So now that we understand what's happening and how to use the basic functionality of the Dodge and Burn tools, let's take it a step further. Let's make this a non-destructive adjustment.
- Alt-Click on the New Layer icon in the Layers Palette. This brings up the dialog box shown above.
- Name the layer in such a way as to serve as a reminder of what you've done. When you are looking at this file months from now, this will jog your memory and help you find your place in your notes.
- Choose Overlay from the Mode pop-up menu and turn on the Fill with Overlay - neutral color (50% gray) check box. This automatically fills the layer with a colour that doesn't alter the image in this blending mode.
- In the Tool palette, select the Brush tool (B).
- Press the D key to reset your foreground and background colours.
- Paint on the new layer. To dodge (lighten) an area, paint with white. To burn an area (darken), paint with black. To restore an area or to remove your edits, paint with 50% gray. Press X to change between black and white.
- If the effect is a bit too strong, you can always dial down the layer's opacity.
- Toggle the layer's view on and off to see your progress.
The Why: Dodging and burning are the professional retoucher’s most versatile tools—especially when working with local light and colour. Some critics argue that these techniques can shift an image’s visual narrative by altering emphasis—changing how a viewer experiences the scene by selectively drawing the eye. But that’s precisely the point: to help the image tell its story. When used with care and integrity, dodge and burn don’t invent details—they reveal what’s already present in the data, just beneath the surface. And by working non-destructively, we retain the original whilst shaping how the image is experienced across varied viewing environments.
3 comments:
This is fantastic and just what I've been looking for! Thanks!
even better, burn and dodge on your overlay layers's midtones (until they are shadows or highlights) for a more controlled and or subtle effect.
Thanks for the comments.
Michael, I enjoyed browsing through your gallery site at http://medina-photo.com/index. Very well done. Your images are beautiful and really capture nature in all its glory.
Post a Comment