
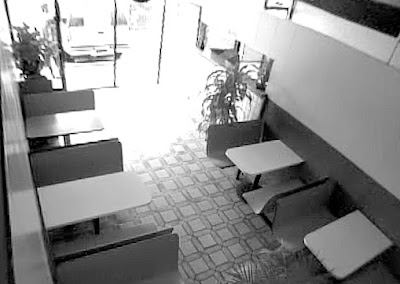
The ADT branded DVR exports the native multimedia data wrapped in an exe file. The self-contained player has the ability to save individual images as BMP files. These files come out at 640x480x72ppi.
Aside from the blown out highlights and overall lack of contrast to the images, the first thing you notice is the barrel effect coming from the lens. This is a fairly common defect in images coming from CCTV. Luckily for us, we've got Photoshop CS3.
Lens Correction to the Rescue
The Lens Correction filter is great for removing the various types of visual distortion which often occur in the wonderful world of low cost CCTV. Start by clicking Filter>Distort>Lens Correction. You'll get a dialog box that looks like the one below. Down the left side of the box are the following controls: the Remove Distortion Tool (D) - drag this tool towards or away from the centre of the image to correct the distortion, the Straighten Tool (A) - use this tool to draw a straight line down or across an object in the scene that you know to be straight on the horizontal or vertical access (like the door frame), and the Move Grid Tool (M) - use this tool to move the grid around to better see what changes will be necessary. These are accompanied by the ever present Move and Zoom tools.
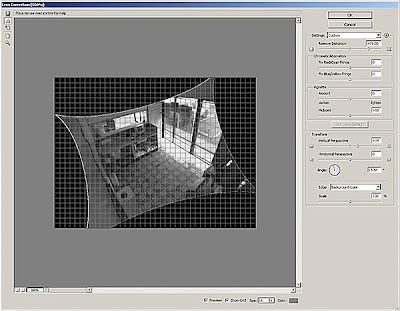
For this image, we can start with the Straighten Tool and drag a line down the door frame. The door frame is a straight vertical line and is about in the center/top of the field of view. Once you release your mouse button, Photoshop rotates the image accordingly. If the image is still a little off, you can select the Angle control and use your up/down arrow keys to nudge the angle a bit.
Next, you can correct for the barrel distortion by increasing or decreasing the Remove Distortion amount. Check your progress as you perform this adjustment by keeping your eyes on the grid. You can adjust the size of the grid size and colour with the controls on the bottom of the dialog box.
To correct perspective distortion, increase or decrease the Vertical Perspective / Horizontal Perspective sliders. I save the for last as its easier to see this work after straightening and removing the barrel distortion.
As you make your adjustments, Photoshop automatically sizes the image. This may result in a clipping of the edges. If you think too much is getting cut off, lower the Scale value at the bottom of the dialog box.
If you are processing multiple images from the same camera, you can save your settings from your first image's adjustments and apply them to the other images later. You can also choose Previous Settings from the Settings drop-down menu.
When you are finished, click OK. You may want to crop the craziness out of the image. Remember, you can choose hide the crop as opposed to deleting the cropped area.
Enjoy the day.
1 comment:
Thanks Jim, I am doing panoramas and this is a great help.
Post a Comment