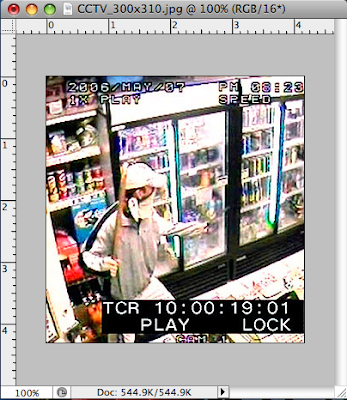
The usual media reviews take a decent photograph with smooth tones and colour transitions and blow it up 2 or 3 times. Naturally, the results look amazing. I am no such reviewer. I am brutal. I took a 500k CCTV image and blew it up over 40 times, going from a little over 4" x 4"@ 72dpi to 40" x 60" @ 300dpi.
![](https://blogger.googleusercontent.com/img/b/R29vZ2xl/AVvXsEhmB5gadb7JfKCmcbw_kTDihmZATYyv3cg5PE9gZNHTVlFhGESznNgtfKr9aIWrRwkI_HKbMjkX7LiDq9Brnf4-7AKSsFmllWPAMJH-5NZdp0brSTzUF0u2gVDuooF2UrVB4rM8cI8sD0Rs/s400/Picture+2.png)
![](https://blogger.googleusercontent.com/img/b/R29vZ2xl/AVvXsEgB1TIZ-L5z0Ck9fTzHPHtcUXEoUCztHzvpbwxPxI5ChXobxERVrO3dvc-ccQ17ezyWpheyxGP2QxpDJGTGuxbKYV2O6orWoLEbWBNSNCHjohopTPPA_lIgR5w7SrtYXNvG57BqPTcvfg7P/s400/Picture+3.png)
![](https://blogger.googleusercontent.com/img/b/R29vZ2xl/AVvXsEgjTlXqTsBePh975-KSG2ZG2G0kXOc9BAzj1weINA6XGju9fOkGK0CQl_7VPuxA-0Ir053eRvBSNte1Yigc0XpuCghyZIFdLWad8j54M6dTC7-GgrNvDW6puqfM-cAaXFiQKwcKKNXgMaft/s400/Picture+4.png)
![](https://blogger.googleusercontent.com/img/b/R29vZ2xl/AVvXsEhli9A70TzGyiu_1qg2HSbEayukiegcH4jYqEHy5FNulW_Gd2vR7SSA2ak9fIuzjFOCq0Jyv-vDhY2AzhoDjCL7Y7abSR3_ObpejOyE8u6nz0YE-kvM6XIT791KajNEqKEwMi99qh_eqsX8/s400/Picture+1.png)
![](https://blogger.googleusercontent.com/img/b/R29vZ2xl/AVvXsEj1MYF5dEJkofCpn_RLcRU2W0AA6IciRQeF6rLPWHnpmXRn8Hdm9LfKv-IhTgfaNX7ohhNJ0S-jVAwtMGfUH2pVSxKt-mPPtJ61i_eVZWOT2GKZRGVu4zG2drLU6CahGg_0G-ZDA3FxQhcC/s400/Picture+5.png)
![](https://blogger.googleusercontent.com/img/b/R29vZ2xl/AVvXsEhmB5gadb7JfKCmcbw_kTDihmZATYyv3cg5PE9gZNHTVlFhGESznNgtfKr9aIWrRwkI_HKbMjkX7LiDq9Brnf4-7AKSsFmllWPAMJH-5NZdp0brSTzUF0u2gVDuooF2UrVB4rM8cI8sD0Rs/s400/Picture+2.png)
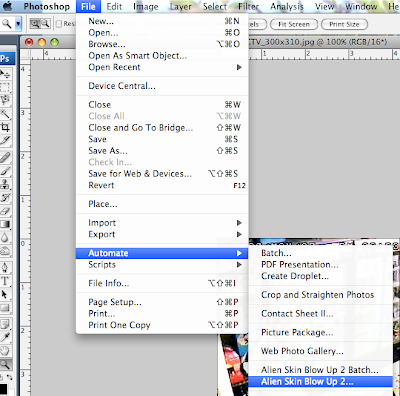
To start with, Blow Up 2 is not found in the Filters Menu. You find it by clicking File>Automate>Alien Skin Blow Up 2.
![](https://blogger.googleusercontent.com/img/b/R29vZ2xl/AVvXsEgB1TIZ-L5z0Ck9fTzHPHtcUXEoUCztHzvpbwxPxI5ChXobxERVrO3dvc-ccQ17ezyWpheyxGP2QxpDJGTGuxbKYV2O6orWoLEbWBNSNCHjohopTPPA_lIgR5w7SrtYXNvG57BqPTcvfg7P/s400/Picture+3.png)
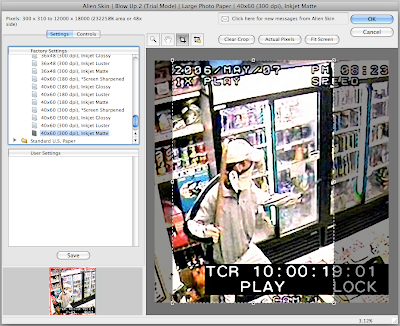
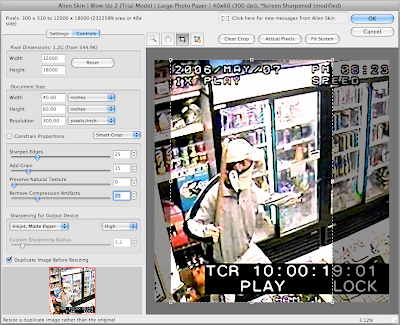
When the dialog opens, you are presented with a ton of presets. Chances are that you'll find a preset for the output scenario for which you are preparing. For me, I wanted to see what it would look like if I chose to output it to my big inkjet plotter.
![](https://blogger.googleusercontent.com/img/b/R29vZ2xl/AVvXsEgjTlXqTsBePh975-KSG2ZG2G0kXOc9BAzj1weINA6XGju9fOkGK0CQl_7VPuxA-0Ir053eRvBSNte1Yigc0XpuCghyZIFdLWad8j54M6dTC7-GgrNvDW6puqfM-cAaXFiQKwcKKNXgMaft/s400/Picture+4.png)
As the purpose of the enlargement would be for court purposes, and accounting for the mismatch in proportions, I chose to crop at this stage as well. Cropping here is easy.
![](https://blogger.googleusercontent.com/img/b/R29vZ2xl/AVvXsEhli9A70TzGyiu_1qg2HSbEayukiegcH4jYqEHy5FNulW_Gd2vR7SSA2ak9fIuzjFOCq0Jyv-vDhY2AzhoDjCL7Y7abSR3_ObpejOyE8u6nz0YE-kvM6XIT791KajNEqKEwMi99qh_eqsX8/s400/Picture+1.png)
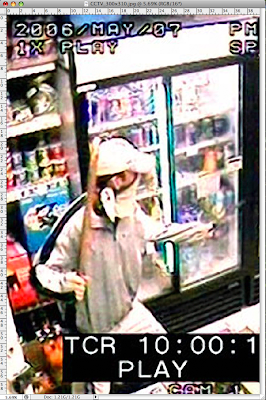
The resulting image is smooth - without the blockiness that frequently happens with Photoshop's built-in interpolation methods. In this case, we've gone from 500k to over 1.2Gb - jumping 40x. You can even add a touch of sharpening with this plug-in. I don't know if they could have made it any easier to enlarge your images. For European users, click here to get the ISO A paper settings.
![](https://blogger.googleusercontent.com/img/b/R29vZ2xl/AVvXsEj1MYF5dEJkofCpn_RLcRU2W0AA6IciRQeF6rLPWHnpmXRn8Hdm9LfKv-IhTgfaNX7ohhNJ0S-jVAwtMGfUH2pVSxKt-mPPtJ61i_eVZWOT2GKZRGVu4zG2drLU6CahGg_0G-ZDA3FxQhcC/s400/Picture+5.png)
Once you get comfortable using this tool, switch from the presets to the manual settings. Here you'll get more control over the results - adding (among other things) a JPEG repair slider and the ability to duplicate the image before resizing.
Meet my new best friend. Blow Up 2 is now an integral part of my workflow. I have not seen a third-party plug-in handle the interpolation of dodgy CCTV images as well as Blow Up 2. Blow Up 2 is now firmly ensconced on my "must have" list.
1 comment:
That's a killer angle to test that software...thanks for being "brutal"! (:
Post a Comment