Featured Post

Welcome to the Forensic Multimedia Analysis blog (formerly the Forensic Photoshop blog). With the latest developments in the analysis of m...

Wednesday, December 31, 2008

Device Central

I got a new phone recently and was apt to set the photo of the kids as my wallpaper. Rather than skim the phone's user guide to try and find the specs necessary for the photo, I just opened up Adobe's Device Central. Device Central now comes with Photoshop (or Creative Suite) and most don't know that they have it installed on their system.


With just a few clicks, I can see the size that I am targeting for my image. I can also see the file types that the phone will support. I get all the information that I need to make sure that my design/image looks its best.


You can even get information on supported video formats and sizes. This is a great feature for getting your kid's football videos tuned up and ready to show off at the office.

Now if you are still on CS3 (and many still are), and this is the first time that you are using the program, you have some updating to do. Go to Adobe's updates page to get the updated phones and profiles. As you can imagine, a lot changes in the world of mobile devices in 18 months. Also, Adobe's only going to keep the CS3 updates on the web site for a little while longer.

Once you've downloaded the updates, click on File>Install Device Profile Package. You'll be presented with a dialog that lists all of the available updates for the particular package that you are installing. When it's finished, it'll restart - so do the updates before starting to work on any images.


This process changes in CS4. Device Central CS4 now features an online device library - which means that you'll have to be connected to the internet to get the most out of the program. It also means problems, as some IT folks block the port that the program uses to access the internet (more on that later).

Still and all, it's a great program that's been there all this time. 

Have a great New Year! Thanks for making the Forensic Photoshop blog a smashing success.

Tuesday, December 30, 2008

Codec Vendors Battle it Out

"I’ve been spending a lot of time comparing codecs lately, and I always feel a little uncomfortable when I encode the test files since I assume that the actual codec vendors know how to wring the last bit of quality out of their respective codecs better than I do. So for this particular review, I asked the codec vendors themselves to encode the files," says Jan Ozer in his informative article on streamingmedia.com. Jan's the author of many outstanding books (like DV 101) dealing with video.

Read the article by
clicking here.


California e-discovery news

The California Assembly is taking another shot at an e-discovery bill. The Governor vetoed a similar bill earlier this year. There are some interesting parts of the bill, California Assembly Bill 5:

"The Civil Discovery Act requires any documents produced in response to an inspection demand to be produced as they are kept in the usual course of business, or be organized and labeled to correspond with the categories in the demand."

"This bill would make this provision applicable, in addition, to documents produced in response to a demand for copying, testing, or sampling. The bill would furthermore provide that if a party responding to a demand for production of electronically stored information objects to a specified form for producing the information, or if no form is specified in the demand, the responding party shall state in its response the form in which it intends to produce each type of information. In general if a demand for production does not specify a form or forms for producing a type of electronically stored information, the responding party would be required to produce the information in the form or forms in which it is ordinarily maintained or in a form that is reasonably usable, but need not produce the same electronically stored information in more than one form."

As with anything in government, you will need to know exactly what you are asking for and how you'd like it returned. Ask for the "video evidence" of the harassment that was caught on the company's CCTV, and you may get the proprietary data with no way of playing it back; especially if the responding party "need not produce the same electronically stored information in more than one form."

As California tends to be a leader in this type of law, you might want to read the text of the bill. Your state may not go this way, but then again ...

Sunday, December 28, 2008

Cameras disappoint Durham police

Cameras disappoint Durham police
By Stanley B. Chambers Jr. in the News and Observer.

Police hoped that the cameras lined up along Angier Avenue would be the latest technology to help them fight crime. They had visions of not only capturing criminals in the act on video, but also controlling the cameras remotely from police cars to keep ever-present eyes on the street.

But so far, after months of work, the video surveillance program has not produced one arrest, and its future is uncertain.

Documents obtained by The News & Observer -- e-mail between city officials and TelePort Systems Inc., the Baltimore-based company that installed the system -- detail a project filled with missed deadlines, recurring technological problems and complaints from police officers and city officials.

Read more.

Hopefully, I won't be reporting on a similar story with a more local connection any time soon.

Saturday, December 27, 2008

Image Doctor 2

A reader asked me to look at Alien Skin's Image Doctor 2 with an eye towards the "forensic applications." The helpful folks at Alien Skin provided a bunch of documentation on the program (along with Blow Up 2). Naturally, I put a bunch of CCTV images and surveillance photos through the program to judge the results.

The program's JPEG repair did try its best on the macro blocks and over-compression that is typical of China's finest systems, but the results were not that spectacular. In fairness, there's not much that can be done with the 60:1 - 270:1 compressed images that come from the Futian District's CCTV manufacturers. (interesting trivial note: Futian is part of Guangdong Provence. A nearby city, Guangzhou - in Pinyin, the provincial capital - was Romanized as Canton. The local people and their language are commonly referred to as Cantonese.)

The disappointment of the forensic side of the trial notwithstanding, it does have some spectacular uses. 

Have you ever seen police web sites and their un-retouched photos of the dept's leadership? What's wrong with touching up the photos a wee bit? Nothing at all. I've been retouching photos for some time now. Presentation is everything - and there's nothing wrong with helping your boss look his/her best.

Retouching can also help restore the dept's archival images. You know, those pictures that decorate our hallways - reminders of the days gone by. Over time, the originals get worn out - they need some help to get in shape for their place of honour.

So, who can use Image Doctor 2? Media relations, dept. web masters, graphic artists, photographers, archivists, and anyone involved with the agency's publicity. Image Doctor 2 is easy to learn and easy to use. It's certainly well worth the price for the time savings it offers. 

After the holidays, I'll take a few posts and show off its power for fixing old photos as well as getting head shots ready for the media.

Until then, enjoy.

Wednesday, December 24, 2008

Smarter Sharpen?

Stephen Marsh, author of the Binary FX: Photoshop Tech Vault, has penned a primer on an alternative to Photoshop's Smart Sharpen. He's called the piece Smarter Sharpen. In it, he presents some never-before published thoughts and techniques on fixing focus in our images.

There are some who might not be used to the Apply Image dialog. So, to get everyone off on the right footing, I've made a small video file (YouTube link) of the introductory steps of the technique. I've used the menus to navigate the steps - except for my last step, which can't be seen. In my last step, I've stamped the visible layers (see Stamp Visible for the technique). I've modified his technique slightly in starting from a copy of the background and copying the copy ... ending with stamping the visible layers in order to easily compare the results with the original image (and not to confuse things).


Try it out on your images and see what you think. I am rather impressed at both the thought that went into it and the detailed explanation as to what's happening and why. For me, his work has all the required elements - what-how-why - and included steps for repeatability.  Well done!

Merry Christmas to all.

iPhone Forensics 2

I know that the Forensics classes teach us not to install software on the "source" device. But many of us have iPhones now, so folks involved in the forensic examination of Cellphones will need to know how they work. Why not start by learning how to use and exploit your own phone?

A cool new App has arrived from the folks at Missing Manuals. You can now download David Pogue's iPhone: The Missing Manual to your iPhone through iTunes.

Since David's a popular author, chances are many possible "targets" will have taken his sage-like advice on how to get the most out their phones. Here's a great way to learn those tips yourself, on your own phone.

Tuesday, December 23, 2008

Supporting Undercover Operations with the Adobe Master Collection

More often than not, a video/image analyst will have the agency's best and fastest computer. Hopefully, the analyst will have the full CS3 (CS4) Master Collection. There are so many options available to you, if you have the software.

One of those options is supporting undercover operations. How can you do that, you ask? There are many things an operator will need, and it depends on the type of operation. From IDs to business cards to letterhead to an entire business legend, there are as many options as there are operations. With the Master Collection, you can support them all.

But, you are new to this. You had a hard enough time learning how to use an Avid, now you are being asked to learn an entire suite of programs? Slow down. My old football coach once said that you eat an elephant, one bite at a time. Learning how to use the suite's programs can be done in much the same way, one project at a time.

Let's say that you need to create a basic business legend for your operator. Where do you start? You want to create something that looks real, professional; staying away from some overused template. I've got just the help that you are looking for. Check out the Complete Idiot's Guide to Graphic Design. No, I didn't just insult you. The CIG series of books are great for distilling concepts down to their basic elements and giving them to you in bite sized chunks, avoiding jargon, and getting you up to speed in a hurry. So, start with the CIG to familiarise yourself with the rules of design and the tools that you'll need. The authors have done a great job with this very complex subject. Then move on to more product specific books, like the Missing Manual series from O'Reilly. 

Dreamweaver CS4's Missing Manual will get you going on creating a web site for your operation. Dreamweaver is part of the Master Collection and is THE tool for creating web sites. Now, most of the cool sites have some Flash elements. So, you'll want to get up to speed on Flash CS4. Try the Flash CS4 Missing Manual. Right now, orders over $29.95 at OReilly.com qualify for free shipping. Best of all, they're having a buy 2 get 1 free promotion ... so throw in Creating a Web Site: Missing Manual as well.

Before you know it, other groups within your agency will see you as the "go-to" person for these types of projects. Nothing keeps our undercover operators safe like a properly created and reinforced legend. Now, you too can create these legends from scratch in the comfort of your own office.

Once you've become comfortable with the process and the tools, you'll begin to see other ways to leverage your investment in yourself and your tools. Many are starting to use Flash for courtroom presentations. You can even build a Flash based web site for sharing contact sheets on your agency's intranet. There are so many uses for this technology. I'm sure that you've already thought of two more ways to use it.

Police Podcasting

A local agency was recently featured on Apple's Business site. Click here to read about the Orange County Sheriff's Dept.'s success using Podcast Producer to help their internal communication.

I've been toying with the idea as well. A recent post included a screen-cast walk through. As time goes on, I'll be producing more of these. Sometimes, a written step-by-step just doesn't capture the essence of the lesson. For those times, I'll include a small video.

In other news, I'm researching the time /effort / cost necessary to produce a weekly podcast and make it available for free via iTunes. Stay tuned ...

Saturday, December 20, 2008

Blow Up 2

Like all NAPP members, I've seen the ads for Alien Skin's Blow Up in Photoshop User Mag for quite some time. With Photoshop's built-in interpolation producing good results, and being a fan of Interactive Interpolation (part of Optipix), I've honestly never paid much attention to the ads. Version 2 is out now and the media is raving about the product. It turns out, they've got a good reason to. So, I endeavoured to find out what all the fuss was about.

The usual media reviews take a decent photograph with smooth tones and colour transitions and blow it up 2 or 3 times. Naturally, the results look amazing. I am no such reviewer. I am brutal. I took a 500k CCTV image and blew it up over 40 times, going from a little over 4" x 4"@ 72dpi  to 40" x 60" @ 300dpi.


To start with, Blow Up 2 is not found in the Filters Menu. You find it by clicking File>Automate>Alien Skin Blow Up 2.


When the dialog opens, you are presented with a ton of presets. Chances are that you'll find a preset for the output scenario for which you are preparing. For me, I wanted to see what it would look like if I chose to output it to my big inkjet plotter.


As the purpose of the enlargement would be for court purposes, and accounting for the mismatch in proportions, I chose to crop at this stage as well. Cropping here is easy.


The resulting image is smooth - without the blockiness that frequently happens with Photoshop's built-in interpolation methods. In this case, we've gone from 500k to over 1.2Gb - jumping 40x. You can even add a touch of sharpening with this plug-in. I don't know if they could have made it any easier to enlarge your images. For European users, click here to get the ISO A paper settings.


Once you get comfortable using this tool, switch from the presets to the manual settings. Here you'll get more control over the results - adding (among other things) a JPEG repair slider and the ability to duplicate the image before resizing.

Meet my new best friend. Blow Up 2 is now an integral part of my workflow. I have not seen a third-party plug-in handle the interpolation of dodgy CCTV images as well as Blow Up 2. Blow Up 2 is now firmly ensconced on my "must have" list.

For more information, or to get your hands on this cool tool, click here.

Friday, December 19, 2008

Getting up to speed

I'm getting flooded with e-mails looking for all the updates found in Photoshop CS4 - all in one update. Don't worry, I have the solution. Ben Willmore's Adobe Photoshop CS4: Up to Speed.

I usually get Ben's Up to Speed books as soon as they come out - and before I upgrade to the next version of Photoshop. (when you beta test you still miss things) He's got a way of distilling the info so that you get all that you need to make the choice on upgrading. You'll also get a sense of how long it's going to take to re-do your workflow, if necessary. And you may find some obscure tidbit that just makes your day. My favourite from this edition, his description of the new soft proof for colour blindness.


Soft proofing for colour blindness lets you see the image as if you were colour blind yourself. Did you know that there were flavours of colour blindness? Protanopia indicates an impaired red sensitivity and Deuteranopia indicates an impaired green sensitivity. Thus these settings simulate a person's vision with these limitations. Now you know.

Thursday, December 18, 2008

Great new resource from Apple

I got the following e-mail from Apple yesterday:

"If you run a business, you know how helpful it is to have one place to go to find most of the information you need. That’s why we created the new Resources page on the Apple Business site. With close to 100 white papers, tech previews, QuickStart guides, user manuals, and tech overviews, it offers a rich collection of information on file sharing, mail services, collaboration services, storage and backup, and more."

I know that Apple has only a small number of users compared when compared to PCs. But, the resources found on Apple's new site can help law enforcement PC users if/when they come across an Apple computer or phone at a crime scene.

Note Tool

A NATIA member wrote in to ask about the Notes Tool. In my classes, I usually show the Notes Tool and how it can work to aid in communication in multi-user environments. In CS4, it has a new look and a new location.

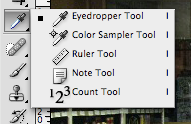
For CS4, Adobe has changed the Notes Tool. It's now called the Note Tool and it can be found grouped with the Eyedropper Tool (I). Why Note and not Notes? Maybe because the dropped its audio functionality? Maybe because the cleaned up the interface?


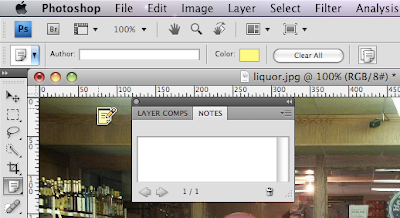
Select Note Tool and click somewhere on the image. This will activate the Note Tool panel. Write a comment, a to-do, or ... whatever. It's great for leaving yourself notes about where you left off so that when you come back to the image, tomorrow or a year from now, you can quickly get up to speed.


Use the Left/Right arrows to scroll through the notes, if you've left more than one. The Trash Can deletes the active note. You can right-click on the note and choose Delete All Notes from the pop-up menu (Win) (or Ctrl-Click for Macs) to delete all the notes.

If you want to hide the Note icon, select View>Show>Notes. Since the notes are now contained within the Notes Panel, you can view the notes even when the icons are hidden (cool - new).


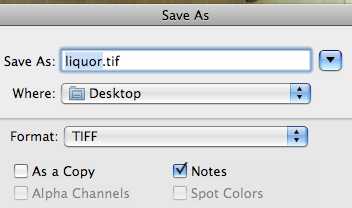
When saving your files, make sure to check the Notes box in the Save As dialog. Notes are supported in PSD, PSB, Tiff, and PDF. 

Work this little gem into your workflow. You'll soon wonder how you've gone so long without it.

Wednesday, December 17, 2008

History States

A reader made a comment about a recent post, asking a question about the amount of History States shown in the graphic. Specifically, she wanted to know if there was a "sweet spot" for History States. Why 55? Can I have 100?

It's really a matter of preference, since you can have up to 1000 History States. Just remember, more states = more memory required by Photoshop.

Take a look at your workflow. Count the number of layers in the final versions of your images. How many steps did it take for you to get there? How much RAM can your system hold? How big are the files that you work with? Take all of this info and do the math. If you only work with small files from CCTV systems, then 100 states should be supported with 1GB of total RAM. If you work with images from a multi-megapixel still camera, then those 100 states would slow your 1GB system down. If you find that your system is getting bogged down, Purge the cache when you start working on a new image.

Tuesday, December 16, 2008

Photographic Technology Series

Many thanks to Stephen Marsh for sending in this link to the Photographic Technology Series on Google.

There's a wealth of information about all things photographic. So, instead of watching stupid pet tricks on YouTube, check out the slides and videos at the PTS. 

Monday, December 15, 2008

On-Line Training

I received word today that we've registered our first international student for the self-paced Introduction to Forensic Photoshop. That's great news. The EU was first out of the gate. Who will be next?

With budgets a mess around the country, and around the world, on-line training is making more sense. On-line training allows your agency to save on airfare, rental cars, hotel stays, per diem ... and they get to keep their best employees around the home office. Now I know that the grumbling usually starts with ... but we like to travel. I know. But, money's tight these days. Employers can either count their savings or enroll two or three students for the price of sending one away to training.

The introductory course simply sets the foundation, gets us all talking the same language. It takes you through the steps in a structured way. It gets you ready to dive head first into the upcoming Advanced class.

As you look towards 2009, consider investing in your Photoshop skills. Click here for more info or to register for the course.

--Update--

Just to clarify this: This course is indeed an introduction. It's meant to get you from a zero point to feeling comfortable enough to take a more advanced course. It is also entirely self-paced. You work the exercises, you watch the videos, you answer the outline questions at your own pace and to your own satisfaction. When you are ready (within 6 months) - you take the test. It's really that simple.

The Advanced Course will be ready to go after the first of the year and will run in a more traditional on-line style with virtual blackboards, assignments, due dates, and so forth.

Thanks for your patience.

Continuing Legal Education

A while back, I was a guest of the LA District Attorney's Office as part of their Continuing Legal Education program. The topic was Using Video Evidence in Trial. The talk was scheduled for 2 hours on a Saturday and was quite successful. I've held similar programs for the LA City Attorney's Office, including one specifically on presenting video evidence with PowerPoint.

I'm looking at my calendar for the next year and I thought of putting the word out. If there is an interest in hosting one of these classes at your organisation, feel free to let me know. We'll sit down with our calendars and hopefully work out a class or set of classes that meet your training needs.

This type of evidence can be tricky to present. Knowing the issues can make/break a case. Let's work together to get your investigators and attorneys up to speed on the latest info and cases. 

Friday, December 12, 2008

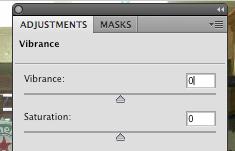
The New Vibrance Adjustment

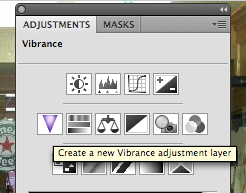
New ... sort of. Vibrance adjustments have been a part of ACR and Lightroom for a while now. It was only a matter of time before it showed its head in Photoshop.

You'll find it in the second row of the Adjustments panel. Vibrance adds colour saturation into the colours that need it whilst leaving other colours alone. Photographers love the fact that Vibrance tends to leave skin tones untouched during adjustments.


Try Vibrance as an alternative to Hue/Saturation. You'll find that just a touch will often make the difference in your images.


Thursday, December 11, 2008

Avid Media Composer 3.1

Hey Avid users! Avid announced shipment of Media Composer 3.1. Registered software support customers should have received an e-mail with download instructions. If you haven't registered your Avid support contract, now's a good time ...

CS4 - GPU Acceleration

A reader sent me a note complaining that some of the promised GPU enabled features of CS4 didn't work as expected. I asked her to send me a screen shot of the Performance tab in her Preferences.


Here Photoshop is telling us that hardware acceleration is unavailable. The computer probably lacks a dedicated graphics card (or its card is not supported/updated). To get the most out of CS4, you'll need that GPU.

Wednesday, December 10, 2008

Colour Correction for Production

Government Video has a great article by Wayne Cole about the complexities of moving images into the correct colour space for video production.

"... [T]he gamut for ITU-R BT.601 digital video color maps to an area that is neither coincident nor symmetric with RGB gamut ..." writes Cole.


Click here to read the article.

File Sharing Software

If you have file sharing software on your computer, or if you use this kind of software (LimeWire, and etc.) in investigations you may want to take note of a recent case heard by the 9th Cir.

In 07-50195, US v Ganoe, the 9th Cir. held that downloading and using file sharing technology on your computer is tantamount to a waiver of privacy. Read the brief analysis from the San Diego District Attorney's Office by clicking here. Their Legal Update site is a good one for the Bookmark Bar.

Tuesday, December 9, 2008

Cool new books

One of the problems with being away from the office for so long is getting caught up with all the mail that comes in whilst you're gone. There were a few books that came in that are worth a mention.

The Canon EOS Digital Rebel XS / 1000D Companion by Ben Long offers a course on digital photography (albeit one based on the Canon) in easily digestible step-by-step lessons. I like the fact that this one isn't just a guide to the many buttons and levers. Ben takes the time to show the reader how to shoot great photos with this camera. Because of this, owners of other camera bodies can certainly benefit from this book. JPEG shooters beware, Ben points out that the Picture Styles feature only works when shooting in RAW and using Canon's Digital Photo Professional software. 

The Photoshop CS4 Companion for Photographers by Derrick Story takes a walk down the "workflow" path. Derrick takes those "must have" options from Photoshop CS4 and shows you how they work and where they fit in to an efficient photographer's workflow. It's a handy little book that will fit nicely in your favourite photographer's stocking this Christmas.

Adobe InDesign CS4 one-on-one by Deke McClelland is just perfect for the LE pro who wants to start utilising the power of this awesome layout program. Those who have taken my classes know how much I rely on InDesign for contact sheets, presentation layouts, and so forth. If you are looking to start bringing InDesign into your workflow, Deke's your man. Sample files, videos, and 12 easy to follow step-by-step lessons will get you on your way.

when you have to photograph the monitor's image

An e-mail came in asking about problems related to taking pictures of a TV screen. Interestingly enough, there are times when officers will have no choice but to take a picture of what they see in order to preserve "the evidence." Whilst this certainly is not the "best way," it may be the only way. As such, it's best to get it right the first time ... there might not be a second shot at it . So, here's a quick look at photographing the images on a DCCTV's monitor. 

The key here is to match the shutter speed with the monitor image's refresh rate. For full motion video, you'll want to be at 1/30 (30 fps). For other settings, you may want a slower shutter speed. Be careful with the slower speeds as motion may tend to get blurred.

You'll definitely want to bring your tri-pod with you. Don't forget to turn the flash off. You don't want the reflection off of the monitor's surface. Check the images in the camera before you leave the scene. Take your time and you'll get it right.

Forensic Nursing and Photoshop

I'm getting an increase in e-mails from the nursing community. It seems that the mix between proper care / documentation of cases and the need to protect against liability has lead many nurses to pack a small point and shoot camera as part of their kit. They are using these cameras to document wounds, bruises, bite marks, odd rashes, and so forth as part of the patient's file.

Patients, especially children, are often in so much pain that keeping them still becomes a problem and the nurses just have to point and shoot and hope for the best. More and more of them are turning to Photoshop to help fix the photos.


Bruising can be tough to shoot. The subtle differences in shading are not always detectable. Thankfully, the Forensic Photoshop workflow was made for this problem. The image above needs correction in terms of focus and global / local light and colour.


In just a few simple steps, we move from an out of focus, hazy picture to one that clearly shows the bite mark and resulting bruising. The wound is now captured in time. Were this an odd rash or something rarely seen, as happens in rural urgent care situations, this clarified picture could be e-mailed along with the nurses notes to a specialist for a consultation - thereby extending the reach of the specialist and maximising the treatment options for the patient.


The differences in the before and after may be subtle, but colour and shading can make all the difference when a doctor is trying to diagnose a patient over a long distance. In cases where the hospital staff is injured by a patient, it can be a vital part of the documentation for a worker's comp case. The uses for the Forensic Photoshop workflow are endless.

Medical professionals who are interested in learning more about the power of Photoshop and how to leverage this power in your workplace can find more information by clicking here. The American Institute of Forensic Education is the new host for my self-paced on-line class. Now you can learn to apply the workflow in the comfort of your own office and at your own pace. 

Monday, December 8, 2008

Obama's citizenship papers

I can not begin to count the number of e-mails that I received with "proof" of the forgery of President-Elect Obama's birth certificate. One thing that all of the attachments lacked was a proper "chain of custody." Questioned Document Examiners will tell you that you need the original for examination. Thanks to the Governor of Hawaii, we'll never see it. So we can all breathe a little easier now that the Supreme Court has declined to hear the case.

Interestingly, Alan Keyes' suit is still going out here in California. My guess is he'll get the same treatment by the Supremes.

Curves - the easy way

Curves - a powerful tool that's been a part of Photoshop since the dawn of time. Nothing new to see here, right? How about this:


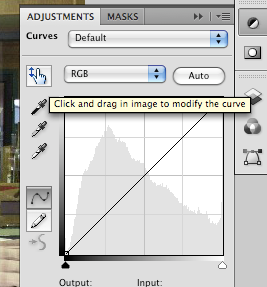
Meet the On-Screen Adjustment Tool.

To utilise this new feature, simply apply a Curves adjustment layer as you normally would, or do it the CS4 way by clicking on Adjustments and then the Curves icon. Notice the icon in the upper left hand corner of the panel. Click on it. Then find the spot in the image that needs adjusting. Click and hold within the image and the icon will change from an eyedropper to an up/down arrow. Keep holding that button down as you slide the cursor up/down to adjust the curve in real-time. You'll see the results on screen as you work. If your work has blown out highlights or shadows somewhere else in the image, simply repeat the process in those spots and balance the image. It couldn't be any easier.

Here's a quick movie clip to show the power and ease of this new feature.


Sure you could do stuff like this before. But, not this easy.