One of the more difficult tasks in managing evidentiary multimedia is taking the audio from a body-worn recorder and merging it with various sources of covertly recorded video. Often times, the body-worn recorder produces the best audio, but the body-worn video misses the hand-off or the face shot. Thus, an investigator will want the better audio inserted into another video feed from the operation (pole cam, hand-held, etc.).
For this reason, I'm looking forward to the release of Audition CS6. According to Adobe, "Automatic Speech Alignment: Designed to align overdub dialogue quickly with existing production audio, the new automatic speech alignment feature does much more than merely align initial transients. When used on overdubbed dialogue, Adobe Audition analyzes the frequency spectrum involved as well as the waveforms, so each word of a dialogue clip is matched to its counterpart in the production audio—the real power is a new algorithm to provide alignment of noisy location audio to reduce mis-alignment. If you have ever worked with ADR or overdubbing, you know that this is a time consuming task and our goal was to provide a powerful tool to help make it a little easier. There’s no replacement for the skill and craft involved in professional ADR, but if you have an overdub performance which matches the location audio’s wording and phrasing, but the timing is off for lip sync, the new automatic speech alignment can help. Where you might normally perform a “stretch” on the audio to fit the timing, or be forced to do lots of editing/compositing to line up each word or phrase, automatic speech alignment can help you get good results quickly."
Yes, I know. This feature is designed for a production environment. Well, Photoshop is for photographers, and we love it in law enforcement. I think that the more LE folks get used to Audition, the more they'll love it. I can't wait to try this with body wire/body-worn matching for field operations.
Enjoy.
Showing posts sorted by relevance for query automatic. Sort by date Show all posts
Showing posts sorted by relevance for query automatic. Sort by date Show all posts
Thursday, March 29, 2012


Monday, May 7, 2012
Bicubic Automatic

Cool. I've got the new version and I'm getting it set up and I see this:

I'm not a fan of anything "automatic." So, a little digging is in order. Here's what I found out.
This from Photographyuncapped.com: "By just having ‘Bicubic Automatic’ checked in the CS6 preferences, all Photoshop functions will default to Adobe’s best choice for the method. No muss. No fuss. Photoshop will decide the best way forward for you. If you want to override this setting on a case-by-case basis, you still can choose other methods in the Image>Image Size dialog under Resampling Method. And, of course, if you want to change this on a continuing basis, the Preferences can be changed at will."
I think I'll stay in control. I'm appreciative of Adobe's efforts to simplify my life ... but ... I'd rather choose the interpolation method.
Enjoy.
Tuesday, May 8, 2012
nitpicks with Bicubic Automatic
There's an interesting read on the various issues with the new Bicubic Automatic setting in Photoshop CS6 over in the Adobe Forums.
Enjoy.
Enjoy.
Thursday, April 18, 2013
Photoshop Sneak Peek: See What's to Come
Adobe's John Nack shared this video about what's coming in a future version of Photoshop.
Based on the short video, it looks like they're attempting to do an automatic PSF correction to motion blurred images - also called deconvolution.
You know me by now, I'm not a huge fan of automatic corrections. From a repeatability standpoint, they're problematic. They're also problematic from a documentation standpoint. Thankfully, I've had the ability to do this for a while now - in AmpedFIVE. Here's a comparable video example - from 4 years ago - demonstrating the same functionality in FIVE. The nice thing about FIVE, is that you can do this on images or video - make precise, reliable, and repeatable adjustments - right now ... you don't need to wait on CS7.
Enjoy.
Based on the short video, it looks like they're attempting to do an automatic PSF correction to motion blurred images - also called deconvolution.
You know me by now, I'm not a huge fan of automatic corrections. From a repeatability standpoint, they're problematic. They're also problematic from a documentation standpoint. Thankfully, I've had the ability to do this for a while now - in AmpedFIVE. Here's a comparable video example - from 4 years ago - demonstrating the same functionality in FIVE. The nice thing about FIVE, is that you can do this on images or video - make precise, reliable, and repeatable adjustments - right now ... you don't need to wait on CS7.
Enjoy.
Thursday, April 17, 2008
Auto Adjustments
I've had a few e-mails asking about using Auto Levels in an adjustment layer. I tend to stay away from the "automatic" adjustments in Photoshop. If you want to use Auto Levels, here's what you need to know.
Image>Adjustments>Auto Levels - Auto Levels expands the tonal range (and contrast) by simply "commanding that the darkest pixels shall be black and the lightest ones shall be white." The intermediate pixels are spread over the range in between. There is a slight clipping with the default settings, the first 0.10% of either extreme.
Colour casts can sometimes be corrected with Auto Levels, if the cast is a result of the way brightness values are distributed amongst the channels. The correction takes into account the histograms of the individual channels.
This leads to one of the problems in using Auto Levels. It can create an unwanted shift in colours. If you want to use Auto Levels (Layer>New Adjustment Layer>Levels), change the Blending Mode of the adjustment layer to Luminosity to cancel out the colour shift (if any shift occurs). Conversely, if you want the colour correction without affecting tone, change the Blending Mode of the adjustment layer to Color.
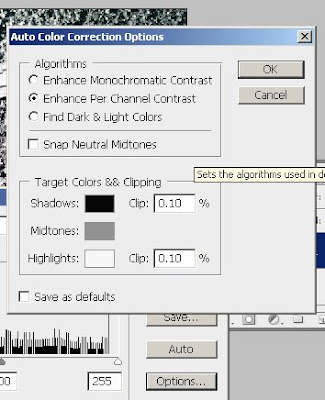
Later versions of Photoshop have opened up the ability to adjust these automatic options. In the Levels dialog box, click on Options.
The above graphic represents the default Auto Color Correction Option settings in Photoshop CS3. From top to bottom, here's what the settings mean:
- Enhance Monochromatic Contrast clips all channels in the same fashion. Colour relationships are maintained whilst making highlights appear lighter and shadows appear darker. This is the algorithm used by the Auto Contrast command.
- Enhance Per Channel Contrast maximizes the tonal range in each channel and thus produces a more drastic correction. As each channel is adjusted separately, this option may remove or introduce colour casts. This is the default algorithm used by the Auto Levels command.
- Find Dark & Light Colors identifies the average lightest and darkest pixels and uses them to maximize contrast whilst minimizing clipping. This is the default algorithm used by the Auto Color command.
- Snap Neutral Midtones finds the "average nearly neutral color" in an image and then adjusts the midtone values to make the colour neutral. This is the default algorithm used by the Auto Color command.
- You can change the default clipping values in the Clip boxes.
- To re-assign the target colour values to the darkest, neutral, and lightest areas of an image, click a colour swatch.
- If you want to save these values and use them as your new defaults, check the Save as Defaults box.
A note from Adobe: "When you save the Auto Color Correction options as defaults for Auto Color, Auto Levels, and Auto Contrast, it does not matter what algorithm you select [in the Algorithms section]. The three auto-correction commands use only those values that you set for the target colors and clipping. The only exception is that the Auto Color command also uses the Snap Neutral Midtones option."
Friday, November 9, 2007
Removing Colour Casts - Part 5: PictoColor® iCorrect® EditLab™ Pro 5.5
Let's finish up the week by taking a look and a simple but powerful plug-in from PictoColor. iCorrect® EditLab™ Pro 5.5 has quickly become one of my favorite tools and when we are done here today, I think that you'll be a fan as well.
We'll continue with Rob's fishing trip photo and work through the plug-in's four step work flow. The first thing that we notice is that EditLab works in 16bpc mode and it works as a Smart Filter. This is great news for us, as we can work non-destructively with this filter.
Start by choosing Open Object from Adobe Camera Raw 4.2 or click Layer>Object>Convert to Smart Object. Next, add a touch of focus correction with Smart Sharpen. I chose 50 as my Amount, 1.5 as my Radius, and Lens Blur as my removal method.
In the next step in our work flow, we want to address global light and colour issues. Activate the EditLab plug-in by choosing Filter>PictoColor>iCorrect EditLab Pro 5.5. This brings you to EditLab's dialog box (shown below).
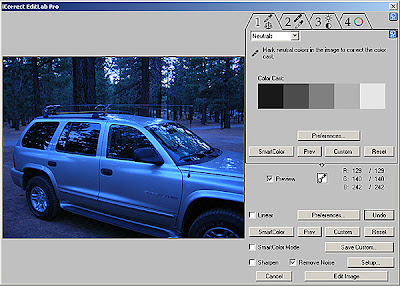
iCorrect EditLab Pro 5.5 works like four tools in one. These tools are contained within separate panels and are labeled for easy identification. Amazingly, the tools act independently of each other so as you progress from Tab 1 to Tab 4, the tools will not affect any of the previously used tools' corrections. This eliminates the problem that many who are new to colour correcting have of correcting for one thing while throwing off another. With EditLab Pro, one pass through the tools and you are finished with this step in the work flow. What could be easier?
Tab 1 - Color Balance
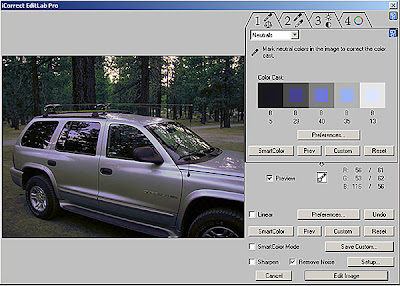
With the first tool, we begin by correcting the colour balance and removing the colour cast by clicking on neutral (black, white, or gray) colours within the image preview window. The display shows that the original image had a predominantly blue/purple colour cast. As you click around the image, make sure to choose dark shadows, bright highlights, and midrange areas in order to maximize the effectiveness of this tool. When we finish with this tool, we are left with a good starting point; most of the cast has been removed.
Tab 2: Tonal Range
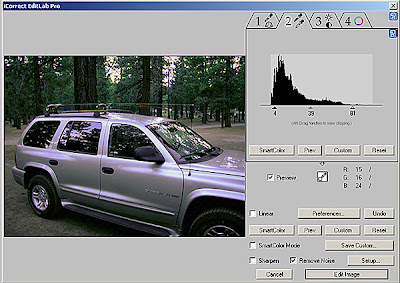
The second tool tab works like a levels adjustment by setting a new black point and new white point. It makes an initial automatic adjustment. From there, we can adjust the sliders in the histogram display. It is possible to extend the black point into negative space, flattening out the image. Be careful and watch the preview window as you make your edits.
Tab 3: Brightness/Contrast/Saturation
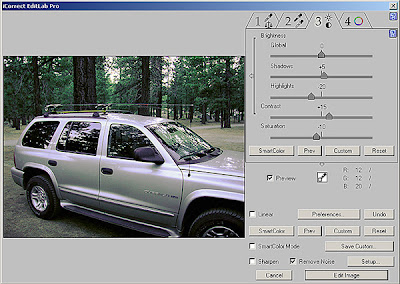
True to it's name, the third tool adjusts brightness, contrast, and saturation. There is a slider for a global adjustment of brightness. You can choose to adjust the brightness of the shadows and highlights independently as well. For Rob's picture, I dialed down the brightness of the highlights and bumped the shadows up a bit. I added a bit of contrast for a little kick and desaturated the image slightly.
Tab 4: Hue-Selective Editing
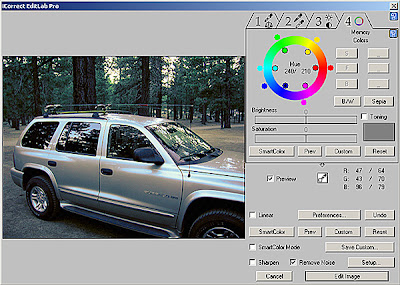
The fourth tab is what sealed the deal for me. Notice that there is still a little purple in the shadow detail after working with Tab 3. With Hue-Selective Editing, we can get rid of that cast quite simply. Here we finely tune specific colours on a hue-selective basis. I activated a colour on the hue-wheel, in this case blue and purple, and then move the sliders to mitigate the cast. The inside slider affects hue and the outside slider affects the brightness of that hue. Further adding to the fun, you can independently adjust its brightness and saturation using the sliders below the colour wheel.
Well begun is half done
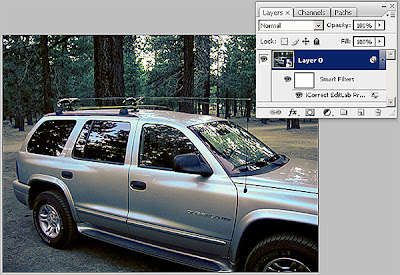
For US$99 (additional $10 for a CD), you couldn't ask for an easier plug-in to use. If you want to go on automatic mode, their SmartColor technology should help you on your way. For tougher cases, such as Rob's fishing trip, you have the power and flexibility that you need at your fingertips. Being able to use this as a Smart Filter is just the icing on the cake.
For those that attended my LEVA course, the trial edition of this plug-in is in your work files (ICEDITLABPRO551SETUP.exe). If you want to get your hands on a trial copy of the plug-in and see for yourself, click here.
On a different note, this Monday is Veterans Day (Remembrance Day). For those of you on active duty, thank you for all that you do to provide freedom and security for the folks back home. For all of the Vets, thank you for your service. In today's crazy world, we are constantly reminded that freedom is not free. Thank you for standing on that wall so that we can all sleep sound at night. A special thanks to the folks at Ft. Stewart, Ga and the men and women of the 3rd Infantry Division deployed in harm's way from the son of a 3rd ID Korean War vet. May God bless and keep you all.
Wednesday, August 21, 2019
Experimental Design
Before one begins any sort of research, one usually surveys the literature on the topic to see if any research has been completed and what, if anything, was concluded. Sure, the researcher has a general idea about what they want to study, but a literature review helps to inform and refine the eventual design of the study. According to Shields and Rangarajan (2013), there's a difference between the process of reviewing the literature and a finished work or product known as a literature review. The process of reviewing the literature is often ongoing and informs many aspects of the empirical research project. See what I just did, I discovered some research on literature reviews, and inserted the summary into my paragraph. Usually, there's an accompanying citation. Here it is: Shields, P., Rangarjan, N. (2013). A Playbook for Research Methods: Integrating Conceptual Frameworks and Project Management. Stillwater, Oklahoma: New Forums Press. ISBN 1-58107-247-3.
I received some feedback about the few posts I've written regarding "headlight spread pattern analysis." One was very intriguing - "... assume the premise is true, that there is uniqueness that can be discovered through experimentation. Where would you begin? What would the experimental design look like?" Hmmm....
Given the term, "headlight spread pattern analysis," there are four distinct elements - "headlamps," "the diffusion of light," "pattern matching," and a methodology for "analysis." Each of these would need to handled separately before adding the next element - the recording of this diffusion of light within a scene.
Let's just do a bit of research on the types of headlamps available to the general commercial market, leaving the other three elements for later.
Our first discovery is that we must separate the "lamp" from the "bulb." The bulb provides the "light" and the "lamp" is a system for the projection of that light.
For the lamp's housing, there are two general types: "reflector" and "projector." Of the light sources ("bulb"), there are several available types: Tungsten, Tungsten-halogen, High-intensity discharge (HID), LED, Laser. Of the "filament" type lamps, there are over 35 types available in for sale in the US, and covered by the World Forum for Harmonization of Vehicle Regulations (ECE Regulations), which develops and maintains international-consensus regulations on light sources acceptable for use in lamps on vehicles and trailers type-approved for use in countries that recognise the UN Regulations.
Given the eventual experimental design, it's important to note that the US and Canada "self-certify" compliance with the ECE Regulations. No prior verification is required by a governmental agency or authorised testing entity before the equipment can be imported, sold, installed, or used.
For a bulb's operation, there are variables to consider. There's voltage (usually 12V) and wattage (between 20w - 75w) - collectively known as "Nominal Power." Then there's "luminous flux." In photometry, luminous flux or luminous power is the measure of the perceived power of light. It differs from radiant flux, the measure of the total power of electromagnetic radiation (including infrared, ultraviolet, and visible light), in that luminous flux is adjusted to reflect the varying sensitivity of the human eye to different wavelengths of light.
Lots of big words there. But two stand out - luminous flux (the measure of the perceived power of light) and radiant flux (the measure of the total power of electromagnetic radiation). For our experiment, we'll need to differentiate between these as someone / some people are going to compare patterns (perception is subjective). We'll also need an objective measure of the total power of our samples. Luminous flux is used in the standard as the point of headlamps is to improve the drivers perception of the scene in front of them as they drive.
Luminous flux is measured in lumens. On our list of bulbs, the luminous flux values are reported as being between 800lm and 1750lm with a tolerance of between +/-10% and +/15%. This makes the range between 680lm and 2012.5lm. It's important to remember that the performance of a bulb over it's life span is not binary (e.g. 1550lm constantly until is stops working). Performance of lamps degrade over time.
Back to the lamp as a system. There are the general types of fixed lamps - they're bolted on to the front of the vehicle by at least four fasteners. These types need to be "aimed" at the time of installation, which can shift over time as the fasteners loosen. There are also "automatic" lamps, which feature some form of "beam aim control." These "beam aim control" types include, headlamp leveling systems, directional headlamps, advanced front-lighting system (AFS), automatic beam switching, Intelligent Light System, adaptive highbeam, and glare-free high beam and pixel light.
Now in the cases that I've reviewed, it seems that "headlight spread pattern analysis" was employed when a proper vehicle make / model determination failed due to a lack of available detail - usually due to a low nominal resolution.
Given what I've just shared above, about the potential variables in our study, an important revelation emerges. If there is insufficient nominal resolution to conduct a vehicle make / model determination, which considers class characteristics like presence / quantity of features like doors and windows before considering the presence / quantity / type of features within those items, then how could there be a determination as to type of lamp system and bulb that would be necessary for any comparison of headlight spread pattern? What if there's a general match of the shape of the pattern, but the quality of light is wrong? Or, what if the recorder's recording process and compression scheme corrupt the shape of the light dispersal or change the quality of the light? How then is a "scientific" comparison possible?
Short answer - it's not. This is one of the ways in which "forensics" (rhetoric) is used to mask a lack of science in "forensic science."
But, let's take a look at that question in a different way. Given all of the variables listed above, what would a normal distribution of "headlight spread patterns" "look like" (observed without recoding) for each of the possible combinations of system, bulb, and mounted position? What would they look like after being recorded on a DVR? This adds more variables to the equation.
For the recording system, there's the camera / lens combination, there's the transmission method, and there's the recorder's frame rate and compression scheme to contend with. Sure, you have the evidence item. But you don't know if the system was operating "normally" during that recording, or what "normal" even is until you produce a performance model of the system's operation in the recording of everything listed above. You'll need the "ground truth" of the recorder's capabilities in order to perform a proper experiment.
Remember, the recording may be "known" - meaning you retrieved it from the system and controlled it's custody such that the integrity of the file is not in question. But, what is unknown is the make / model of the vehicle. THIS CAN'T BE PRESUPPOSED. IT MUST BE DETERMINED.
In the cases that I reviewed, each comparison was performed against a presupposed make / model of vehicle - the "suspect's vehicle." If convenience samples were employed for a "comparison," then it was a few handy cars of the same make / model / year as the accused's vehicle. THIS IS NOT A VEHICLE DETERMINATION. This is no different than a single-person line-up, or a "show-up." This method has no relationship with science.
Back to the literature review and how it may inform a future experimental design.
What I've discovered is that the quantity of variables is quite large. Actually, the quantity of system types, then the variables within those systems, is quite large. This is before considering how these will be recorded by a given recorder. This information would be required to validate case work, aka a CASE STUDY. A case study is only applicable to that one case. If one wanted to validate the technique, then an appropriate amount of recorders would need to be included (proper samples of complete system types).
Given all of this, the cost of a single case study would be beyond the budget of most investigative agencies. It's certainly beyond my budget. The cost of testing the questions, "headlight spread pattern analysis has no validity" (H null) and "headlight spread pattern analysis has validity" (H1) would be massive.
Nevertheless, given all of the above, to conclude "match" - it is "the accused's vehicle" - one must rule out all other potential vehicles. Given that estimates put the number of cars and trucks in the United States at between 250-260 million vehicles for a country with 318 million people, then "match" says "to the exclusion of between 250-260 million vehicles" - which doesn't include the random Canadian or Mexican who drove their car / truck across the border to go shopping at Target. Because of this, "analysts" usually equivocate and use terms like "consistent with" or "can't include / exclude." Which, again, is rhetoric - not science.
I received some feedback about the few posts I've written regarding "headlight spread pattern analysis." One was very intriguing - "... assume the premise is true, that there is uniqueness that can be discovered through experimentation. Where would you begin? What would the experimental design look like?" Hmmm....
Given the term, "headlight spread pattern analysis," there are four distinct elements - "headlamps," "the diffusion of light," "pattern matching," and a methodology for "analysis." Each of these would need to handled separately before adding the next element - the recording of this diffusion of light within a scene.
Let's just do a bit of research on the types of headlamps available to the general commercial market, leaving the other three elements for later.
Our first discovery is that we must separate the "lamp" from the "bulb." The bulb provides the "light" and the "lamp" is a system for the projection of that light.
For the lamp's housing, there are two general types: "reflector" and "projector." Of the light sources ("bulb"), there are several available types: Tungsten, Tungsten-halogen, High-intensity discharge (HID), LED, Laser. Of the "filament" type lamps, there are over 35 types available in for sale in the US, and covered by the World Forum for Harmonization of Vehicle Regulations (ECE Regulations), which develops and maintains international-consensus regulations on light sources acceptable for use in lamps on vehicles and trailers type-approved for use in countries that recognise the UN Regulations.
Given the eventual experimental design, it's important to note that the US and Canada "self-certify" compliance with the ECE Regulations. No prior verification is required by a governmental agency or authorised testing entity before the equipment can be imported, sold, installed, or used.
For a bulb's operation, there are variables to consider. There's voltage (usually 12V) and wattage (between 20w - 75w) - collectively known as "Nominal Power." Then there's "luminous flux." In photometry, luminous flux or luminous power is the measure of the perceived power of light. It differs from radiant flux, the measure of the total power of electromagnetic radiation (including infrared, ultraviolet, and visible light), in that luminous flux is adjusted to reflect the varying sensitivity of the human eye to different wavelengths of light.
Lots of big words there. But two stand out - luminous flux (the measure of the perceived power of light) and radiant flux (the measure of the total power of electromagnetic radiation). For our experiment, we'll need to differentiate between these as someone / some people are going to compare patterns (perception is subjective). We'll also need an objective measure of the total power of our samples. Luminous flux is used in the standard as the point of headlamps is to improve the drivers perception of the scene in front of them as they drive.
Luminous flux is measured in lumens. On our list of bulbs, the luminous flux values are reported as being between 800lm and 1750lm with a tolerance of between +/-10% and +/15%. This makes the range between 680lm and 2012.5lm. It's important to remember that the performance of a bulb over it's life span is not binary (e.g. 1550lm constantly until is stops working). Performance of lamps degrade over time.
Back to the lamp as a system. There are the general types of fixed lamps - they're bolted on to the front of the vehicle by at least four fasteners. These types need to be "aimed" at the time of installation, which can shift over time as the fasteners loosen. There are also "automatic" lamps, which feature some form of "beam aim control." These "beam aim control" types include, headlamp leveling systems, directional headlamps, advanced front-lighting system (AFS), automatic beam switching, Intelligent Light System, adaptive highbeam, and glare-free high beam and pixel light.
Now in the cases that I've reviewed, it seems that "headlight spread pattern analysis" was employed when a proper vehicle make / model determination failed due to a lack of available detail - usually due to a low nominal resolution.
Given what I've just shared above, about the potential variables in our study, an important revelation emerges. If there is insufficient nominal resolution to conduct a vehicle make / model determination, which considers class characteristics like presence / quantity of features like doors and windows before considering the presence / quantity / type of features within those items, then how could there be a determination as to type of lamp system and bulb that would be necessary for any comparison of headlight spread pattern? What if there's a general match of the shape of the pattern, but the quality of light is wrong? Or, what if the recorder's recording process and compression scheme corrupt the shape of the light dispersal or change the quality of the light? How then is a "scientific" comparison possible?
Short answer - it's not. This is one of the ways in which "forensics" (rhetoric) is used to mask a lack of science in "forensic science."
But, let's take a look at that question in a different way. Given all of the variables listed above, what would a normal distribution of "headlight spread patterns" "look like" (observed without recoding) for each of the possible combinations of system, bulb, and mounted position? What would they look like after being recorded on a DVR? This adds more variables to the equation.
For the recording system, there's the camera / lens combination, there's the transmission method, and there's the recorder's frame rate and compression scheme to contend with. Sure, you have the evidence item. But you don't know if the system was operating "normally" during that recording, or what "normal" even is until you produce a performance model of the system's operation in the recording of everything listed above. You'll need the "ground truth" of the recorder's capabilities in order to perform a proper experiment.
Remember, the recording may be "known" - meaning you retrieved it from the system and controlled it's custody such that the integrity of the file is not in question. But, what is unknown is the make / model of the vehicle. THIS CAN'T BE PRESUPPOSED. IT MUST BE DETERMINED.
In the cases that I reviewed, each comparison was performed against a presupposed make / model of vehicle - the "suspect's vehicle." If convenience samples were employed for a "comparison," then it was a few handy cars of the same make / model / year as the accused's vehicle. THIS IS NOT A VEHICLE DETERMINATION. This is no different than a single-person line-up, or a "show-up." This method has no relationship with science.
Back to the literature review and how it may inform a future experimental design.
What I've discovered is that the quantity of variables is quite large. Actually, the quantity of system types, then the variables within those systems, is quite large. This is before considering how these will be recorded by a given recorder. This information would be required to validate case work, aka a CASE STUDY. A case study is only applicable to that one case. If one wanted to validate the technique, then an appropriate amount of recorders would need to be included (proper samples of complete system types).
Given all of this, the cost of a single case study would be beyond the budget of most investigative agencies. It's certainly beyond my budget. The cost of testing the questions, "headlight spread pattern analysis has no validity" (H null) and "headlight spread pattern analysis has validity" (H1) would be massive.
Nevertheless, given all of the above, to conclude "match" - it is "the accused's vehicle" - one must rule out all other potential vehicles. Given that estimates put the number of cars and trucks in the United States at between 250-260 million vehicles for a country with 318 million people, then "match" says "to the exclusion of between 250-260 million vehicles" - which doesn't include the random Canadian or Mexican who drove their car / truck across the border to go shopping at Target. Because of this, "analysts" usually equivocate and use terms like "consistent with" or "can't include / exclude." Which, again, is rhetoric - not science.
Tuesday, September 2, 2008
Variables part 4 - define the variables
Thanks for the patience over the long holiday weekend. Let's take a look at where we are with this project, creating data-driven graphics.
When documents that share common elements, such as wanted posters, the usual way of doing things is to design a document in Word or PowerPoint, make duplicates of it, and manually edit the text information and images for each suspect or person of interest. With Photoshop, there’s an automatic way to generate files that use the same layout but have different images and text. How? Variables, or place holders in the file that maintain position but contain contents that will be swapped out automatically by Photoshop. If you've ever done a mail merge in MS Word, you can do this in Photoshop.
So what do we need? We need a template, the variables, and a data set. Last week, we designed the template in Photoshop using layers that contained text and graphics. Now we'll look at defining the variables.
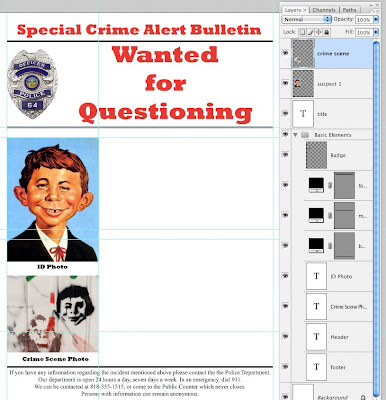
In an external file, we'll want to set up a data set of text and graphics that uses the names that correspond to the variables that we create. Most of the data that we are working with is already contained within spread sheets - and this data can easily be exported to text files for Photoshop's use.
Look at the template that we've created. I've grouped the elements that won't changed into a folder. Those items that will change are on top, the suspect photo, title, and crime scene photo.
Now, we're up to date.
Let's define the variables. A layer can contain any of three types of variables.
- Visibility. This is an on/off option. Is it visible or not?
- Pixel Replacement. This option replaces a layer with an image. Perfect for suspect or crime scene images that will change from poster to poster.
- Text Replacement. Names and other personal information will be changed. So will titles, from time to time.
In our poster, we have three variables, the suspect photo, the crime scene photo, and the title text. You may have more or less, but three is an easy number to work with.
To define each variable, click on Image>Variables>Define. Within the dialog box, select the layer that will be assigned a variable. Under the Variable Type, click on the check box for the appropriate variable and name it - or select an existing variable. If you are swapping pictures and check the Pixel Replacement box, you'll want to specify how images of different sizes should fit on the layer. The Method drop-down box specifies a resizing method. It's best to resize your images ahead of time. Then, in this box, pull down to As-Is. Resizing all of your images also saves you from the unpredictability of the Alignment and Clip to Bounding Box options. Click Next to assign another variable. When you are done, you can click OK.
Next, we'll look at creating the data-set.
Tuesday, October 9, 2007
Adobe Camera Raw 4.2
Adobe Camera Raw was recently updated. Did you miss it. If you don't have your system set up for automatic updates: click here.
Here is a look at what's included. They've added support for a bunch of Leaf and Phase One products.
Enjoy!
Thursday, May 25, 2017
FFT for video - yes, video
Eliminating repeating pattern noise from images has been a pain for forensic analysts for quite some time. There are tons of freeware apps and plug-ins ranging in price from inexpensive to cost prohibitive Some of their limitations include: they only work on images, their reliability is spotty, you must document your work without quite knowing how the tool is doing what it's doing.
Imagine having to account for the frequency spikes in each frame of video. This has been the barrier to using FFT tools to fix noise in video. Until now ...
Enter Amped FIVE (Axon Five*). FFT has been a part of the tool set for quite some time. Last year, we added Automatic Selection functionality. Auto Selection Mode, automatically identifies frequencies to remove without user intervention. What's the big deal? VIDEO!!!
Check out the video below to see FFT with Auto Selection Mode in action.
For the most part, it's a one-click fix.
As folks buy cheap CCTV systems meant for an indoor installation and place the cameras and cables outside (in the weather), the components degrade, corrode, and create all sorts of problems for the vide signal. With our tools, including FFT with Auto Selection, you can restore the video accurately. Then, when finished, you'll find that our reporting functionality has kept track of your activities. Just generate the report. The ease of use of our reporting tool is second to none.
*The Axon Forensic Suite tools are powered by Amped Software technologies.
Imagine having to account for the frequency spikes in each frame of video. This has been the barrier to using FFT tools to fix noise in video. Until now ...
Enter Amped FIVE (Axon Five*). FFT has been a part of the tool set for quite some time. Last year, we added Automatic Selection functionality. Auto Selection Mode, automatically identifies frequencies to remove without user intervention. What's the big deal? VIDEO!!!
Check out the video below to see FFT with Auto Selection Mode in action.
For the most part, it's a one-click fix.
As folks buy cheap CCTV systems meant for an indoor installation and place the cameras and cables outside (in the weather), the components degrade, corrode, and create all sorts of problems for the vide signal. With our tools, including FFT with Auto Selection, you can restore the video accurately. Then, when finished, you'll find that our reporting functionality has kept track of your activities. Just generate the report. The ease of use of our reporting tool is second to none.
*The Axon Forensic Suite tools are powered by Amped Software technologies.
Wednesday, September 3, 2008
Variables part 5 - the data set

- Click on the Create New Data Set button. Then, enter a name for your data set.
- In the Variables section, choose a variable from the Name pull-down.
- For Value, check the Select File button and locate the appropriate image file that goes with this variable. Repeat this step for each variable on the list.
- Click Apply.
To create an external data set, use a spreadsheet or database to store all of your information.

Create a unique file for each data set. In this example, I've used Excel 2008 for Mac. Remember that the image path names must be logical for your platform. In my example, I'm using a Mac. But Windows users will have something like C://. The first line in the spreadsheet should match your variable names. When you have your data, export it as a tab/comma delimited text file.
From the Variables dialog box, just click on Data Sets and select Import (make sure that the Preview box is checked). The Import Data Set dialog box comes up and presents more options. Select your file and leave Encoding set to Automatic. Check Use First Column for Data Set Names and Replace Existing Data Sets ... then click OK.
In the final installment, we'll put this all together and generate our images.
Until then, enjoy.
Tuesday, October 8, 2019
Mind the Communication Gap

As most in government service know, often the ability to spend money on tools and training happens within a short window of time. Such a window had opened for this person and they reached out to a company in response to a bit of marketing on new redaction functionality in a particular piece of software.
In the email that was shared with me, the requestor made it clear that they wanted to redact footage from body worn cameras. A trial code was shared for the company's tool. The requestor eagerly downloaded and installed the software, then assembled his supervisors and stakeholders to evaluate the new software. That's when the problems began.
Redacting the visual information was relatively straight forward, but cumbersome. However, he couldn't figure out how to redact the audio portion of the file. He reached out to the company's rep. Unfortunately, it was late on Friday in California. He received no reply from the company's rep, who'd likely gone home for the weekend. Thus, having previously communicated with me on technology issues, he reached out hoping that I'd still be around.
I let him know that to the best of my knowledge, none of Amped SRL's products redact audio. Yes, they'd promised audio redaction in FIVE at the 2016 LEVA conference. But, it's never materialized. As it's not been developed, it's quite likely that there is no audio redaction functionality in Replay.
He received a note from the sales rep on Monday. It informed him that the redaction functionality was built around a CCTV use case, and as such, did not concern itself with audio. The order taker that responded to the inquiry could have saved the requestor a ton of time and stress by simply reading the request - redaction of BWC footage - adding a helpful disclaimer in the reply that the tech doesn't redact audio.
Redaction remains a huge issue in California. Agencies are looking for a quick fix, but no easy solutions have presented themselves. The marketing from Amped seemed to provide a glimmer of hope to the requestor. But those hopes were dashed when the advice from the order taker, three days late, was that there is no single redaction solution - which isn't entirely true.
As I informed the requestor on Friday evening, the Adobe Creative Suite has all the necessary tools to perform a standards-compliant redaction for California's new laws. The automatic tracking in PremierePro is the best currently available. Plus, at $52.99/month, the cost savings is substantial vs. FIVE or Replay.
Given that the requestor had until 1700 PDT to spend the allocated funds, not receiving a reply until the following Monday was not an option. Thankfully, I was able to answer his questions and get him on the right path. Next stop for him is my redaction class, featuring the Adobe tools (link).
Have a great day friends.
Sunday, July 12, 2009
Soundbooth CS4 for interview rooms
Suspects mumble and whisper. People sit too far from the hidden microphone. There are all sorts of reasons why interview room audio can need cleaning up. So ... here's a Sunday bonus ... a Soundbooth CS4 tip for quickly fixing interview room audio.
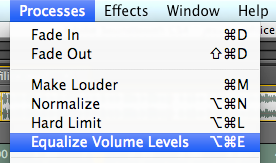
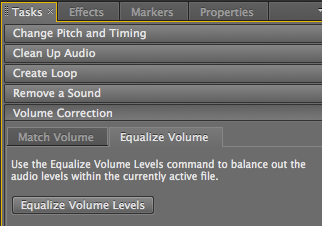
Equalize Volume Levels is a new feature in Soundbooth. With it, you fix these troublesome recordings automatically.
As you can see, you can access this feature from the Process menu or from the Volume Correction task panel.
And ... surprise ... it's automatic and it works fairly well. Try this function first, before you spend hours on manual adjustments in Audition.
According to Sven Duwenhorst from Adobe, "Equalize Volume Levels is different from normalizing an audio file. Normalizing will increase the amplification of the entire audio clip based on the highest peak value in the clip. In contrast, Equalize Volume calculates a reference volume level and amplifies or lowers the signal over the time to maintain this reference level throughout. This is similar to what happens when you use a compressor/limiter.
The Volume Correction task in Soundbooth CS4 also includes Match Volume, which adjusts volume levels across multiples audio files."
The Volume Correction task in Soundbooth CS4 also includes Match Volume, which adjusts volume levels across multiples audio files."
If I didn't know better, I'd say that the folks at Adobe wrote Soundbooth for law enforcement. Lots of "easy buttons" and one button fixes ...
Friday, December 31, 2010
Electronic Discovery Just Keeps Getting More Complex
From Ex Forensis' Larry Daniel: "I have this application that I use and it is awesome. DropBox. DropBox is a cloud based (Internet) application that allows me and my team to share documents and access them virtually from anywhere. I can review and edit these documents on my desktop, my laptop, my iPad, and review them on my Android phone. Talk about convenience.
What is so cool about the application is that it also provides automatic online backup of the documents and keeps a revision history so you can “go back” to a previous version of a document. It even keeps deleted documents, just in case you didn’t really mean to delete that oh so important Word document.
So why write about this on a digital forensics blog? Applications like Dropbox are the future of distributed file sharing. There are quite a few applications that serve the same or similar purpose such as Google Docs, Windows Live Skydrive and Apple’s Mobile Me.
What’s interesting about these applications is the potential to hold discoverable electronic evidence.
The basic approach to ESI (Electronically Stored Information) cases is to follow the who, what, where and how of potential evidence.
Who are you trying to find out information about, or who owned, modified, deleted or created a document or email.
What are you looking for? This part is pretty well defined; Email, Documents, Spreadsheets and so forth.
Where might this evidence be stored? This is what is getting more complicated with more storage options gaining ground in the marketplace.
How do you get the evidence? In the old days, that was the simplest of questions; either from the computer hard drive or a floppy disk. You would get access to the computer in question and do the evidence collection.
These days, the interrogatories for building a discovery motion needs to include the possibility of cloud storage applications like these.
Companies should also bear in mind that since these applications sync file to multiple devices, and an employee now has a copy of the files and can access them from their home computer as well as their office computer or company laptop.
When you look at obtaining electronic discovery, one of the approaches now must be: Does the custodian of interest have access to or participate in on-line shared storage options beyond SharePoint server or a company file share. If the company is using an on-line backup service in the cloud, will documents be available there that are not on the local computers and servers?
The beauty of applications like Dropbox is the audit trail that is automatically created when documents are modified or deleted from Dropbox ..."
Click here to finish reading this valuable article.
Enjoy.
What is so cool about the application is that it also provides automatic online backup of the documents and keeps a revision history so you can “go back” to a previous version of a document. It even keeps deleted documents, just in case you didn’t really mean to delete that oh so important Word document.
So why write about this on a digital forensics blog? Applications like Dropbox are the future of distributed file sharing. There are quite a few applications that serve the same or similar purpose such as Google Docs, Windows Live Skydrive and Apple’s Mobile Me.
What’s interesting about these applications is the potential to hold discoverable electronic evidence.
The basic approach to ESI (Electronically Stored Information) cases is to follow the who, what, where and how of potential evidence.
Who are you trying to find out information about, or who owned, modified, deleted or created a document or email.
What are you looking for? This part is pretty well defined; Email, Documents, Spreadsheets and so forth.
Where might this evidence be stored? This is what is getting more complicated with more storage options gaining ground in the marketplace.
How do you get the evidence? In the old days, that was the simplest of questions; either from the computer hard drive or a floppy disk. You would get access to the computer in question and do the evidence collection.
These days, the interrogatories for building a discovery motion needs to include the possibility of cloud storage applications like these.
Companies should also bear in mind that since these applications sync file to multiple devices, and an employee now has a copy of the files and can access them from their home computer as well as their office computer or company laptop.
When you look at obtaining electronic discovery, one of the approaches now must be: Does the custodian of interest have access to or participate in on-line shared storage options beyond SharePoint server or a company file share. If the company is using an on-line backup service in the cloud, will documents be available there that are not on the local computers and servers?
The beauty of applications like Dropbox is the audit trail that is automatically created when documents are modified or deleted from Dropbox ..."
Click here to finish reading this valuable article.
Enjoy.
Friday, March 7, 2014
Send images from Amped FIVE to Word and PowerPoint
This just in from the folks at Amped Software:
"We just released an update to FIVE with a lot of improvements, bug corrections and customer requested features.
Despite FIVE having very advanced and automated reporting capabilities, it’s undeniable that most of us use very often Word, PowerPoint and other programs to show our results to courts, customers and colleagues. They could be simple investigative reports or some tutorials for explaining how to work with images and video.
I do it daily and I was sick of saving pictures and importing them in other various applications, so we added a very convenient way to interact with third party programs.
In the latest version of Amped FIVE (release 5989), if you right click on the Save Snapshot button in the Player Panel of FIVE you will have access to new settings for the Save Snapshot button.
These are the available options:
The last selection is kept in memory so the next time you simply click the button Save Snapshot it will be reapplied.
Imagine how useful it is the combination of these features: you can show and explain step by step in a document or presentation, all the operations done with FIVE."
It's amazing to have a company respond to suggestions by implementing changes in such a speedy fashion. For those agencies with pre-made report templates in MS Word, or who use MS PowerPoint extensively, this is a huge time saver.
"We just released an update to FIVE with a lot of improvements, bug corrections and customer requested features.
Despite FIVE having very advanced and automated reporting capabilities, it’s undeniable that most of us use very often Word, PowerPoint and other programs to show our results to courts, customers and colleagues. They could be simple investigative reports or some tutorials for explaining how to work with images and video.
I do it daily and I was sick of saving pictures and importing them in other various applications, so we added a very convenient way to interact with third party programs.
In the latest version of Amped FIVE (release 5989), if you right click on the Save Snapshot button in the Player Panel of FIVE you will have access to new settings for the Save Snapshot button.
These are the available options:
- Save Image (Automatic Filename): the displayed image is saved in the default path, along with the current project file needed to recreate the image from scratch.
- Save Image (Selected By The User): like above, but the user can select the filename and folder of the file.
- Send Image To Clipboard: the displayed image is copied to the system clipboard to be pasted in other applications.
- Send Image To Word: the displayed image is copied in the currently opened Word document.
- Send Image to PowerPoint: the displayed image is copied in the currently opened PowerPoint document.
- Current Image: saves the currently displayed image alone.
- Current Window: saves the full Amped FIVE interface.
- Full Screen: saves the whole screen.
The last selection is kept in memory so the next time you simply click the button Save Snapshot it will be reapplied.
Imagine how useful it is the combination of these features: you can show and explain step by step in a document or presentation, all the operations done with FIVE."
It's amazing to have a company respond to suggestions by implementing changes in such a speedy fashion. For those agencies with pre-made report templates in MS Word, or who use MS PowerPoint extensively, this is a huge time saver.
Thursday, July 3, 2008
CS4 Public Beta downloads
Adobe Labs has public beta versions of Dreamweaver, Fireworks, and Soundbooth CS4.
If you haven't used Soundbooth, it's a great tool for cleaning up body wire audio files - a minimal amount of controls with a maximum amount of functionality. New to Soundbooth CS4 is non-destructive audio editing, automatic volume matching, and speech to text functionality.
Check them out - they're FREE.
Tuesday, April 23, 2013
Blurring faces in Amped Five
Here's some good news from Amped Software about blurring faces in video: "Usually the main task put in front of the forensic video analyst is to process a video or image in order to make the details like a car, face, or other fine details more visible. Since cross-disciplined tasks are becoming much more common, we see that the request can also go in the opposite direction, and the expert is asked to hide sensitive details from the video. In order to preserve the privacy of people not involved in the case, it is often needed to mask faces or license plates from videos which will be shown in courts or given to the media.
Since having this type of capability can lend some additional utility to our customers, we included tools in Amped Five to achieve this result with the filter “Hide Selection”. Since just pixilation does not work for all applications, we have given the user the flexibility to selectively darken, blur or pixelate an area of the image. The area can be static, or can follow a subject of interest along the whole video or just parts of it; as this tool works with our other tools to provide the results needed.
The tracking of the area, person, or object can be done both automatically and manually. While the automatic approach is very effective on simple object such as license plate, often for people and faces it is necessary to use the manual approach which allows a better customization of tracking and ensures accurate results that won’t compromise the privacy or sensitivity of the obscured area.
Even in our manual mode, the process is very quick and effective, as the user just needs to set the area of interest only on some frames where the motion or the subjects has a higher rate of change. The software will automatically calculate intermediate positions on the other frames.
Click here for a quick video that show how easy is to accomplish the desired task of hiding the face of a suspicious subject from a surveillance video."
This is yet another reason to love Amped FIVE. How many more do you need?! :)
Since having this type of capability can lend some additional utility to our customers, we included tools in Amped Five to achieve this result with the filter “Hide Selection”. Since just pixilation does not work for all applications, we have given the user the flexibility to selectively darken, blur or pixelate an area of the image. The area can be static, or can follow a subject of interest along the whole video or just parts of it; as this tool works with our other tools to provide the results needed.
The tracking of the area, person, or object can be done both automatically and manually. While the automatic approach is very effective on simple object such as license plate, often for people and faces it is necessary to use the manual approach which allows a better customization of tracking and ensures accurate results that won’t compromise the privacy or sensitivity of the obscured area.
Even in our manual mode, the process is very quick and effective, as the user just needs to set the area of interest only on some frames where the motion or the subjects has a higher rate of change. The software will automatically calculate intermediate positions on the other frames.
Click here for a quick video that show how easy is to accomplish the desired task of hiding the face of a suspicious subject from a surveillance video."
This is yet another reason to love Amped FIVE. How many more do you need?! :)
Monday, June 4, 2012
more to like about AmpedFive
The more I work with AmpedFive, the more I like it. One of the cool features, especially for those in a Frye state, is the reporting feature.
AmpedFive's automatic report generation feature includes the sequence of all operations applied to all files, the used parameters and a detailed description of their usage and implementation. It also has links to the relevant science behind the operations. How cool is that?
AmpedFive Professional is the perfect addition to your tool kit. It's purpose built for the forensic analysis of video and images. Check out a demo today. I think that you'll like it.
Enjoy.
AmpedFive's automatic report generation feature includes the sequence of all operations applied to all files, the used parameters and a detailed description of their usage and implementation. It also has links to the relevant science behind the operations. How cool is that?
AmpedFive Professional is the perfect addition to your tool kit. It's purpose built for the forensic analysis of video and images. Check out a demo today. I think that you'll like it.
Enjoy.
Thursday, December 26, 2013
Academic sources for authentication of digital images
For folks needing references for their authentication work, here's a short list (in no particular order):
- E. Kee, M.K. Johnson and H. Farid, "Digital image authentication from JPEG headers", IEEE Transactions on Information Forensics and Security, vol. 6, pp. 1066-1075, 2011.
- J. Kornblum, "Using JPEG quantization tables to identify imagery processed by software", Digital Investigation, vol. 5, pp. S21–S25, 2008.
- CCITT Recommendation T.81, ISO/IEC 10918-1:1994, "Information technology - Digital compression and coding of continuous-tone still images: Requirements and guidelines ", 1992.
- Z. Lin, J. He, X. Tang, Chi K. Tang "Fast, automatic and fine-grained tampered JPEG image detection via DCT coefficient analysis", Journal Pattern Recognition, Vol. 42, pp. 2492-2501, 2009.
- Alin C. Popescu and H. Farid, "Statistical tools for digital forensics", Lecture Notes in Computer Science, vol. 3200, pp 128-147, 2005.
- H. Farid, "Exposing digital forgeries from JPEG ghosts", IEEE Transactions on Information Forensics and Security, vol. 4, pp. 154-160, 2009.
- M.C. Stamm and K.J.R. Liu, "Forensic Detection of Image Tampering Using Intrinsic Statistical Fingerprints in Histograms", IEEE Transactions on Information Forensics and Security, vol. 5, pp. 492-506, 2010.
- J. Lukas, J. Fridrich and M. Goljan, "Digital Camera Identification from Sensor Noise ", IEEE Transactions on Information Security and Forensics, pp. 205-214, 2006.
- Mo Chen, J. Fridrich and M. Goljan , "Digital Imaging Sensor Identification (Further Study)", Proceedings. of SPIE Electronic Imaging, Security, Steganography and Watermarking of Multimedia Contents, pp. 0P-0Q, 2007.
- W. Wang, J. Dong and T. Tan, "Tampered Region Localization of Digital Color Images Based on JPEG Compression Noise", Proceedings of the 9th International Conference on Digital watermarking, pp. 120-133, 2010.
- R. Gonzalez and R. Woods, "Digital Image Processing (3rd ed.)", Prentice Hall, pp. 165–168, 2008.
- M. Kirchner and T. Gloe, "On Resampling Detection in Re-compressed Images". IEEE Workshop on Information Forensics and Security, pp. 21-25, 2009.
Wednesday, June 18, 2008
rgb to cmyk - part 3

You will have the most control over the output of your images if you handle the conversion of your own images from RGB to CMYK. Many print houses will perform a "standard value conversion." In other words, their staff will open up the files and convert them to CMYK without any thought of preserving colours as you would like them. It's not a personal thing. They simply don't have the time to handle each file with the care it deserves. That's why it's best if you handle it yourself.
Remember from the earlier post that there are colours available in the RGB gamut that are simply not possible in CMYK. Select the Colour Picker (eyedropper) and check the colours in your image. Pay attention to the greens and the blues. Notice the gamut warnings (above image).
Take a look at what you would consider "blue." 100% blue in RGB would translate into a purple blue with the automatic conversion. For spot colours, or solid inks, you'd want to change the values to C=100, M=65, Y=0, K=0 to get a nice looking blue. But what about your images?
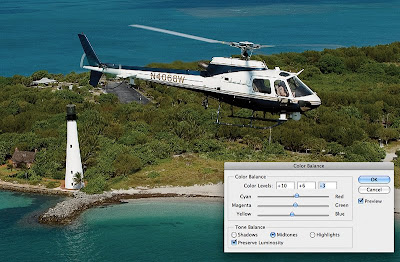
Remember that blues and greens will give you the most trouble. Select View>Gamut Warning to see just what parts of your image will need special treatment. Next, take a look at what your image will look like by selecting View>Proof Setup>Custom. Check the box to Simulate Paper Color. You'll get the device information from your print provider. For now, try choosing between US Web coated and uncoated - and US Sheet fed coated and uncoated. Now toggle the Preview button on and off. What do you see? Are you happy with the results?
Thankfully, a Color Balance adjustment layer can help restore your image's colours. I realise that it'll be a bit tricky colour balancing a CMYK image in the RGB monitor space - whilst aiming for a target that you are not quite sure about. Use your best judgement and don't over do it. Subtle shifts are corrected with subtle adjustments. Do your best and always ask for a "match print" or an accurate printer proof.
Subscribe to:
Posts (Atom)