Featured Post

Welcome to the Forensic Multimedia Analysis blog (formerly the Forensic Photoshop blog). With the latest developments in the analysis of m...

Showing posts with label curves. Show all posts

Thursday, July 17, 2008

Unwanted Colour Shifts


Sometimes, the changes that we make to light introduce unwanted colour shifts. This week at NATIA, we looked at a simple way to stop this from happening using blending modes.


Finding and setting the black and white points on this image proved to be a little challenging. But, we found values that worked using a Threshold adjustment layer. We cancelled the adjustment once we set our points (using the Shift key).


A Curves adjustment was easy once our Black and White points were chosen in the image and the values were set in the dialog box. With this image, there is a bit of a hazy cast that we wanted to get rid of. But, once we set our values - the colours shifted. Not wanting this effect, we needed a way to just affect the light (tone).


We set our blending mode to Luminosity, thus limiting our changes to the tonality of the image and leaving colour unchanged. With that, the haze was gone.


Tuesday, May 27, 2008

quick fix with self blends


One of the things that photography students are taught is to correctly light the subject matter, thus saving time later by not having to fix the shot in Photoshop. But, when you are not the photographer ... what do you do?

Forensic Photography classes are becoming more popular these days. Proper placement and choice of light sources is a key topic within these classes. But what do you do if you aren't the photographer and you received images that need some work? Is there a quick way to bring out the detail in this image and reveal the tyre track? Of course there is ...

With the Forensic Photoshop workflow as your guide, begin working this image as any other, addressing focus and any global colour issues. Then address the local colours to bring out the detail of the tracks.

In this case, a Color Burn self blend can be employed to drive up contrast. Remember, Color Burn lightens the whites and darkens the blacks. Follow this up with a Curves adjustment to fine-tune this contrast enhancement and the details really jump off of the screen.


In just a few seconds of work, you'll have brought out the details in this image. And, you can save the results of the Curves adjustment for use in any other images that may have come with this one ... speeding up your work even more.

Thursday, April 17, 2008

Auto Adjustments

I've had a few e-mails asking about using Auto Levels in an adjustment layer. I tend to stay away from the "automatic" adjustments in Photoshop. If you want to use Auto Levels, here's what you need to know.

Image>Adjustments>Auto Levels - Auto Levels expands the tonal range (and contrast) by simply "commanding that the darkest pixels shall be black and the lightest ones shall be white." The intermediate pixels are spread over the range in between. There is a slight clipping with the default settings, the first 0.10% of either extreme.

Colour casts can sometimes be corrected with Auto Levels, if the cast is a result of the way brightness values are distributed amongst the channels. The correction takes into account the histograms of the individual channels.

This leads to one of the problems in using Auto Levels. It can create an unwanted shift in colours. If you want to use Auto Levels (Layer>New Adjustment Layer>Levels), change the Blending Mode of the adjustment layer to Luminosity to cancel out the colour shift (if any shift occurs). Conversely, if you want the colour correction without affecting tone, change the Blending Mode of the adjustment layer to Color.

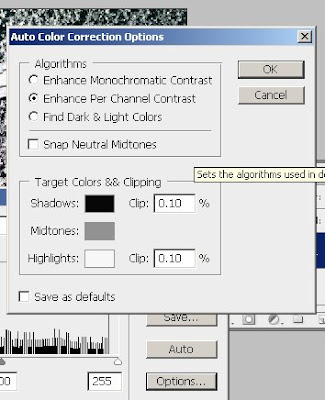
Later versions of Photoshop have opened up the ability to adjust these automatic options. In the Levels dialog box, click on Options.


The above graphic represents the default Auto Color Correction Option settings in Photoshop CS3. From top to bottom, here's what the settings mean:
  • Enhance Monochromatic Contrast clips all channels in the same fashion. Colour relationships are maintained whilst making highlights appear lighter and shadows appear darker. This is the algorithm used by the Auto Contrast command.
  • Enhance Per Channel Contrast maximizes the tonal range in each channel and thus produces a more drastic correction. As each channel is adjusted separately, this option may remove or introduce colour casts. This is the default algorithm used by the Auto Levels command.
  • Find Dark & Light Colors identifies the average lightest and darkest pixels and uses them to maximize contrast whilst minimizing clipping. This is the default algorithm used by the Auto Color command.
  • Snap Neutral Midtones finds the "average nearly neutral color" in an image and then adjusts the midtone values to make the colour neutral. This is the default algorithm used by the Auto Color command.
  • You can change the default clipping values in the Clip boxes.
  • To re-assign the target colour values to the darkest, neutral, and lightest areas of an image, click a colour swatch.
  • If you want to save these values and use them as your new defaults, check the Save as Defaults box.
A note from Adobe: "When you save the Auto Color Correction options as defaults for Auto Color, Auto Levels, and Auto Contrast, it does not matter what algorithm you select [in the Algorithms section]. The three auto-correction commands use only those values that you set for the target colors and clipping. The only exception is that the Auto Color command also uses the Snap Neutral Midtones option."

Thursday, February 14, 2008

Taking photos around town

When taking pictures outdoors, you should be conscious of the lighting sources (both direct and reflected) as well as the temperature of the light. When processing outdoor shots, don't assume that the images are colour/white balanced.


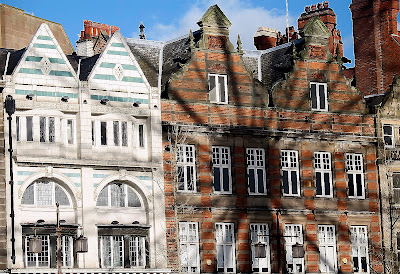
Today's shot comes from Nottingham Daily Photo, a nice little blog about life in Nottingham's city centre. This is one of my favourite photography blogs as it's shot from the hip and straight from the heart. You really get a sense of the Photographer's love for his subject matter, in this case the heart of Nottingham.

I love the effect of the shadow from the big wheel on the buildings. To further emphasize this effect, I've restored the focus to the image and made a subtle change to the white/black points using a curves adjustment layer. There are a ton of edges to work with, so I used EasySharp to handle edge sharpening. Noise wasn't an issue here; there was just a touch of noise in the sky which I removed with Noise Ninja. In less than 30 seconds, I managed to kick this image up a notch.

After the Forensic Photoshop treatment

Image analysts and retouchers have the easiest part of the process. With a shot like this, timing is everything. The hard part, the photographer's part, is lugging around the camera in hope that a shot like this will come along. Thankfully for us, he was well prepared.

Check out more daily photo sites by clicking here.

Enjoy.