Featured Post

Welcome to the Forensic Multimedia Analysis blog (formerly the Forensic Photoshop blog). With the latest developments in the analysis of m...

Wednesday, March 4, 2009

Getting colour right in the field

Getting colour right in the lab can be helped greatly by getting colour right in the field. For evidence photographers, there are several products available to help. But what about your average investigator? Surely, we can't have every officer and inspector heading out with a Gretag card in his kit. Can we? There's got to be a better way, right? There is.


Photographers have known about WhiBal cards for some time. Having a calibrated neutral gray card on hand is great. They come in a variety of sizes, and now ... small enough to fit on your keychain. Did you spot the WhiBal card in the pic above? Check out the zoomed in version below.


It's big enough to get the job done and small enough so as to not overload your kit. Take the first shot as a reference, then remove the card and shoot the rest of your shots. Load up the shots in ACR and Synchronise the settings. It's really that easy.

Here's an evidence shot from the field, taken under less than ideal circumstances. Notice the blueish tint to the white page. Also notice the presence of the WhiBal keychain.


A quick touch from the White Balance Tool (I) on that handy neutral gray card and the colours line right up. Here's what the manufacturer has to say about it, "unlike your eyes, a digital camera does not automatically see whites as white. It sees the color of the light reflected from it, hence blue-ish in Daylight and Orange-ish in incandescent lighting. By photographing a Gray Card reference for each lighting situation that you are in, you are assured of being able to achieve a proper White Balance for all of your pictures. "

The colour's temperature before using
the White Balance Tool.


The colour's temperature after correcting;
using the WhiBal keychain as the reference point.

Skip on that cup of expensive coffee for you and your mates just once and you can afford to put this on your keychain. Once purchased, you'll see the time savings add up in your work flow, helping you to be more productive.

Monday, March 2, 2009

OnLocation CS4

A hidden gem in the Adobe Creative Suite CS4 Production Premium and Master Collections is a product called OnLocation. Remember DV Rack? Adobe bought it a few years back, changed the name to OnLocation and added it to the Creative Suite. Here's why it's cool and why you'll love it.

One of the big problems with shooting video on location is running out of tape or disc space. The other problem comes afterwards, digitising all of that footage and getting it into Premiere Pro. What if these problems went away? With OnLocation CS4, they do. Here's how ...

Connect your camera to your computer via Firewire or USB2 (which ever is the supported connection). Start up OnLocation. Fine tune the colour and lighting with the handy on-screen controls. Record the video.

That's it. When you are finished recording, just identify and move the clips into Premiere Pro CS4 using the Shot List and transfer features. 

You've already purchased the Suite. Now, you've got a powerful DVR in your computer. Use if for those crucial elder abuse interviews, on-scene polygraphs, in your surveillance van ... the list is only limited by your creativity.

Big improvement: everything fits on one screen - even a laptop screen. One of my old pet-peeves about DV Rack was the fact that you couldn't fit everything into one view. They've fixed that and cleaned up the interface.

And ... the best news of all ... it's now available for Macs. (in moving from PC to Mac, this was the one product that I knew I'd miss. I'm so glad that they've made it cross platform.)

Sunday, March 1, 2009

Camera Raw tip

A reader wanted to know what he was doing wrong. He figured that he had set Bridge up wrong or something. He had heard of all of these cool presets for White Balancing in Adobe Camera Raw, but all he could find in his menu was "As Shot, Auto, and Custom."


Well, the good news is that it's not a problem with ACR or your Bridge Preferences. It's not something magical that happens when you upgrade to CS4 and ACR v5. What is at issue is one of the many reasons to shoot RAW instead of JPEG.


The "big list" of presets are only available to you when processing RAW images. Sure ACR lets you work with JPEG and Tiff images, but you'll get limited preset options on white balancing.

Remember, RAW images are unprocessed. You get to do all the work. JPEGs are processed in the camera. Why not shoot in RAW and save all of the fun for yourself?

Saturday, February 28, 2009

Shot in IR

Shot with Fuji's IR bridge camera. Easy to use, small enough, fixed 300mm lens, RAW supported in ACR 4.6+ ... and the good Lord blessed us with a gorgeous day.


With all the talk about population explosion and over crowding ... I didn't see a soul whilst on these trails in the deserts outside of Los Angeles.

Thursday, February 26, 2009

Afghanistan presents image challenges

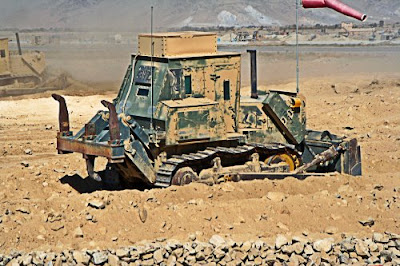
The harsh environmental conditions in Afghanistan can present challenges to the photographers tasked with documenting the efforts on the ground. Dust/sand storms and glare can get in the way - and sending you into the digital darkroom.


In this shot, there's plenty of detail information available to expand upon.


Photoshop and the Forensic Photoshop process can cut through the sand storm to reveal an incredible shot.


The same goes for the shot of our friends in the tractor kicking up a bunch of dust. With the power of Photoshop and a systematic approach, clearing up the shot is a breeze.


You even get the added bonus of detail out on the horizon. For this image, aggressive use of the Recovery and Vibrance sliders in ACR helped a lot.

To all of our troops and workers overseas, stay safe and come home soon.

Binders vs. Portfolios

I've been looking at PDF as a format for packaging and delivery for some time. I started to incorporate it a while ago and love the flexibility of the format. A question came in response to a previous post about the difference between PDF Binders and PDF Portfolios. It's actually pretty simple.

A PDF Binder: all of your native files will be converted and combined into a single PDF file. A 10 slide powerpoint, a 5 page word doc, and a 10 page PDF report would be combined into a 25 page PDF file. Navigation is through bookmarks and hyperlinks. Binders can't contain PDFs protected with passwords, digitally signed documents, or PDF forms.

PDF Portfolios are new with version 9: works like a container, box, or "portfolio" (thus the name). Can hold all sorts of file types and keeps them in their native formats. Navigation is Flash based which gives you a cleaner and more professional looking package. Acrobat 9 Pro gives you 9 different Portfolio layout options (Standard only offers a grid layout).

The other cool thing about Portfolios is the ability to preview Tiff images. So often, attorneys can't view the Tiffs that we produce as final files. But, with the help of the free Acrobat reader, now they can. They can view them within the Portfolio that also contains your searchable notes and reports.

Finally, creating Portfolios is almost an automatic process. It's really simple to do and you'll find yourself asking why you didn't switch to this delivery method sooner.

Wednesday, February 25, 2009

Using Nikon cameras just got a little easier

I can't tell you the amount of mail that I get from around the world that describes the following scenario:

"I've just promoted/transfered into a posting and found a whole room full of gear. I'm new to this and have no idea how any of it is supposed to work. Please help."

Often times, this room full of gear includes cameras from Nikon. These great cameras can often stump even the most technical of people. For us photographers, things like aperture, stops, metering, and such are second nature. But to someone new, its like a foreign language.

So this person has an amazing kit of gear and now has to go and use it. Where do they go for help? Thankfully, there's a ton of books on the subject. One such book, the Nikon Creative Lighting System by Mike Hagen is an outstanding introduction to flash photography using Nikon's flashes.

Where would this come into play? Crime scenes, evidence photography, the list is quite long. Knowing how to properly light a scene or an object takes a bit of practice and the right techniques. This book is a detail packed gem that's written so that most new photographers will grasp the techniques easily. Included are detailed instructions on the SB-600/800/900 and the R1C1 Flashes. Even if you aren't using these flashes, you'll get a lot out of seeing how they are used for various situations. Evidence photographers will probably want to run right out and buy the R1C1 for their Nikon after reading this book.

And as an added bonus, you'll get an offer code for a 50% reduction in the Gold membership price for the Nikonians - the largest internet community for Nikon shooters. This discount alone saves you more than the price of the book. 

With the Nikonians discount and all the helpful tips, I highly recommend this book.

Tuesday, February 24, 2009

Going digital after decades of analogue work

Many agencies are making the switch to digital. In doing so, they are declaring a "zero date" for the switch over - everything after a certain date shall be shot in digital format ... But what about the older stuff? What about the old negatives? 

Scanning negatives and slides is a bit of an art form. So is moving from the negative/slide to a clarified positive image. Thankfully, Sascha Steinhoff's new book, Scanning Negatives and Slides is here to help.

There's so much to this book it's hard to know where to start. From a detailed discussion on the basics of the process, to differences between lower density and higher density scanners, to a harsh look at Scanhancer, and everything in between. 

Sascha takes you through many of the popular scanners and associated software. There's tons of comparison images and helpful notes on appropriate settings. And, of course, there's a lot of info on using ACR and Photoshop (plus some helpful plug-ins). But wait, there's more ... the book also includes a CD chocked full of goodies and samples. (mac users rejoice, there's sample software for us too)

In all, it's an outstanding reference that should be in every lab. As such, I highly recommend it.

Monday, February 23, 2009

More colour casts - individual levels adjustments


At last Thursday's Photoshop Users Group meeting in Beverly Hills, one of the topics for discussion was the many different ways Photoshop has of doing the same thing ... but some times they produce different results. Take colour cast removal as an example. How may different ways are posted here on the blog? Are there others? Sure.

You can use a Levels adjustment layer and target the colour channel that is causing the majority of the colour cast. In this case, you can do it to two channels separately when the colours are really off. This technique works great for folks who have yet to upgrade to the Creative Suite versions of Photoshop.

How many more ways can you think of?

Saturday, February 21, 2009

A historical look at surveillance

Here's a link to an interesting site that looks at the societal aspects of surveillance. In the current edition of their journal, I found a provocative article entitled:  Police use of public video surveillance in Germany 1956: management of traffic, repression of flows, persuasion of offenders

Abstract: "Every technology has its history. What are the beginnings of public television? This article explores the use of police CCTV in West Germany between the 1950s and the 1970s. In these early years, the public police cameras served three functions: the use of cameras in traffic management; the repressive use of cameras at demonstrations; and the persuasive use of the images. The second part of the paper takes a closer look at the third function: surveillance images as a means of persuading offenders of their guilt. It is argued, that a persuasive force exists and is consciously exploited by the police. But this force also weakens over time, when subjects acquire more and more media competence. The police respond to this problem with the transition from still to moving images – and beyond."

The site requires membership, but the registration is free. Check it out. It's interesting reading ... even if you don't agree with their conclusions.

Forensic Science practices under scrutiny

In a recently posted editorial, How to Bring Real Science Into the Courtroom - A disturbing new report says our criminal courts have been relying on bad evidence, Radley Balko takes a hard look at the state of forensic science in our courts.

He outlines several areas in which our methods could be improved. Additionally, in this time of higher unemployment, his ideas could open the door to more jobs in the field. With more people looking to enter this line of work, access to training becomes essential.

The recommendation that "[d]efendants should be given access to their own forensic experts. For every prosecution expert, defendants should be issued a voucher to hire their own expert" would have huge budgetary implications for our courts. Many cases feature forensic expertise in a variety of disciplines. Some of those experts only provide lab services and are not called into court to testify. Essentially, this editorial is calling for defendants to have a court/tax payer sponsored lab at their service for trial.

Read the editorial and see what you think. As always, your comments and e-mails are most welcome.

Wednesday, February 18, 2009

Guest blogger at Adobe.com

Rick Miller, Senior Systems Engineer from Adobe's Education Technologies group asked me to pen a guest blog post for their space at Adobe's blogs. "No problem," I said. The topic: write 1000 words on using the Creative Suite products in Criminal Justice. "Help CJ majors to see how the CS products help you and can thus help them," he said. No problem.

Check out the post by clicking here.

Tuesday, February 17, 2009

Getting images ready for court

Last week, Adobe's Acrobat Law folks ran a very informative e-seminar on metadata redaction and e-discovery issues. Naturally, it was Acrobat-centric. It got me thinking. Why would we need to redact metadata?

Why indeed.

Many agencies have personnel in the field shooting surveillance photos. These professionals may have workflows that include Lightroom or Bridge and metadata templates. Keywords and other metadata are great from a management standpoint, but you may not want photographer or other info getting into the wrong hands. Law enforcement does enjoy a certain amount of discretion when it comes revealing investigative details that may burn an operator. So what do you do?

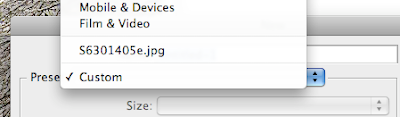
Open the image in Photoshop. Then click on File>New. Within the dialog box, pull down the Preset menu and find the name of the file that you are working on. Then click OK. This makes a new blank image with the exact settings as your current image.


Here's where it gets a bit tricky. Click in the original image. Press V (or click on the Move Tool in the Tool bar). Press and hold the Shift key and click+drag the original image into the new image space. Why Shift+Click+Drag? The image will be placed in the exact position (from the old image) in the new image. It now shows up on its own layer in the new image. You can flatten the image now, if you wish.

With that, you have a clean copy that's ready for discovery.

Phoenix Tour Stop

The road show is heading to Phoenix, which just happens to have a Highland Games scheduled for this weekend. If anyone in  the Phoenix area wants to get together for some impromptu Photoshop or photography fun, shoot me a note.

Monday, February 16, 2009

Advanced class on the way

We're just putting the finishing touches on the Advanced Forensic Photoshop class at the AIFE. This class will leverage the power of on-line collaboration tools to put your Photoshop and forensic skills to the test.

Join me as we work through six cases from start to finish. Each case will present different imaging challenges (or a combination of challenges).  Not only will students be required to clarify the images, but they will be required to answer investigators' questions to determine if the image data supports the investigators' theories about the crimes. In order to complete the investigators' requests, you'll need to properly document your work and ensure that it can be repeated by your peers. 

It will be an interesting and challenging format. Not only will students be required to perform their own work, they will also be responsible for checking their fellow students' work; is it well documented, can it be repeated, does their data support their conclusions?

The on-line format gives us the opportunity to stretch the 40 hours of "class time" over a few weeks, whilst respecting your already busy schedule. It also gives us the opportunity to include folks those in states with budget troubles (like California and New York) who can't afford to travel to training.

Many analysts say that over 95% of the cases that they work on do not require testimony or cross examination. It's those remaining 5% of your cases, the ones that make it to trial, that can make or break a career. This class will help prepare you for those 5%. 

Click on the AIFE link above to request more info on the class.

Saturday, February 14, 2009

Grow houses on the rise


With the troubles in the economy and foreclosures increasing by the week, some homeowners are renting out their houses with little care as to what goes on once they hand over the keys. Many end up being grow houses. Criminals love these rental situations - there's only the crop to loose if the house gets raided, they just set up elsewhere.

Getting pictures right in these houses can be tricky. They are packed with plants and special lamps that aid in growing the crop. These lamps can cause havoc with the pictures taken on scene. Luckily, you've got Forensic Photoshop.

In this case, it took 3 passes with EditLab Pro to get all of the errant colour out of the image. Then, it was just a matter of sharpening it up a bit. In just a few minutes the images were finished and ready for the filing team. Now there's no doubt as to the type of plants that we're dealing with.


One small tip for the photographers, try to keep the light source out of the scene as much as possible.

Thursday, February 12, 2009

Forensic Photoshop works for casinos too!

Today's casinos have thousands of cameras looking at anything and everything that comes onto the casino property. Camera and recorder manufacturers salivate at the thought of getting a big casino contract. Once the cameras are in, maintenance is time consuming and costly. Each one of those cameras need to be serviced on a regular basis. Often times, colours drift - as does focus (be it ever so slightly).


Image courtesy of IQinVision

Casinos are now replacing their analogue cameras with multi-megapixel IP cameras. As technology marches along, many of the issues remain the same. Colour casts are still present. Focus issues are there as well.

Within the Forensic Photoshop workflow, we look at focus in the opening steps of our work. Previously, we've looked at Smart Sharpen and the Optipix plug-in. Let's look at another - FocusFixer V2 from FixerLabs (part of the FixerBundle).


Click on Filter>FixerLabs Filters V2>FocusFixer V2 to activate the filter's dialog box. You have the ability to manually adjust the image using the Deblur and Threshold sliders. The Threshold slider can be used to suppress noise in high-ISO settings and/or low light conditions, but is best left at 0 for our indoor shot. The preview gives you the ability to dial in the adjustment and keep the scene from getting too "crispy."

But wait ... there's more. It also has the ability to work with your image's EXIF data and model your camera's behaviour and optics using their LensFit feature. How cool is that?

So with our focus fixed, we went on to remove the image's colour cast and dealt with a few local colour issues. When it came time to deal with the noise in the image, along comes FixerLabs again with their NoiseFixer V2 (again ... part of the FixerBundle).


It's an easy to use plug-in that's deceptively powerful. I like the fact that I can work separately on chroma and luminance noise (Color / Grey in the plug-in). I also like the fact that there is very little loss of sharpness when using this tool.

Along with FocusFixer and NoiseFixer you also get ShadowFixer and TrueBlur (topics for a later date) as part of the FixerBundle V2 - all for less than $100. And, there's now a Mac version. What could be better? Needless to say, I recommend the FixerBundle for its value, ease of use, and versatility.

Looking at where we started and where we finished, we can see what's been done. We've removed the green cast from the indoor lighting as well as increased the focus and removed the noise. The difference is amazing.


Here's the final image on its own. See the bright, vibrant colours and all that wonderful detail just pop off the screen. Modern multi-mega pixel IP cams can capture more pixels than ever before. But, they still need to be processed. Casinos spend millions watching their bottom lines with these systems. In just a few more steps, they can have accurate images for their files - insurance, cheats, etc. The Forensic Photoshop workflow, enabled by a systematic approach and the proper tools can definitely help.


The scary side of CCTV

I received this in the morning's mail from Peter, Director of the CCTV Users Group.

"Colleagues,

This is the first time I have heard of such an event, but
please let me know if it has happened before, I will pass any comments on to the Local Authority Manager involved who is happy to talk to anyone who can help.

It occurred about a year ago and the brief summary is:

Police Officers were called to a vagrant one day, who appeared under the influence. They did nothing.

Later that evening the LA CCTV operators saw the vagrant ‘sleeping rough’

The vagrant later died, and the Police arrested the two CCTV Operators for questioning regarding potential charges of manslaughter on the grounds that they had not fulfilled their ’Duty of Care’ to the individual. No charges have in fact yet been brought.

The inquest is to be held in March, and the Police will be represented by Barristers, and so the Local Authority have appointed Barristers for themselves, and separate Barristers to represent the operators. So things are getting quite high powered.

Bearing in mind everyone has lived with this hanging over them for a year, naturally concern is rising.

Amongst all other things they are concerned that even if not charged the arrest for manslaughter will stay on their record and affect future job prospects

The help we need is, does anyone know of any other similar CCTV case in the UK where operators have been arrested by the Police, not for doing something but in the Police view failing to do something.

My personal view is we are stepping on incredibly dangerous ground here with all the incidents and events operators watch,. Is it ‘over the top action’ by the Police who themselves did not act earlier in the day?

Any helpful thoughts would be appreciated"

Wednesday, February 11, 2009

Photographic Multishot Techniques

Rocky Nook Publishing recently released Photographic Multishot Techniques by Gulbins and Gulbins. It's an outstanding book with lots of practical help on this very technical subject.

Included in the book are sections on high dynamic range imaging (HDRI), super-resolution, focus stacking, and stitching images. Once you are introduced to the subject matter, they teach you how to effectively combine these techniques to create amazing images.

In addition to Photoshop (Cs2-CS4), they also offer techniques using plug-ins and stand alone programs like PhotoAcute, Photomatix Pro, FDRTools, CombineZM, DOP Detail Extractor, and Helicon Focus. Links to the tools can be found on Rocky Nook's web site. Most offer a free trial version.

This book offers excellent information for anyone who is looking to get the most out of their images. As such, I highly recommend it.

Thursday, February 5, 2009

Exposure adjustment layers

I received a note from a reader who needed to see more detail inside a building's glass windows. I made the mention of adjusting exposure in ACR, but the reader wasn't comfortable with ACR yet and wanted to know what sorts of non-destructive adjustments could be done in Photoshop.

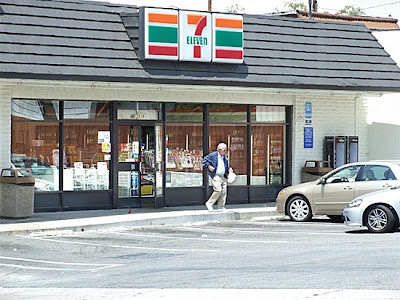
In our example, we see a brightly lit scene in front of a convenience store. Inside the store is visible, but there's room for improvement.


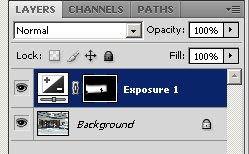
In CS3, you can make exposure adjustments from the Image>Adjustments (destructive) menu or you can choose to create an exposure adjustment layer from the Layers panel (non-destructive). 

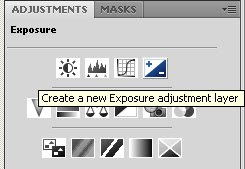
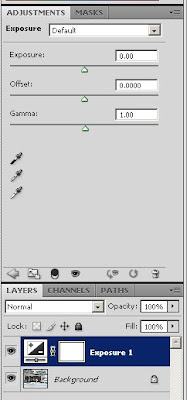
In CS4, there's been a little rearranging. You can now find the adjustment layer choices clearly displayed in the Adjustments panel. The Exposure adjustment is located in the top row at the far right. Click on it to create your new exposure adjustment layer.


If you were used to making exposure adjustments in Photoshop CS3, the tools aren't much different. The nice thing now is that they are all in the same panel. No more pop-up dialog boxes that you have to drag out of the way.


For our example, I just wanted to see more information through the glass store front, but leave the rest of the image untouched. So, I painted with black on the mask to limit the effect to just those areas I was concerned with. In this way, I don't blow-out the whole image and it looks much more realistic.


The nice thing about adjustment layers is that you can always go back and change your settings. If you find that it still prints out a bit dark, bump it up another half stop or so or adjust the gamma - or both.