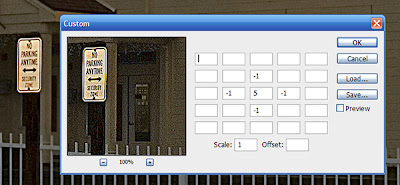
Let's take a look at a couple of effects that can be produced using custom filters.

Sharpening with the Custom filter.
Note: the scale is 1 which is the sum of the weights.
When you first open the filter (Filter>Other>Custom) you'll see a dialog box that looks like the one shown above.
The dialog box has a table of boxes that allow you to input values called Weights. It also have boxes for Scale and Offset values. The values must be integers, no fractions are allowed.
The rules:
The dialog box has a table of boxes that allow you to input values called Weights. It also have boxes for Scale and Offset values. The values must be integers, no fractions are allowed.
The rules:
- The scale should usually be equal to the sum of all the weights.
- If the sum of the weights divided by the scale is 1, then the offset should be 0.
- If the sum of the weights is 0 then the offset should be 128.
- If the sum of the weights divided by the scale is −1 then the offset should be 255. The image will be inverted from what it would be if the sum were +1.
- The sum of the weights divided by the scale should generally not be more than +1 or less than −1. Otherwise the image will come out very dark or very bright.
- The scale can't be less than 1 (you can't divide by zero).
- If the filtered image is very dark, the scale is probably too high. If it's very light, the scale is probably too low.

2 comments:
Thanks :) now i know what it is :P .. you rock
Thank you so much, I have been using Photoshop for just over a year and I never even noticed this filter.
Great help!
Post a Comment