Featured Post

Welcome to the Forensic Multimedia Analysis blog (formerly the Forensic Photoshop blog). With the latest developments in the analysis of m...

Monday, December 10, 2007

Forensics as debate and discussion

For those that are familiar with this blog, you'll remember that I separate Forensics from Forensic Science. Forensics, from the Latin root "forensis," meaning forum and Forensic Science meaning the application of a broad spectrum of tools and techniques to answer questions about a particular piece of evidence in the legal system.

From the Forensics as debate and discussion files, I call your attention to  The Institute of Ideas and Pfizer Debating Matters Competition 2007/08 (link). Part of their competition involves a debate on CCTV. From time to time, we (as analysts) will get drawn into a discussion about the nature of the evidence we analyse. Here is an overview of this debate's central points:
  • Closed circuit television (CCTV) is a threat to our freedom
  • Is CCTV effective?
  • Have we sleep-walked our way into a surveillance society?
  • Surely if you’ve got nothing to hide, you’ve got nothing to fear?
  • So is CCTV less like Big Brother and more like a benevolent father?
A big part of using Photoshop for Forensic work is being able to explain your results in court. Whilst on the stand and under cross examination, you may get questions like the ones above. "I call your attention to People's 34A. I find that this image is grainy and unclear. What is clear is that this does not show my client - the one sitting over there. Don't you agree? With this in mind, is CCTV effective as evidence? Clearly, I would say no ..." It's up to your side's attorney to object when appropriate to do so, but you may have to answer questions such as these. You are an expert and the courts will want to hear your opinion. That is why you are there. How do you prepare?

Check out the Institute for Ideas' page on their CCTV debate. See how the arguments are structured. See the questions and responses. Look at the articles that they cite. Examine the data that they refer to. What conclusions can you draw? Is there a particular style involved when making an argument? Do you buy their premise? Are their facts correct (one side says 4.5m-5m cameras in the UK and the other rules out private unmanned CCTV and comes to a total of around 1.5m)?

There will be a time when you are on the stand and the attorney will attempt to frame a question to suit his/her client's best interest ... and it may not fit the facts. Do you accept the premise of the question and proceed to answer from a position of weakness? Do you challenge the premise? Do you ask him/her to restate the question in simpler terms? Notice on the debate's page that there are arguments both for and against. What do you do? Challenging the premise could make you appear to be a bit cocky whereas having the question restated could make you seem as though you aren't an expert. 

Preparation is the key. Preparation starts with information; info like the links on this page. I want you to be as prepared as possible to engage in courtroom forensics as you are to engage in the forensic science for which you are employed (or wish to be employed). Of course it can be done. I am sure that, with adequate preparation and a dash of confidence, you can do it too.

Enjoy.

CCTV User Group

This morning, I want to call your attention to the CCTV User Group. Located in the United Kingdom, the group has members around the globe and serves as an outstanding resource for information on public and private use of CCTV systems. You can find out more information by clicking here. Find out about the groups efforts outside the UK by clicking here.

One of the many benefits of membership is their magazine, CCTV Image. The November 2007 edition has features on School Security, Redeployable CCTV, as well as a response to draft CCTV Code of Practice. Past editions have dealt with highway CCTV, large event CCTV, public housing CCTV, as well as Video Analytics, and lens selection tips.


Of particular note in the latest edition is a link given in the CCTV User Group's Director's column to The Home Office ACPO National Strategy for CCTV. There is also a detailed discussion on the Strategy on page 8. "While developments in technology have outpaced some of the capabilities within the police and justice system, the new National CCTV strategy aspires to meet the challenges so the benefits and full potential of CCTV can be maximised," reads the commentary. It goes on to say that "the report acknowledges the significant role that CCTV has played in protecting the public and assisting the police, as well as the leading role that the UK has held in the development of CCTV worldwide." The UK's Home Office has produced some outstanding documents over the years. Those that are crafting best practice documents or SOPs for their agency should consult the HOSDB's on-line publications related to this complex field.

The why of this topic is best put this way: “You can create as many images as you want, but unless that person gets nailed in court there’s no point in creating the image! You’re the start of the journey to getting crimes into court and helping make our communities safer.” - DCI Mick Neville, Metropolitan Police (In CCTV Image, November 2007, pg. 22) I couldn't have said it better myself.

Visit the links and check this valuable resources out for yourself. Better yet, encourage your agency to fund your membership in the group. Groups like this deserve our support.

Enjoy.

Sunday, December 9, 2007

Proprietary Digital Formats - h.264 is here to stay

I wanted to point out this amazing resource. Streaming Media Magazine is great for understanding all things streaming video. In this month's issue, there is an article which has some outstanding insights on the future of h.264. I read this from the standpoint of an analyst and an evidence collection specialist and thought ... wait until the CCTV vendors get a hold of this open standard. We should all take a closer look at h.264 and get to know it well. It'll be here for a while.

Have you ever wondered
why digital CCTV is so proprietary? Here is some insight from the article, "Online video standardization has had a much more rocky road. For one thing, there was no top-down industry standardization as there had been for DVD and MPEG-2. And the fact that the online equivalent of the "DVD player" is software means that the barrier to entry is low—any company can try to introduce their own proprietary player. Because of this, it took almost a decade to shake out the standards for online video, and they're still too numerous. Although Adobe Flash Video has become the dominant platform for streaming and progressive download video, there are still three major flavors of downloadable video—Microsoft, Apple, and DivX/XviD."

There's the key, "...
no top-down industry standardization ..." Add to this, "... the payoff for inventing and owning new ways to distribute content is too high to pass up ..." and you have the formula for the CCTV industry.

On the topic of
h.264 video, page 84 has an article explaining the many ways this format is working its way into our lives.

There is also a well thought out review of
Adobe's Production Suite CS3 which includes a thorough treatment on the video encoding options as well as the problems with ingesting HD video in Premier Pro CS3.

Best of all, you can subscribe to the print version of Streaming Media Magazine for free.
Click here to find out more.

Enjoy the day.

Thursday, December 6, 2007

Scott Kelby's 7 Point System - reviewed

Scott's done it again. His latest book on the market is Scott Kelby's 7-Point System for Adobe Photoshop CS3

The Photoshop elite are starting to get it ... finally. In the introductory pages, he mentions that he wants to change the way Photoshop is taught. An outstanding development. I have sat in on enough of the typical Photoshop training sessions to know that this is a great step forward. I've watched eyes glaze and law enforcement folks fall to sleep whilst the presenter goes on with the "imagine the possibilities" speech. Its tough to imagine the possibilities when you are still struggling with the tools. It seems that Scott is making a move to change that. I can only say, amen.

The book is packed full of examples. He takes an image and works each from start to finish. Each image is typical, from a photographer's problem point of view. (I know what you are thinking ... I'd like to see what he can do with this 352x240 crap from my local gas station. I'm sure he'd do just fine.) He walks you through the problems and his solutions towards a great looking image. 

I have long preached, and I teach, a work flow model of approaching Photoshop. Scott's logical work flow works well for his audience and I think the response to this book and his new approach will be more than positive. His book is a great read for intermediate and advanced photographers and designers. For beginners (and law enforcement), there may be a bit of a struggle to connect with the discussion at first. Please, don't let that discourage you from diving in. Grab the example files and give it a go.

Don't worry, law enforcement / forensic  image folks; I've got you covered. Help is on the way. Hopefully, right after the first of the year my book will be available. In the mean time, you can get Scott's book from Amazon by clicking here.

Enjoy.

Wednesday, December 5, 2007

Colour Management - helpful link

As a quick aside, I wanted to leave this link to a very helpful site:

Digital Dog - tips, tricks, articles, and more from Andrew Rodney.

Andrew has been featured in the following publications: PDN, Publish, Photoshop User, Electronic Publishing, Digital Output, MacWeek, Digital Photo Pro and Professional Photographer. He lectures around the country on many aspects of digital imaging and color management. The Digital Dog is devoted to the understanding and adoption of color management.

Andrew was named a "Top 40 Photoshop Expert" by Wacom Technologies. This fall, Andrew was inducted into the NAPP Photoshop Hall of Fame.

Rules of engagement for using Photoshop?

I wanted to revisit the Reuters photographer fiasco to facilitate a discussion on the ethical boundaries of Photoshop's use in our work flow. Evan Hindra asks "when is [the use of] Photoshop unethical?" A very important question. Let's take a look.

Often times, I am asked to do things to an image that will obviously cross the line into the (let's say) not exactly true and correct realm. My typical response is that Photoshop allows me to realize my wildest creative dreams. The law, however, is not so understanding. Many of the things that detectives may wish done could thus fall under the title of reenactment.

As far as Reuters' position is concerned, David Schlesinger (Reuters' Editor-in-Chief) says that "... materially altering a picture in Photoshop or any other image editing software will lead to dismissal." What does "materially altering a picture" mean?
  • No additions or deletions to the subject matter of the original image, thus changing the original content and journalistic integrity of an image.
  • No excessive lightening, darkening or blurring of the image, thus misleading the viewer by disguising certain elements of an image.
  • No excessive colour manipulation, thus dramatically changing the original lighting conditions of an image.
Wow. Can we possibly work under these harsh conditions? Sure. We do everyday. With all of these, it's all in how you argue it.

Firstly, these rules apply to their photographers in the field. Reuters has a photo desk that does image correction for their wire service (print/video/web). "The level of Photoshop privileges granted to photographers should be at the discretion of the Chief/Senior Photographers within the above guidelines. All photographers should understand the limitations of their laptop screens and their working environments." 

Second, Reuters understands that it needs to correct its images before they are used for publication. They are not going to hamstring themselves, "... ask your regional or global picture desks to perform any required further Photo-shopping on their calibrated hi-resolution screens. This typically entails lightening/darkening, sharpening, removal of dust and basic colour correction." So, they have a team of Adobe trained professionals available to work on the images from the field. They don't want Photographers doing corrections in the field under sub-optimal conditions (see Gordon Ramsay - Cook what you know).

Third, Reuters is quite aware of the power of their Photographer's images, "... our news photography must depict reality. Any attempt to alter that reality constitutes fabrication and can lead to disciplinary action, including dismissal." Must our images depict reality? Of course.

Finally, let's look at their do/don't list in light of what we know about our work flow.

Allowed by Reuters:
Cropping (we learned earlier how to crop non-destructively)
Adjustment of Levels to histogram limits (non-destructive adjustment layer)
Minor colour correction (can easily be done in a non-destructive way)
Sharpening at 300%, 0.3, 0 (those settings may not always fit our purpose - we can use Smart Filters)
Careful use of lasso tool (can be useful in making layer masks to limit global effects)
Subtle use of burn tool (we learned how to do this non-destructively)
Adjustment of highlights and shadows (can now be done in Smart Filters)
Eye dropper to check/set gray (we've learned several ways to balance colour and light)

Not Allowed by Reuters:
Additions or deletions to image (big no-no)
Cloning & Healing tool - except dust (there is a way to do this semi-destructively - but it's tough to explain)
Airbrush, brush, paint (masks - yes. Actual pixels - no)
Selective area sharpening (in a multi-pass sharpening work flow, this can be explained)
Excessive lightening/darkening (a night time image in the dark needs "excessive lightening" to be seen - so as long as it's non-destructive I say ... why not?)
Excessive colour tone change (red shirt vs orange shirt vs purple shirt - it makes a difference)
Auto levels (best done manually anyway)
Blurring (what are you trying to hide?)
Eraser tool (masks - yes. Actual pixels - no)
Quick Mask (to limit adjustments - yes. To mask pixels - no)
In-camera sharpening (best left to Photoshop)
In-camera saturation styles (best left to Photoshop)

Since Forensics is debate and Forensic Science is the application of a broad spectrum of tools and techniques to answer questions about a particular piece of evidence in the legal system, then we can have a debate about our use of this broad spectrum of tools. Don't be afraid to try something new. Document your work. Start over and see if it can be easily duplicated. Send it to a peer to see if he/she can duplicate it as well. If it's documented properly and it's able to be duplicated - and it's a non-destructive process ... give it a shot. If your peers can't make it work from your notes ... take another look before trying the process on an acutal case file.

Enjoy the day.

Tuesday, December 4, 2007

Adobe turns 25 ...

... and I didn't even remember to send a present.

Seriously though, Adobe was founded on December 2, 1982 by John Warnock and Chuck Geschke. Look how far we've come with this amazing company's suite of products.

Imagine what you can create,
Create what you can imagine.
Adobe.

Check out John Nack's blog article on this historic occasion.

Enjoy the day.


Monday, December 3, 2007

Sorry ... I couldn't resist

Last year, Microsoft announced that its format, formerly known as Windows Media Photo, has been restyled Microsoft HD Photo. For those that downloaded the beta plug-in for Photoshop in August, that plug-in will stop working at the end of this month. I don't know if anyone is using it, but it may be wise to convert your images to a more established format if you are.

The file extension for an HD Photo file is either hdp or wdp.

To find out more, check out Bill Crow's HD Photo blog.
Download the specification from Microsoft.

Sunday, December 2, 2007

The final push towards publishing the book

December is here too fast this year. As I enter into the final stage towards getting my book to print, I need to take a wee break from the blog.

In the mean time, take a look at NAPP's Photoshop User Magazine. This edition has a nice piece from George Reis on page 88; Photoshop CS3 Extended for Research - Photoshop as a crimefighter? Learn how our favorite program is being used in the field of forensics. With George's book getting some well deserved attention from the "Photoshop establishment," I am glad that NAPP has included a section on our growing field.

In the mean time; strive, grow, and seek to be better than yourself.

Thank you so much for all of your support. It means the world to me.

Enjoy the holidays.

Friday, November 30, 2007

Before and after

Recently, I found a blog whilst surfing. I love the creative eye of the photographer. I just wanted to show how the workflow could help any image, not just forensics work.

A nice pile of leaves as shot.

Look at how much colour and detail is hidden under the colour cast.

A nice shot of the moonrise.

Again, look at the brilliant colour and contrast that was captured, but obscured by the cast.

Good close-up - an interesting subject.

Drive up the contrast and clear away the cast and an interesting subject gets some added drama.

I sincerely hope that the photographer doesn't mind this quick showcase of her work. She's captured the essence and she's got a great eye - and all of that passion is trying to get out. You can feel it by just looking at her work

Enjoy the weekend.

Prosecuting Graffiti Taggers using Color Deconvolution


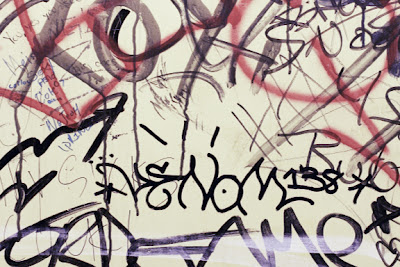
Graffiti seems to be everywhere. Graffiti costs cities hundreds of thousands of dollars per year to clean up. There has been a recent trend towards installing cameras to catch these vandals in the act. Once again, agencies are putting these cameras up, but little thought is being given to the fact that we're adding to our already heavy image processing workload. Hopefully, with today's exercise, we can make that load a little easier to bear.

In the world of graffiti in general, and tagging in particular, each "artist" has a unique signature. Identifying and cataloging these signatures can greatly assist in the prosecution of these pesky and destructive people. Often times, however, graffiti can be layered upon existing layers. Getting these signatures off of the wall and into our catalogs can be a tricky enterprise. Until now ...

Meet 3D Color Deconvolution - a FREE plug-in available from 4N6Site.com.


Grafitti comes in many different colours. Separating these colours (and the signature tags) can be a time consuming process. With 3D Color Deconvolution, the process is just a few minutes from start to finish. Starting with the image (shown at the top of the page), click on Filters>Forensic Filters>Color Deconvolution. This brings up the dialog box shown above. Select your Undesired Colour (red) and your Desired Colour (black) and your background colour (cream) with a right mouse click. Click on Apply and you are done. Walls with multiple colour layers can be approached with a multiple pass workflow. In our first step, we got rid of the red tag.


Once the red tag is gone, there is still work to do. We can go after the brown areas to leave us with just the black tag "signature" that we are after. Again, click on Filters>Forensic Filters>Color Deconvolution to bring up the dialog box. Select your Undesired Colour (brown) and your Desired Colour (black) and your background colour (cream) with a right mouse click. Click on Apply and you are done.


It's easier to see how this works by looking at the colour in three dimensions. Thankfully, Couleur.org has a great tool for this that allows us to see the selected colour in a three dimensional colour cube. You can see (below) how our starting point looks in three dimensions. Notice the red, orange, and brown areas as they come away from the black (our target). Isolating colour in this way is the brilliance behind the Color Deconvolution plug-in.


When we've finished, our image looks like this.


We can then simply crop out the signature and add it to our files.


Stripped down to its essence, the signature is now a powerful tool in prosecuting taggers. With this, you can build a history of their work and the associated costs to clean up after them. You can also tie this information to GIS data to show the geographical scope of each tagger. These two pieces, along with the time and date info from the camera, can aid in predicting where the tagger might strike next.

To add to the value of this plug-in, it works great for Questioned Document Examiners too. More on that later.

Enjoy the day.

Thursday, November 29, 2007

Easy Edge Sharpening with EasySharp plug-in

Back at the LEVA conference, we worked our forensic imaging work flow with great success. One of the many topics covered was Sharpening and how in our work flow, we're really sharpening in three passes. Our three pass sharpening consists of an initial focus correction, a content specific sharpening stage, and a final output sharpening. It is this content specific sharpening that is today's topic.

Introducing EasySharp from Pixel Vistas


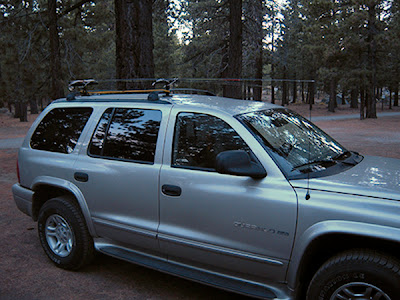
Let's take a look at Rob's fishing trip photo again. Out of the camera, the image is a bit soft. We've taken some initial steps to mitigate the colour cast and remove the noise. Now, we want to do a touch of edge sharpening to really make this image pop out of the screen. This is where EasySharp really stands out.


The what of this step has already been defined by our work flow. We want to do content specific sharpening. The most efficient way to do this, the how, is to employ edge sharpening. Edge sharpening, however, can be a tiresome process. Creating edge masks is its own art form and takes some practice. Luckily for us, there is EasySharp. With EasySharp, you can achieve the benefits of edge sharpening, the how, without the effort.

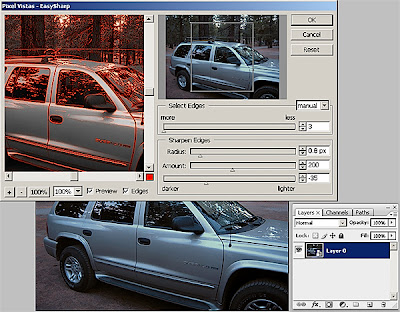
Launch the EasySharp dialog box by clicking Filter>Pixel Vistas>EasySharp. Make sure to check the boxes marked Preview and Edges. In the beginning, you can select Auto from the Select Edges drop down menu. You can also choose More or Less, which add or subtract from the auto selection. With the preview activated, you can see the edge mask being created right before your eyes. For total control, select Manual. Each image will require different settings under this mode. Use the preview and adjust the Amount and Radius sliders until your mask is perfect. Use the Lighter/Darker slider to drive the white/black edges farther away from each other.

Here comes the fun part, the why. Instead of creating and using edge masks, EasySharp "uses an edge-preserving blur filter to extract the edge component of an image. This edge component is then sharpened and recombined with the detail component, resulting in an image which has been selectively sharpened only on its edges. By varying the parameters of the edge-preserving operation, you can easily choose the strength of the edges which are selected for sharpening." This selectivity is the essence of content specific sharpening. EasySharpe makes that selectivity simple and fast.


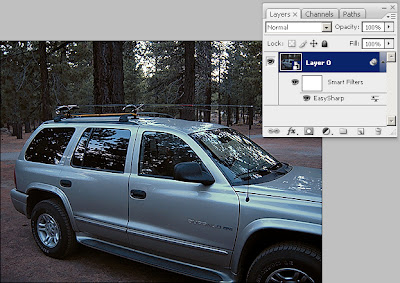
Adding to the fun, EasySharp can be used as a smart filter. It supports 16bpc images and even works in the LAB colour space. If you are used to using the Unsharp Mask filter, EasySharpe is an easy to use and inexpensive alternative which gives you surprising results. Best of all, you can try EasySharp for yourself for free with their 30 day time limited trial. Once you've used it, you can easily justify the $35 expense to make it yours.

Enjoy the day.

Wednesday, November 28, 2007

This just in ... Digital Imaging Procedure Updated

Our sources have told us that the UK's Home Office Scientific Development Branch have recently released an update to their 2002 Digital Imaging Procedure.

This new release (58/07) makes some significant revisions. These include a recognition that police services may wish to store their image data on a secure server instead of CD or DVD (write once media) as well as an expansion of the types of available devices for capture and storage of images.

Here are some of the highlights:
  • "It has to be recognised that digital images are not necessarily better than conventional ones (Pg. 5)."
  • "All compression algorithms remove data from the file and some are more effective than others at reconstruction of the data for replay. Generally, the greater the compression ratio, the more seriously affected is the replay (Pg. 6)."
  • "Image processing cannot make up for inadequate data (Pg. 6)."
  • "The generation of the secure copy should be carried out as soon as possible after the capture to reduce the time and opportunity for the accidental or malicious alteration to images (Pg. 16)."
  • "All images should be presented so that evidential content is not compromised. Where possible, images should be presented in their native or original format (Pg. 33)."
  • "It should be understood that images may look different depending on the equipment used. In particular, images viewed on different screens may appear different from one another. An accurate replay facility should be provided wherever possible (Pg. 33)."
  • and ... the flow chart on page 36 is priceless.
All in all, an outstanding piece of work from an agency dedicated to helping make our lives a bit easier. For those who are looking to standardise their procedures and are looking for materials to help, the HOSDB's web site offers a wealth of information.

Tuesday, November 27, 2007

Simple Noise Removal - use the Color Replacement Tool


Welcome back to our incredibly noisy image. Today we'll look at a semi-destructive way to remove colour noise. I say semi-destructive because even though we are using a "painting tool," the content and context remains unchanged. Working from a layer copy and hiding the original, we're simply removing the noise in this image the easy way.

Introduced in Photoshop CS, the Color Replacement tool can be used to remove digital noise from images. Paint away noise? Yes. Colour noise ... those red, blue, and green specks in our images. Noise is common in low light situations, like our noisy image. But noise can happen in any image.

Let's take a look at this simple technique.


Start with the Eyedropper tool. In the Options Bar, set the tool to sample a five-pixel by five-pixel area. Click in the area that you'll be fixing to select that color as the foreground color. We're starting with the red masonry and then moving to the dirty white marble. Every time you move to an area with a different major colour, use the Eyedropper tool to select that colour.

Once you've selected your work area and your colour, select the Color Replacement tool. In the Options Bar, set Sampling to Continuous, Limits to Find Edges, and a Tolerance of about 30%. Then simply paint away the noise. Notice how the detail and luminosity is preserved as you paint away the noise.


Click on each picture to compare the before and after shots. In ours, that orangy yellow noise is gone from the white marble and the blue noise is gone from the red areas. We've also managed to get rid of the noise in the roll-up doors' sill. Try this one for yourself and watch the noise melt away.


Enjoy the day.

Monday, November 26, 2007

Moving Beyond Bullet Points

I give over 2 dozen presentations per year. For the most part, I utilize Microsoft's PowerPoint as a visual aid. PowerPoint can be a great tool, if used properly. Fortunately, there is help for those who are PowerPoint shy.


Cliff Atkinson's outstanding work has recently been updated for Office 2007. If you are new to presenting, this is a must read. If you've been using PowerPoint for some time, this will definitely shock and amaze you.

Find out why it matters what you put on your slide's headlines. Find out the importance of the first five slides of your presentation. Learn to be an effective and engaging presenter. Use PowerPoint to help you tell your story. Don't let PowerPoint try to tell your story for you (it just won't work).

Forensics is the art of debate and oration. It is important that you, the presenter, tell your story. Your audience cannot pay attention to you and read your endless supply of bullet points. Most people will read the bullet points and tune you out. Learn how to fix this problem quite easily in Cliff Atkinson's book.

This on is on my must have list. Click here to get yours today.

Friday, November 23, 2007

CCTV images - the difference between monitor and identify

There are a bunch of news reports of various agencies switching to digital CCTV to monitor vulnerable areas. Many of us get the weekly and monthly government magazines as well as the daily news papers. Notice as you read the stories that they only really talk about monitoring activities. Very seldom do they talk about identification of specific individuals as their goal. These are two very specific technically challenging activities that are not necessarily supported by the same sets of technology.

As food for thought this weekend, identify the CCTV installations within your own agencies. See if you can identify their purpose; monitor, recognize, or identify. Would you know how to tell the difference? If your agency's CCTV, which was designed to monitor a large area, captured footage of a crime; would you be comfortable using the images for identification purposes? How would you approach the task of clarifying the images for use in your agency's investigation? Just some food for thought.

For more information on a CCTV system that IS designed to identify individuals and objects, click here. Have a great weekend.

Thursday, November 22, 2007

OQO Model 02 On Sale!

Here are a couple of great deals on the OQO Model 02. The good folks over at OQO were kind enough to extend this offer to the readers of this blog.

First Offer:
(1) Buy an OQO model 02 computer and get a FREE holiday pack (a $267 value). Pack includes a double capacity battery, Stronghold metal case, and battery charger adapter.

OQO free Holiday Bundle


Second Offer:
Save $150 off the purchase of an OQO model 02.

OQO $150 off Holiday special

Happy Thanksgiving - Original Thanksgiving Proclaimation from George Washington

Whereas it is the duty of all Nations to acknowledge the providence of Almighty God, to obey his will, to be grateful for his benefits, and humbly to implore his protection and favor -- and whereas both Houses of Congress have by their joint Committee requested me "to recommend to the People of the United States a day of public thanksgiving and prayer to be observed by acknowledging with grateful hearts the many signal favors of Almighty God especially by affording them an opportunity peaceably to establish a form of government for their safety and happiness."

Now therefore I do recommend and assign Thursday the 26th day of November next to be devoted by the People of these States to the service of that great and glorious Being, who is the beneficent Author of all the good that was, that is, or that will be -- That we may then all unite in rendering unto him our sincere and humble thanks -- for his kind care and protection of the People of this Country previous to their becoming a Nation -- for the signal and manifold mercies, and the favorable interpositions of his Providence which we experienced in the tranquility, union, and plenty, which we have since enjoyed -- for the peaceable and rational manner, in which we have been enabled to establish constitutions of government for our safety and happiness, and particularly the national One now lately instituted -- for the civil and religious liberty with which we are blessed; and the means we have of acquiring and diffusing useful knowledge; and in general for all the great and various favors which he hath been pleased to confer upon us.

And also that we may then unite in most humbly offering our prayers and supplications to the great Lord and Ruler of Nations and beseech him to pardon our national and other transgressions -- to enable us all, whether in public or private stations, to perform our several and relative duties properly and punctually -- to render our national government a blessing to all the people, by constantly being a Government of wise, just, and constitutional laws, discreetly and faithfully executed and obeyed -- to protect and guide all Sovereigns and Nations (especially such as have shewn kindness onto us) and to bless them with good government, peace, and concord -- To promote the knowledge and practice of true religion and virtue, and the encrease of science among them and us -- and generally to grant unto all Mankind such a degree of temporal prosperity as he alone knows to be best.

Given under my hand at the City of New York
the third day of October in the year of our Lord 1789.

George Washington

Also of note on this Thanksgiving:
Abraham Lincoln's Thanksgiving Proclaimation
Ronald Reagan's Thanksgiving Proclaimation
Rush Limbaugh reads the Real Story of Thanksgiving.

I thank you for your support of this forum. I feel truly blessed to have the support of so many wonderful people. - Jim Hoerricks

Wednesday, November 21, 2007

Noise Ninja in 30 seconds or less


For those that attended the LEVA class in Calgary, you'll remember how easy Noise Ninja was to use on our noisy night shot.

The good folks at Picture Code were gracious enough to let me put the demo installer on the class disc. If you were in Calgary and you didn't get a chance to install Noise Ninja, you'll want to before you work through this exercise. If you weren't in Calgary, click here to download a demo.

For today, we are going to go with the quick way of using Noise Ninja. Next week, we'll get more in-depth with this outstanding plug-in.

The thirty second guide to Noise Ninja

To get immediate results from Noise Ninja, try the following:
  1. Click on Filter>Picture Code>Noise Ninja. This will bring up the Noise Ninja dialog box.
  2. Click on the Profile Image button on the Profile page. This will measure the noise in the image.
  3. Adjust the Luminance Strength slider on the Filter page until you like the results.
  4. Go to the Noise Brush page. Paint with the brush tool in the Preview window to protect parts of the image from filtering.
  5. Press the OK button to filter the entire image. 
This procedure should yield reasonable results for many images. However, your work flow will probably be more productive and consistent if you learn to use more advanced features like camera profiles, automatic profile loading, and actions; which we'll go over next week.

Bang for the buck factor is quite high with this plug-in; landing it on my Must Have List.

Adobe Bridge CS3 2.1.1 update


The Adobe Bridge CS3 2.1.1 update includes the following fixes and enhancements: 
  • A new preference to enable High Quality Preview has been added to Bridge's Preferences > Advanced panel. When enabled, the preference addresses the problem of a soft or blurry preview appearing in the Preview panel and in Slideshow mode.
  •  Data loss that could result from replacing a folder with another folder by the same name has been prevented.
  • Issues that could cause Bridge to crash (for example, when encountering a PDF or AI file) have been corrected.
  • A problem that could cause Bridge to lock up when using arrows to navigate has been fixed.
  • XMP data is now handled correctly when added to CR2 files.
  • A problem that could cause the Loupe tool not to be available after exiting from Slideshow mode has been corrected.
  • Rapid clicks to select multiple files are no longer interpreted as a double-click, so unintended opening of multiple files is now reduced.
All components of Bridge must be updated to provide stable and robust performance. The following components (released previously) provide important updates to search and collection functionality: 
  • Adobe Version Cue® Client 3.1.0 update
  •  Adobe Asset Services 3.1.0 update 
If you are using Adobe Version Cue Server, the following update is required:
  • Adobe Version Cue Server 3.1.0 update. 
These updates can be found via the Bridge Help>Updates menu.

Click here to download the Bridge CS3 2.1.1 update from Adobe.