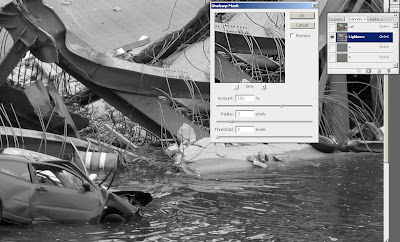
- Press Ctrll+Alt+1 to select only the lightness values.
- Invert the selection - Shift+Ctrl+I.
- Click Ctrl+H to hide the selection.
- With the Channels Palette open, select the Lightness Chanel.
This blog is no longer active and is maintained for archival purposes. It served as a resource and platform for sharing insights into forensic multimedia and digital forensics. Whilst the content remains accessible for historical reference, please note that methods, tools, and perspectives may have evolved since publication. For my current thoughts, writings, and projects, visit AutSide.Substack.com. Thank you for visiting and exploring this archive.
Featured Post
Welcome to the Forensic Multimedia Analysis blog (formerly the Forensic Photoshop blog). With the latest developments in the analysis of m...
Wednesday, January 30, 2008
Sharpening in LAB mode
Tuesday, January 29, 2008
Can you zoom in on that license plate?

- Monitoring: to watch the flow of traffic or the movement of people where you do not need to pick out individual figures.
- Detecting: to detect the presence of a person in the image, without needing to see their face.
- Recognising: to recognise somebody you know, or determine that somebody is not known to you.
- Identifying: to record high quality facial images which can be used in court to prove someone’s identity beyond reasonable doubt.


Monday, January 28, 2008
Local Contrast Control with the Sponge Tool

Friday, January 25, 2008
Scots Wha Hae
Thursday, January 24, 2008
Output Levels

Wednesday, January 23, 2008
DVR question answered
Tuesday, January 22, 2008
Adobe Camera Raw - some clarifications
Sunday, January 20, 2008
Saturday, January 19, 2008
Book update
Thanks to all for your support and patience.
Jim Hoerricks
Thursday, January 17, 2008
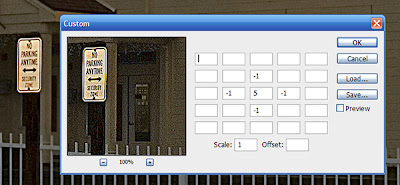
Custom Filters Explained
Let's take a look at a couple of effects that can be produced using custom filters.

Sharpening with the Custom filter.
Note: the scale is 1 which is the sum of the weights.
The dialog box has a table of boxes that allow you to input values called Weights. It also have boxes for Scale and Offset values. The values must be integers, no fractions are allowed.
The rules:
- The scale should usually be equal to the sum of all the weights.
- If the sum of the weights divided by the scale is 1, then the offset should be 0.
- If the sum of the weights is 0 then the offset should be 128.
- If the sum of the weights divided by the scale is −1 then the offset should be 255. The image will be inverted from what it would be if the sum were +1.
- The sum of the weights divided by the scale should generally not be more than +1 or less than −1. Otherwise the image will come out very dark or very bright.
- The scale can't be less than 1 (you can't divide by zero).
- If the filtered image is very dark, the scale is probably too high. If it's very light, the scale is probably too low.
Tuesday, January 15, 2008
Excellent Example of Flash Slideshows
US Air Force Staff Sergeant Stacey Pearsall
Military Photographer of the Year - 2003
The site is a functional mix of text and pictures that highlight Sgt. Pearsall's outstanding work and not only tell her story, but the story behind her pictures.
Check this one out as well:
U.S. Air Force Tech. Sergeant Bret Irwin
Videographer of the Year - 2003
If you are looking to jazz up your presentations, why not check out what Adobe's Flash can do for you.
Enjoy.
Interesting web site: plug-ins for VirtualDub
Here are some of the titles of the research found on their site:
Video Compression
In this field our works and main interests are video quality evaluation, codecs testing, analysis and tuning, lossless compression. Projects:
- Objective comparison of H.264 video codecs
- Subjective Assessment of Video Quality
- Objective Metrics of Video Quality
- Lossless Video Compression
- Subjective Comparison of Video Codecs
And this interesting page, Converting Video to High Resolution Photo.
I did end up finding what I was looking for, plug-in filters for VirtualDub, specifically, a de-interlacing filter. Turns out, the one that I was looking for is only available by commercial license (not free).
With the economy constantly in the news, combined with a weakening US dollar, I am not surprised that many law enforcement agencies are looking to freeware to help with their case work. VirtualDub seems to be a popular choice for working with digital video.
Enjoy.
Monday, January 14, 2008
Noise reduction tool comparison
In spite of the age of the article, it serves as a good example of how to evaluate one piece of software vs. another.
Enjoy.
Colour Casts - most dangerous source yet

Sparks Flying - Photo by Sgt. Michael Pryor
A combat engineer with Company A, 325th Special Troops Battalion, 2nd Brigade Combat Team, 82nd Airborne Division, uses a power saw to cut away storefront locks during an early morning raid on suspected sniper positions in Baghdad's Adhamiyah district.
The sparks generated from the saw create an interesting cast, which combines with the indirect light from the sunrise.
This one works as a good example of how colour cast removal, combined with a touch of focus correction, can reveal a great amount of detail. Notice the Corporal's arm on the picture above. Can you see the flag? Notice below. There are more examples, like the Airborne patch. What about elsewhere? The diamond plate hatch? Can you find more of them?
Sharpening Fun
I realise that budgets are tight and people might not be upgrading. My order for a Salient Stills VideoFocus Pro keeps getting kicked from year to year to next year. I completely understand.
So with this in mind, here is a content sharpening tutorial that should work in versions of Photoshop back to 7 (maybe even 5.5). You can use this in the creative sharpening step in the forensic photoshop workflow and achieve some surprising results.
Let's begin:
1. Create a duplicate of the image by dragging the layer over the Create New Layer button, or by selecting the layer and pressing Ctrl+J.
2. Click Image>Adjustments>Desaturate. The copied layer is converted into shades of gray.
3. Create a copy of the desaturated layer and select it.
4. Click Image>Adjustments>Invert. The image layer becomes a grayscale negative (leave the negative image selected).
5. Click the Blending Mode list arrow on the Layers palette, and then click Color Dodge. The image appears to change to white.
6. Click Filter>Blur>Gaussian Blur. Very slightly blur the image (just a few radius pixels) until you see a soft-ghosted outline of the image.
7. Click OK.
8. Select the top layer in the Layers palette, click the Layers Options button, and then click Merge Down, or press Ctrl+E. You should now be left with the original image (the bottom layer), and the softly ghosted image (the top layer).
9. Click the Blending Mode list arrow on the Layers palette, and then click Multiply. The white areas of the ghosted image change to transparent and the darker lines are blended in with the original image, creating the illusion of sharpness.
10. If your image appears too sharp, move the Opacity Slider away from 100% until you've reached the desired result.
There you have it. 10 simple steps to a new image.
Enjoy.
Thursday, January 10, 2008
New Non-Destructive Imaging White Paper
"SO WHAT IS DESTRUCTIVE IMAGING?
You might be tempted to ask, why destroy your photos? Aren’t you supposed to make them better? The word destructive is not referring to destruction of the photo’s goodness, but rather destruction of the original data in the image.So while you may make a photo “better” by lightening up shadow detail, you may do it in a way that destroys the original information. This paper concentrates on ways to adjust photos without losing the original information."
Enjoy.
Ultra slow motion movies ... from a point and shoot camera?
Casio says that their newest offering will let you capture the perfect moment with bursts of up to 60 frames per second. Look mom, no shutter ... If 60 fps excites you, wait till you hear that this camera can capture videos at up to 1,200 fps for ultra slow motion videos:
- High Def (1920x1080 pixels): 30 fps
- Standard (640x480 pixels): 30 fps
- Hi-Speed (512x384 pixels): 300 fps
- Hi-Speed (432x192 pixels): 600 fps
- Hi-Speed (336x96 pixels): 1200 fps
Check out Gizmodo's review of this interesting new toy. It's set to drop into stores this spring at a price just under US$1000. They've even put the camera to the test. Check out this still from a burst series. Not bad. It's a bit dark, so I cleaned it up a bit.
I love the CES show.
Enjoy.Monday, January 7, 2008
Faster Photoshop Faster
A little known command burried near the bottom of the Edit menu is Purge (Edit>Purge). With Purge, you can get rid of your undos, clipboard, histories ... or all of the above, in an effort to speed up your machine.
Just remember, if you use this one, it really does remove these items. After you press that button, there's no going back.
Enjoy.
Sunday, January 6, 2008
Chronicling Success - the Public Affairs Photojournalist

Photo by Hassan Janali - US Army Corps of Engineers
The Ma'dan of Southern Iraq live a lifestyle dating back 5,000 years. The US Army Corps of Engineers played an important role in advising the Iraqi Ministry of Water Resources, (MOWR) as they work to restore the Marshes destroyed by Saddam Hussein after Desert Storm.
If you are looking to start a career as a photographer, the USACE is a great place to start. They are announcing an entry level position of Public Affairs Photojournalist (GS-5) at Ft. Eustis, Va. The vacancy announcement number is SCER07395784D and the closing date for applications is Jan 09, 2008.
Scanning Newsprint
From time to time, you may be called upon to scan something that was printed in a newspaper. It may be an article for your boss or a picture for use in PowerPoint.
Newsprint offers a unique set of challenges. The web fed 4 colour process that is employed in newsprint softens images and flattens colours. Added to this is a moire pattern that is made from the screens used to print each colour.
This scan comes from an article sent to me by my cousin, Michael MacFarlane (pictured in the photo). The article is promoting the 2009 Scottish Homecoming. The Gathering in 2009 will be the largest clan get-together in Edinburgh since Sir Walter Scott's Pageant of 1822. As a retired caber toss champ, I can't wait for this historic event and plan to bring the whole family.
Back to the image.
In setting up the image in your scanner's software, scan the image in at 150%-200% of what will be required for your final output size (but don't exceed the limit of your scanner's optical resolution).
Initially, we see an image that is flat and a bit soft. Our first instinct is to refocus the image. But with newsprint, try a touch of Gaussian Blur first, Filter>Blur>Gaussian Blur. This will tighten up the image and remove most of the moire. From there, we can resume our usual workflow. We will be doing creative sharpening and output sharpening, so don't worry so much about the refocus step.
Try just a touch of Gaussian Blur, a radius of 1 or less. Modern printing presses achieve higher line screens than some of the older presses. If you can see a pronounced dot pattern, you may need to use a radius of 1.5 or so. Subtle patterns can be removed with a radius of around .5. For this image, I used a radius of .5. For an more subtle effect try using the Median filter, Filter>Noise>Median, with a radius of between 1-3.
Enjoy.
Friday, January 4, 2008
On-line training opportunities
Color Management Essential Training - from Lynda.com
Photoshop CS3 Channels & Masks, Advanced Training - from Lynda.com
Photoshop CS3 Color Correction - from Lynda.com
Lynda.com's training library is constantly expanding. At $25/month, it's a tremendous value.
Scott Kelby's new on-line training site offers titles like Adobe Photoshop Starting from Scratch, Photoshop CS3 for Beginners, and Camera Raw Workflow Essentials for a low monthly rate of $19.99 (NAPP members get a discount).
And finally, O'Reilly's Safari Books Online offers a ton of books from the leading publishing houses for a low monthly rate. Included with your monthly subscription are download tokens which allow you to download chapters of your favourite books as PDF files.
Enjoy
Wednesday, January 2, 2008
Spare Lithium Batteries Banned in Checked Bags
Move allegedly designed to reduce risk of fires on aircraft
December 31, 2007 (IDG News Service) -- New rules will go into effect on Jan. 1 that prohibit air passengers in the U.S. from carrying spare lithium batteries in their checked baggage.
The new rules, announced Friday by the U.S. Department of Transportation, are designed to reduce the risk of fires in aircraft. Lithium batteries have been identified as a possible cause of several aircraft fires.
Passengers will still be able to carry lithium batteries in checked bags if they are installed in a device like a laptop or digital camera. But loose batteries will need to be put in a plastic bag and carried on the plane as hand luggage, the DOT said.
The rules also limit each passenger to two "extended-life" lithium batteries. These are larger batteries with more than 8 grams of equivalent lithium content, examples of which are pictured in the DOT's statement.
The rules are also described at the SafeTravel.dot.gov Web site.
In February 2006 a United Parcel Service flight landed at Philidelphia International Airport after the crew detected a fire in its cargo. The National Transportation Safety Board said later that it found several burned-out laptop batteries on the plane, and could not rule them out as a possible cause of the fire.
Lithium batteries are a fire hazard because of the heat they can generate when they are damaged or suffer a short circuit, the NTSB said at a hearing about the Philidelphia incident last July.
"Several lithium battery incidents have occurred in recent years, including a lithium-ion battery fire that occurred less than two months ago on an airplane in Chicago," the NTSB said.
Several big makers of laptops and cell phones, including Dell and Nokia, have recalled batteries recently because of flaws that created a potential fire hazard.
Story copyright 2006 International Data Group. All rights reserved.
Required reading - a History of Photoshop
"Adobe Photoshop 1.0 shipped on a single 800k disk."
"One big new feature caught a lot of users by surprise: Color Management. To some it was a Holy Grail. To others, it was a conspiracy to screw up their lives. I think the color management tools in Photoshop 5.0 are great. For the first time, users can do the majority of color management duties right in Photoshop, instead of using an expensive third-party tool."
Enjoy.


